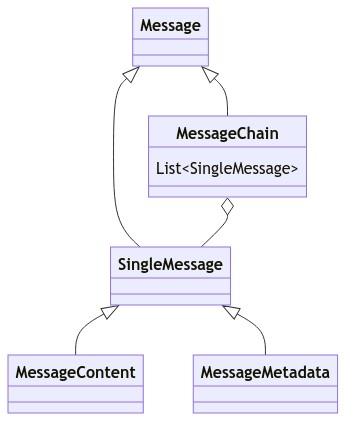
在 Contacts 章节提到,要发送消息,使用 Contact.sendMessage(Message)。Message 架构如下图所示。
SingleMessage 表示单个消息元素。
MessageChain(消息链) 是 List<SingleMessage>。主动发送的消息和从服务器接收消息都是 MessageChain。
回到 目录
Mirai 支持富文本消息。
单个消息元素(SingleMessage) 分为 内容(MessageContent) 和 元数据(MessageMetadata)。
实践中,消息内容和消息元数据会混合存在于消息链中。
内容(MessageContent) 即为 纯文本、提及某人、图片、语音 和 音乐分享 等有内容的数据,一条消息中必须包含内容才能发送。
元数据(MessageMetadata) 包含 来源、引用回复 和 秀图标识 等。
- 消息来源(
MessageSource)存在于每条消息中,包含唯一识别信息,用于撤回和引用回复的定位。 - 引用回复(
QuoteReply)若存在,则会在客户端中解析为本条消息引用了另一条消息。 - 秀图标识(
ShowImageFlag)若存在,则表明这条消息中的图片是以秀图发送(QQ 的一个功能)。
元数据与内容的区分就在于,一条消息没有元数据也能显示,但一条消息不能没有内容。元数据是消息的属性。
回到 目录
Mirai 支持多种消息类型。
消息拥有三种转换到字符串的表示方式。
| 方法 | 解释 |
|---|---|
serializeToMiraiCode() |
对应的 Mirai 码. 消息的一种序列化方式,格式为 [mirai:TYPE:PROP],其中 TYPE 为消息类型, PROP 为属性 |
contentToSting() |
QQ 对话框中以纯文本方式会显示的消息内容。无法用纯文字表示的消息会丢失信息,如任何图片都是 [图片] |
toString() |
Java 对象的 toString(),会尽可能包含多的信息用于调试作用,行为可能不确定 |
各类型消息元素及其 contentToString() 如下表格所示。
MessageContent 类型 |
解释 | contentToString() |
最低支持的版本 |
|---|---|---|---|
PlainText |
纯文本 | $content |
2.0 |
Image |
自定义图片 | [图片] |
2.0 |
At |
提及某人 | @$target |
2.0 |
AtAll |
提及全体成员 | @全体成员 |
2.0 |
Face |
原生表情 | [表情对应的中文名] |
2.0 |
FlashImage |
闪照 | [闪照] |
2.0 |
PokeMessage |
戳一戳消息(消息非动作) | [戳一戳] |
2.0 |
VipFace |
VIP 表情 | [${kind.name}]x$count |
2.0 |
LightApp |
小程序 | $content |
2.0 |
Voice |
语音 | [语音消息] |
2.0 |
MarketFace |
商城表情 | [表情对应的中文名] |
2.0 |
ForwardMessage |
合并转发 | [转发消息] |
2.0 (1) |
SimpleServiceMessage |
(不稳定)服务消息 | $content |
2.0 |
MusicShare |
音乐分享 | [分享]曲名 |
2.1 |
Dice |
骰子 | [骰子:$value] |
2.5 |
FileMessage |
文件消息 | [文件]文件名称 |
2.5 |
MessageMetadata 类型 |
解释 | 最低支持的版本 |
|---|---|---|
MessageSource |
消息来源元数据 | 2.0 |
QuoteReply |
引用回复 | 2.0 |
ShowImageFlag |
秀图标识 | 2.2 |
RichMessageOrigin |
富文本消息源 | 2.3*(2)* |
MessageOrigin |
富文本消息源 | 2.6 |
(1):
ForwardMessage在 2.0 支持发送, 在 2.3 支持接收
(2):RichMessageOrigin在 2.3 增加, 在 2.6 弃用并以MessageOrigin替换
只需要得到各种类型 Message 的实例就可以使用,可以直接发送(Contact.sendMessage)也可以连接到消息链中(Message.plus)。
可在上文表格中找到需要的类型并在源码内文档获取更多实践上的帮助。
回到 目录
前文已经介绍消息链,这里简略介绍消息链的使用。详细的使用请查看源码内注释。
在 Contacts 章节 提到,要发送消息使用 Contact.sendMessage。Contact.sendMessage 的定义是:
suspend fun sendMessage(message: Message): MessageReceipt<Contact>要发送字符串消息,使用:(第一部分是 Kotlin,随后是 Java,下同)
contact.sendMessage("Hello!")contact.sendMessage("Hello!");发送字符串实际上是在发送纯文本消息。上面的代码相当于:
contact.sendMessage(PlainText("Hello!"))contact.sendMessage(new PlainText("Hello!"));要发送多元素消息,可将消息使用 plus 操作连接:
contact.sendMessage(PlainText("你要的图片是") + Image("{f8f1ab55-bf8e-4236-b55e-955848d7069f}.png")) // 一个纯文本加一个图片contact.sendMessage(new PlainText("你要的图片是:").plus(Image.fromId("{f8f1ab55-bf8e-4236-b55e-955848d7069f}.png"))); // 一个纯文本加一个图片更复杂的消息则需要构造为消息链。
| 定义 |
|---|
fun Iterable<Messaged>.toMessageChain(): MessageChain |
fun Sequence<Messaged>.toMessageChain(): MessageChain |
fun Array<Message>.toMessageChain(): MessageChain |
fun Message.toMessageChain(): MessageChain |
fun messageChainOf(vararg Message): MessageChain |
fun Message.plus(tail: Message): MessageChain |
可以使用如上表格所示的方法构造,或使用 DSL builder。
class MessageChainBuilder : MutableList<SingleMessage>, Appendable {
    operator fun Message.unaryPlus()
    operator fun String.unaryPlus()
    fun add(vararg messages: Message)
}
val chain = buildMessageChain {
    +PlainText("a")
    +AtAll
    +Image("/f8f1ab55-bf8e-4236-b55e-955848d7069f")
    add(At(123456))
}

// chain 结果是包含 PlainText, AtAll, Image, At 的 MessageChain| 定义 |
|---|
public static MessageChain newChain(Iterable<Message> iterable) |
public static MessageChain newChain(Message iterable...) |
public static MessageChain newChain(Iterator<Message> iterable...) |
方法都位于 net.mamoe.mirai.message.data.MessageUtils。
使用 newChain:
MessageChain chain = MessageUtils.newChain(new PlainText("Hello"), Image.fromId("{f8f1ab55-bf8e-4236-b55e-955848d7069f}.png"));使用 MessageChainBuilder:
MessageChain chain = new MessageChainBuilder()
    .append(new PlainText("string"))
    .append("string") // 会被构造成 PlainText 再添加, 相当于上一行
    .append(AtAll.INSTANCE)
    .append(Image.fromId("{f8f1ab55-bf8e-4236-b55e-955848d7069f}.png"))
    .build();
该示例中 + 是位于 MessageChainBuilder 的 Message.unaryPlus 扩展。使用 + 和使用 add 是相等的。
通常要把消息作为字符串处理,在 Kotlin 使用 message.content 或在 Java 使用 message.contentToString()。
获取到的字符串表示只包含各 MessageContent 以官方风格显示的消息内容。如 "你本次测试的成绩是[图片]"、[语音]、[微笑]
部分元素只能单一存在于消息链中。这样的元素实现接口 ConstrainSingle。
唯一的元素例如 消息元数据 MessageSource,在连接时,新的(右侧)元素会替换旧的(左侧)元素。如:
val source1: MessageSource
val source2: MessageSource

val chain: MessageChain = source1 + source2
// 结果 chain 只包含一个元素,即右侧的 source2。
元素唯一性的识别基于 MessageKey。MessageKey 拥有多态机制。元素替换时会替换。如 HummerMessage 的继承关系
              MessageContent
                    ↑
              HummerMessage
                    ↑
       +------------+-------------+------------+
       |            |             |            |
 PokeMessage     VipFace      FlashImage      ...
当连接一个 VipFace 到一个 MessageChain 时,由于 VipFace 最上层为 MessageContent,消息链中第一个 MessageContent 会被(保留顺序地)替换为 VipFace,其他所有 MessageContent 都会被删除。
val chain = messageChainOf(quoteReply, plainText, at, atAll) // quoteReply 是 MessageMetadata, 其他三个都是 MessageContent
val result = chain + VipFace(VipFace.AiXin, 1) // VipFace 是 ConstrainSingle,最上层键为 MessageContent,因此替换所有的 MessageContent
// 结果为 [quoteReply, VipFace]MessageChain 继承接口 List<SingleMessage>。
val image: Image? = chain.filterIsInstance<Image>().firstOrNull()Image image = (Image) chain.stream().filter(Image.class::isInstance).findFirst().orElse(null);在 Kotlin 要获取第一个指定类型实例还可以使用快捷扩展。
val image: Image? = chain.findIsInstance<Image>()
val image: Image = chain.firstIsInstance<Image>() // 不存在时 NoSuchElementException如果要获取 ConstrainSingle 的消息元素,可以快速通过键获得。
val quote: QuoteReply? = chain[QuoteReply] // 类似 Map.get
val quote: QuoteReply = chain.getOrFail(QuoteReply) // 不存在时 NoSuchElementException
QuoteReply quote = chain.get(QuoteReply.Key);这是因为
MessageKey一般都以消息元素的companion object实现
可在 Kotlin 使用属性委托。这样的方法与上述方法在性能上等价。
val image: Image by chain // 不存在时 NoSuchElementException
val image: Image? by chain.orNull()
val image: Image? by chain.orElse { /* 返回一个 Image */ }消息可以序列化为 JSON 字符串,使用 MessageChain.serializeToJsonString 和 MessageChain.deserializeFromJsonString。
实现了接口 CodableMessage 的消息类型支持 mirai 码表示。
mirai 码内的属性字符串会被转义。
| 原字符 | 转义结果字符 |
|---|---|
[ |
\[ |
] |
\] |
: |
\: |
, |
\, |
\ |
\\ |
| 换行符 \n | \n |
| 换行符 \r | \r |
一个有效的 mirai 码 (如 [mirai:atall] (无参数), [mirai:at:123] (有参数)) 可分为以下几个组成部分
[mirai:固定开头- 消息类型, 如
at - 消息参数
:固定分隔符- 参数内容 (需要进行转义)
]固定结尾
为了 mirai 码的正确解析, 不转义无法正确解析原本意义
假如有以下参数
{"msg": [1, 2, 3]}
如果不进行转义直接进行 mirai 码拼接 (如: [mirai:msg:{"msg": [1, 2, 3]}]), 那么 mirai 码会被错误解析
解析结果如下:
- mirai 码
[mirai:msg:{"msg": [1, 2, 3]- 纯文本
}]
消息链 MessageChain 是多个 SingleMessage 的集合。MessageChain 也实现 CodableMessage。在转换为 mirai 码时所有 CodableMessage 直接相连:
val chain = messageChainOf(PlainText("plain"), At(123), AtAll)

chain.serializeToMiraiCode() // "plain[mirai:at:123][mirai:atall]"
通过 CodableMessage.serializeToMiraiCode()。
val at = At(123)

at.serializeToMiraiCode() // 结果为 `[mirai:at:123]`
| 消息类型 | serializeToMiraiCode() |
|---|---|
PlainText |
$content |
Image |
[mirai:image:$imageId] |
At |
[mirai:at:$target] |
AtAll |
[mirai:atall] |
Face |
[mirai:face:id] |
FlashImage |
[mirai:flash:${image.imageId}] |
PokeMessage |
[mirai:poke:$name,$pokeType,$id] |
VipFace |
[mirai:vipface:${kind.id},${kind.name},$count] |
LightApp |
[mirai:app:$content] |
SimpleServiceMessage |
[mirai:service:$serviceId,$content] |
Dice |
[mirai:dice:$value] |
MusicShare |
[mirai:musicshare:$args] |
FileMessage |
[mirai:file:$id,$internalId,$name,$size] |
val chain = "[mirai:atall]".deserializeMiraiCode()MessageChain chain = MiraiCode.deserializeFromMiraiCode("[mirai:atall]");PlainText("[mirai:atall]").serializeToMiraiCode() // \[mirai\:atall\]new PlainText("[mirai:atall]").serializeToMiraiCode() // \[mirai\:atall\]到这里,你已经完成了 Mirai 所有文档的阅读。现在你已经熟悉了 Mirai,并可以开始使用了。
你可以首先构造 Bot,登录,然后从监听事件起开始创建你的机器人,或从 Bot 获取到指定群主动发送消息。在使用中遇到问题可以参考 Mirai 源码内注释,该注释会包含更多实践上的帮助。
如果你仍然对 Mirai 架构有不明确的地方,欢迎在 #848 提出建议,或者直接在 PR 提交你的修改。
回到 目录
