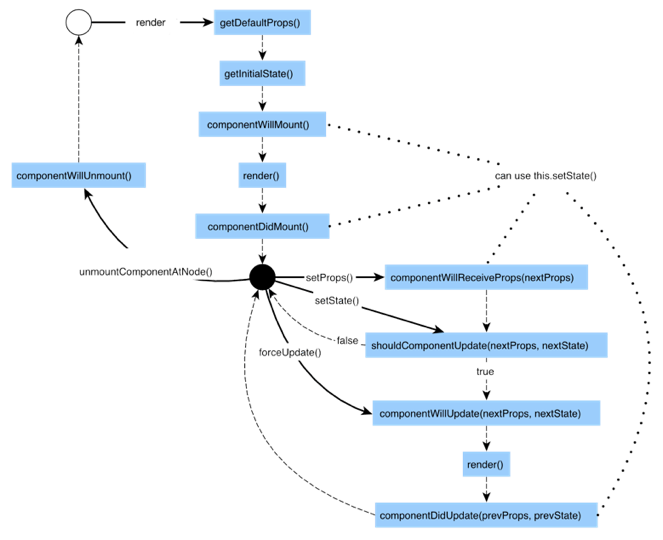
QAP 应用使用开源的 Rax 渲染引擎渲染页面,Rax 语法 + 生命周期,以下简要介绍 Rax 与相关语法。
- 一个页面就是一个组件
- 一个页面里嵌套的每一极标签,都可以理解为一个子组件
- 页面是由一层一层组件构成
- 对于页面内的子组件尽可能采用无状态组件(UI组件)
import { createElement, render, Component } from 'rax';
import {Text} from 'nuke';

class Demo extends Component {
  render() {
    return <Text>Hi QAP~</Text>;
  }
}

render(<Demo />);
render( 是将 这个组件渲染到了客户端容器的根节点,此时我们称为一个页面,或者一个根组件。
- 通过state绑定页面数据展现
import {createElement, Component,render} from 'rax';
import { Text} from 'nuke';

class TextDemo extends Component {
    constructor() {
        super();
        this.state = {
            num: 0
        }
    }
    render(){
        return (
            <Text style={styles.container}>{this.state.num}</Text>
        )
    }
}
this.state获取数据尽量使用结构赋值
render(){
        const {num}=this.state;
        return (
            <Text style={styles.container}>{num}</Text>
        )
} - 数组遍历输出
- return 的里每一个item必须加上key值,可以是index,建议使用item,这样可以优化提高diff算法
{
    this.state.imageList.map((item,index)=>{
        return (<Image key={item} style={styles.pic} source={{ uri : item.url }}></Image>)
     })
}
- 条件渲染
import {createElement, Component,render} from 'rax';
import {View, ListView} from 'nuke';

class ListViewDemo extends Component {
    constructor() {
        super();
        this.state = {
            loaded: false
        }
    }
    render(){
        const {loaded } = this.state;
        return (
            <View style={styles.container}>
            {
                loaded ?
                <ListView
                    renderRow={this.renderItem}
                    dataSource={this.state.imgList} style={styles.list}
                />
                : null
            }
            </View>
        )
    }
}
Rax与React语法相近,生命周期相同,组件免不了要与用户互动,React 的一大创新,就是将组件看成是一个状态机,一开始有一个初始状态,然后用户互动,导致状态变化,从而触发重新渲染 UI。
组件的生命周期大致可以分为:创建、变化、销毁
生命周期枚举:
- 组件即将加载: componentWillMount
- 组件已加载: componentDidMount
- 组件即将接收新的props: componentWillReceiveProps
- 组件是否要更新: shouldComponentUpdate
- 组件即将更新: componentWillUpdate
- 组件已更新: componentDidUpdate
- 组件即将卸载: componentWillUnmount
[课外延伸]
- initialization 初始化
- Mounting 挂载
- Updation 组件更新
- Unmounting 组件卸载
以 MyButton 为例,在项目中创建 qap/src/components/MyButton/index.jsx
import { createElement, Component,render } from 'rax';
import { Touchable ,Text } from 'nuke';

class MyButton extends Component {
   constructor(props){
        super(props);
    }
    render() {
    	const {text, onPress } = this.props;
       return (
        	<Touchable style={{...}} onPress={(e)=>{onPress && onPress(e) }}>
            	<Text>{text}</Text>
        	</Touchable>
        );
    }
}
render(<MyButton />);
在首页使用,打开 qap/src/pages/index/index.jsx
/* @jsx createElement */
import { createElement, Component,render } from 'rax';
import MyButton from '../../components/MyButton';
import { View,Text, Modal} from 'nuke';

class Index extends Component{
    pressEvent = (e) => {
        Modal.alert('hello QAP');
    }
    render(){
        return (<View>
           <Text>...其他部分省略</Text>
           	<MyButton onPress={this.pressEvent}>请点我</MyButton>
        </View>
        );
    }
}

render(<Index />);
样式书写在对应组件或页面内
rem 单位与原来传统的 rem 的含义是不同的。
1rem = 设备宽度(最短边) / 750
如我们推荐视觉稿产出宽度为750px,在这样的前提下,我们在 750 的设计稿上量到的数值是100,那么 width : 100 rem 就是我们需要映射到元素上的尺寸。
const styles={
    button:{
        width:'100rem',
        height:80  // 缩写, 可以不写 rem , 直接写 number 类型。
    }
}
你可以使用 :active 伪类来定义你的组件 press 时的样式。
<View style={{height:'300rem',backgroundColor:'#3089dc','backgroundColor:active':'#cccccc'}}>
    <Text style={{color:'#ffffff'}}>普通使用</Text>
</View>
请注意以上伪类写法与 h5 端不同。
你也可以使用封装过后的 Touchable 组件的 activeStyle 定义伪类
- 样式的属性名必须采用驼峰命名规范,如:
borderWidth: '0rem', borderTopWidth: '2rem', borderColor: '#e2e3e8'
-
一般情况下样式属性不能被继承,没有全局样式的概念,没有样式层叠的概念
-
页面布局仅仅支持Flexbox布局,没有流式布局、响应式布局的概念
-
可以使用js 数组完成样式的叠加
<View style={[styles.container,styles.new,{backgroundColor:'yellow'}]}>
  <Text>hello world</Text>
</View>

const styles = {
  container: {
    backgroundColor: 'grey',
    width: '750rem'
  },
  new:{
  	borderWidth:'1rem',
  	borderStyle:'solid',
  	borderColor:'#ffffff'
  }
};
Flex 是 Flexible Box 的缩写,意为“弹性布局”,用来为盒状模型提供最大的灵活性。元素排列默认主轴为水平方向,起点在左端。项目都排在一条线,默认不换行。
子元素在父节点内的水平对齐方式 - 居左(start)、居中(center)、居右(end)、等宽排列(between)排列。子元素与子元素之间,支持顶部对齐(start)、垂直居中对齐(center)、底部对齐的方式(end)。
Flex.Item 组件默认加上了样式flex:1,保证所有 item 平均分宽度, Flex 容器的 children 不一定是 Flex.Item
Native 支持的样式属性有限,和 web 的 css 属性名称与含义存在一小部分交集
当组件上发生点击手势时被触发。
事件对象:
- type: click
- target: 触发点击事件的目标组件
- timestamp: 触发点击事件时的时间戳
<Button onPress={(e) => console.log(e)} type="primary"> onPress 事件</Button>
注意:onLongPress h5 暂不支持
当用户长按某个组件时,该事件将会被触发,View、Touchable 、Button 等容器级组件具备
事件对象:
- type : longpress
- target : 触发长按事件的目标组件
- timestamp : 长按事件触发时的时间戳
<Button onLongpress={(e) => console.log(e)} type="primary"> onPress 事件</Button>
如果一个在可滚动区域内的组件在屏幕上可见时,该事件将被触发,与 onDisappear 事件交替触发(在页面内可被多次触发)。
事件对象:
- type : appear
- target : 触发 Appear 事件的组件对象
- timestamp : 事件被触发时的时间戳
- direction : 触发事件时屏幕的滚动方向,up 或 down
<View onAppear={(e) => console.log(e)}></View>
如果一个在可滚动区域内的组件滑出屏幕变为不可见状态时,该事件将被触发,与 onAppear 事件交替触发(在页面内可被多次触发)。
事件对象:
- type : disappear
- target : 触发 Disappear 事件的组件对象
- timestamp : 事件被触发时的时间戳
- direction : 触发事件时屏幕的滚动方向,up 或 down
<View onDisappear ={(e) => console.log(e)}></View>
ScrollView 在滚动时触发。
事件对象:
- type : scroll
- target : 触发 Scroll 事件的组件对象
- timestamp : 事件被触发时的时间戳
- contentOffset : 内容区位移 {x: 0, y: -100}
- contentSize : 内容区域尺寸 { height:1320.048, width:750}
<ScrollView onScroll ={(e) => console.log(e)}></ScrollView>
Image 组件完成加载时触发。
事件对象:
- type : load
- target : 触发 Load 事件的组件对象
- timestamp : 事件被触发时的时间戳
- success : 图片是否加载成功
- size : 图片实际尺寸 { naturalWidth:520, naturalHeight:280}
<Image source={{uri:'http://img.alicdn.com/tps/TB1SrmcOVXXXXXFXpXXXXXXXXXX-520-280.jpg'}} onLoad ={(e) => console.log(e)}></Image>
见 Input 组件文档
见 Slider 组件文档
见 Switch 组件文档

