-
Notifications
You must be signed in to change notification settings - Fork 17
Joint Position Example
The Joint Position Control Examples demonstrate how to use position control to move and sense the arm based on joint angles. Examples include keyboard or joystick based user control of arm angles, along with complementary example programs to record and playback joint positions.
- Overview
- Running the Example:
- Recording Joint Positions
- Playback Recordings
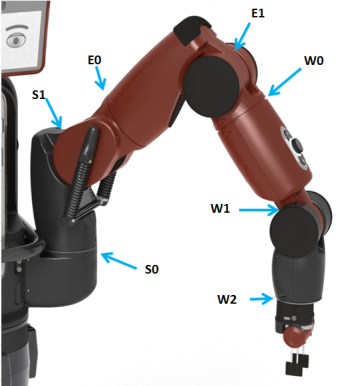
The joint_position example allows control of Baxter's arm in joint position mode. Either the keyboard or a joystick can be used as a controller. Joint names are labeled below.

Note: For control of Head Joints, see the Head Wobbler Example.
Start the example joint_position program using the keyboard to control Baxter:
$ rosrun joint_position keyboard.py hit ? for help commands
esc to exit example and disable the robotTo run the example joint_position program using a joystick game controller to control the joints:
First ensure that joy drivers are installed.
$ rospack find joy
If not run:
$ sudo apt-get install ros-electric-joystick-drivers
For Beta Version: To run the example:
$ rosrun joint_position joystart <joystick_type> Where <joystick_type> is 'xbox', 'logitech', or 'ps3'.
(If using a ps3, make sure you run the node from the ROS ps3joy package in a separate sudo terminal. See instructions here: ps3joy )
For Alpha Version: To run the example:
$ roslaunch joint_position joystick.launch joystick:=logitechNote: This method uses an included ROS launch file to start both joint_position example and joy_node using the roslaunch tool. You can exit the joint_position example by hitting any keyboard key, however you will have to ctrl-c to also cleanup the joy_node.
NOTE: Don't forget to calibrate each gripper before using gripper open/close.
(And no, the 'joystick left <-> robot right' mappings are not typos; they assume the user is in front of the robot when using the joystick.)

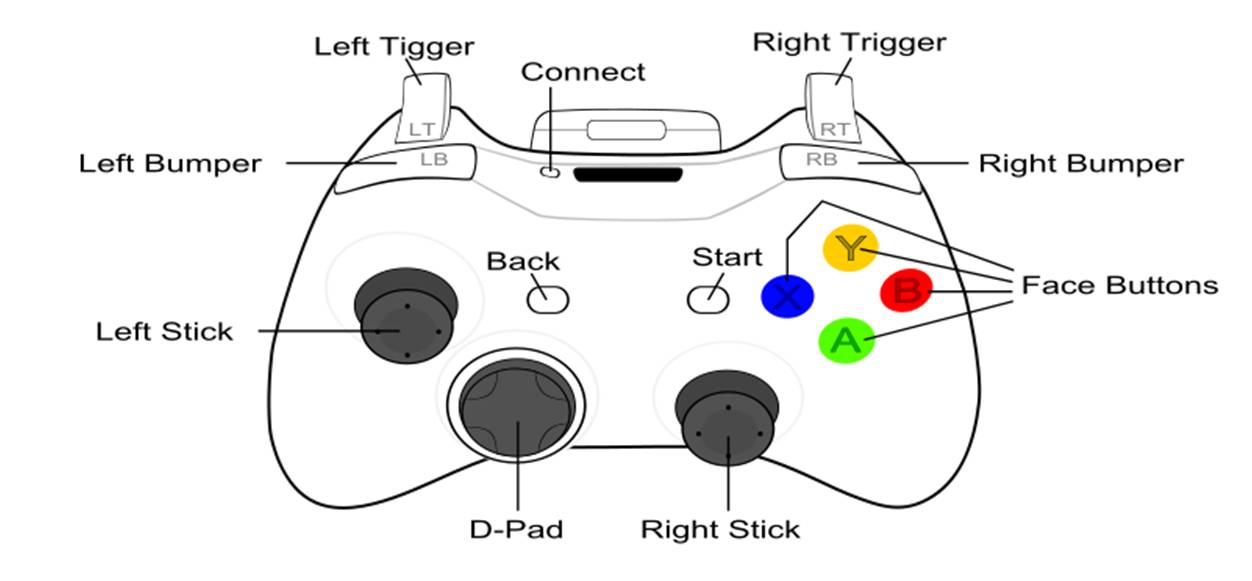
| Buttons | Action | Buttons | Action |
|---|---|---|---|
| Function 1 or 2 (e.g. Select/Select) | Help | <Any Keyboard key> | Quit |
| Left Button (X) | right: gripper calibrate | Right Button (B) | left: gripper calibrate |
| Top Button (Y) | Bottom Button (A) | ||
| Left Trigger [PRESS] | right: gripper close | Right Trigger [PRESS] | left: gripper close |
| Left Trigger [RELEASE] | right: gripper open | Right Trigger [RELEASE] | left: gripper open |
| Left Bumper | right: cycle <current joints> +1
|
Right Bumper | left: cycle <current joints> +1
|
| Stick Axes | Action |
|---|---|
| Left Stick Horizontal | right: increase/decrease <current joint 1> (s0) |
| Left Stick Vertical | right: increase/decrease <current joint 2> (s1) |
| Right Stick Horizontal | left: increase/decrease <current joint 1> (s0) |
| Right Stick Vertical | left: increase/decrease <current joint 2> (s1) |
Press any keyboard key to quit.
Note: The left and right bumper buttons will cycle through the joints that are controlled with the left and right stick (<current joint 1> and <current joint 2>). The order the joints are cycled through is S0-S1-E0-E1-W0-W1-W2.
Alternatively, you can run the joint_position example and the joy_node (joystick driver) independently in their own shells:
- Initialize an environment and run the
joy_node:
$ cd ~/sdk-examples
$ ./init <robot_hostname>
$ export ROS_IP=<xxx.xxx.xxx.xxx>

$ rosrun joy joy_node- From another shell, repeat the initialization and run the example program:
# repeat lines 1-3 above
$ rosrun joint_position joystick.py logitech
For the joystick examples to work, the joy_node driver must be running at the same time as the example. Using any of the other one-line launch commands to start the joystick examples is really just using a short-cut to start two programs at once.
You can start recording the joint positions at any time using:
$ rosrun joint_position recorder.py <filename>After you have finished recording, stop the joint_position program using <Ctrl-C> or hit one of the function 1 or 2 buttons on the game controller.
You can now playback the recording using:
$ rosrun joint_position file_playback.py <filename>© 2008-2013 Rethink Robotics. All rights reserved. ![]()