You signed in with another tab or window. Reload to refresh your session.You signed out in another tab or window. Reload to refresh your session.You switched accounts on another tab or window. Reload to refresh your session.Dismiss alert
new Center(
    child: new Container(
      decoration: new BoxDecoration(
        image: new DecorationImage(
            image: new AssetImage('assets/images/9_patch_scaled_320x190.png'),
            centerSlice: new Rect.fromLTWH(50.0, 50.0, 220.0, 90.0),
            fit: BoxFit.fill,
        )
      ),
      child: new Container(
        //color: Colors.yellow,
        width: 110.0,
        height: 110.0,
      )
    ),

  );
得到的效果如下(将 320 x 190 尺寸大小的图片拉伸在 110 x 110 的容器中,其中图片四个角 50 x 50 的区域不进行拉伸,其他区域进行拉伸):
扩大容器的大小后:
new Center(
    child: new Container(
      decoration: new BoxDecoration(
        image: new DecorationImage(
            image: new AssetImage('assets/images/9_patch_scaled_320x190.png'),
            centerSlice: new Rect.fromLTWH(50.0, 50.0, 220.0, 90.0),
            fit: BoxFit.fill,
        )
      ),
      child: new Container(
        //color: Colors.yellow,
        width: 350.0,
        height: 450.0,
      )
    ),

  );
得到的效果如下(将 320 x 190 尺寸大小的图片拉伸在 350 x 450 的容器中,其中图片四个角 50 x 50 的区域不进行拉伸,其他区域进行拉伸):
这个属性的效果一般比较少用,其中的值大家可以随便测试看看效果。
DecorationImage.colorFilter
给背景图片加上颜色滤镜。值一般为 ColorFilter.mode(颜色, 混合模式)。
我们将给以下图片
加上粉色滤镜colorFilter: new ColorFilter.mode(Colors.red.withOpacity(0.5), BlendMode.color), 并以不同的模式进行混合。
new Center(
    child: new Container(
      width: double.infinity,
      height: double.infinity,
      color: Colors.white,
      child: new Container(
        decoration: new BoxDecoration(
          image: new DecorationImage(
              image: new AssetImage('assets/images/JL-Logo-empty.png'),
              colorFilter: new ColorFilter.mode(Colors.red.withOpacity(0.5), BlendMode.color),
          )
        ),
      ),
    ),
  );
borderRadius: new BorderRadius.horizontal(
    left: new Radius.circular(20.0),
    //right: new Radius.circular(20.0),
  ),
BorderRadius.vertical
设置垂直方向一边的边框
borderRadius: new BorderRadius.vertical(
    top: new Radius.circular(20.0),
    //bottom: new Radius.circular(20.0),
  ),
BorderRadius.only
指定角的圆角弧度
borderRadius: new BorderRadius.only(
    // 设置椭圆
    topLeft: new Radius.elliptical(40.0, 10.0),,
    //topRight: new Radius.circular(20.0),
    //bottomRight: new Radius.circular(20.0),
    bottomLeft: new Radius.circular(20.0),
  ),
boxShadow
在容器后设置阴影。
值是一个 list , 也就是说可以设置多个阴影的值
值为 BoxShadow 类, 参数为:
color : 阴影颜色
offset: 阴影的偏移值
blurRadius: 高斯模糊值
spreadRadius: 模糊扩散的偏移范围
仅设置偏移值
new Center(
    child: new Container(
      width: 200.0,
      height: 200.0,
      color: Colors.white,
      child: new Container(
        decoration: new BoxDecoration(
          color: Colors.white,
          border: new Border.all(
              color: Colors.green,
              width: 5.0,
              style: BorderStyle.solid
          ),
          borderRadius: new BorderRadius.only(
            topLeft: new Radius.elliptical(40.0, 10.0),
            bottomLeft: new Radius.circular(20.0),
          ),
          boxShadow: [
            new BoxShadow(
              color: Colors.red,
              offset: new Offset(20.0, 10.0),
            )
          ],
          image: new DecorationImage(
              image: new AssetImage('assets/images/JL-Logo-150.png'),
          )
        ),
      ),
    ),
  );
设置高斯模糊值
boxShadow: [
    new BoxShadow(
      color: Colors.red,
      offset: new Offset(20.0, 10.0),
      blurRadius: 20.0,
    )
  ],
高斯模糊的扩散范围 spreadRadius
boxShadow: [
    new BoxShadow(
      color: Colors.red,
      offset: new Offset(20.0, 10.0),
      blurRadius: 20.0,
      spreadRadius: 40.0
    )
  ],
多个阴影值(由外向内)
boxShadow: [
    new BoxShadow(
      color: Colors.red,
      offset: new Offset(20.0, 10.0),
      blurRadius: 20.0,
      spreadRadius: 40.0
    ),
    new BoxShadow(
        color: Colors.yellow,
        offset: new Offset(20.0, 10.0),
        blurRadius: 20.0,
        spreadRadius: 20.0
    ),
    new BoxShadow(
        color: Colors.green,
        offset: new Offset(10.0, 5.0),
        blurRadius: 20.0,
        spreadRadius: 5.0
    )
  ],
shape
形状,只有矩形和圆形两种
BoxShape.rectangle(默认)
BoxShape.circle
new Center(
    child: new Container(
      width: 200.0,
      height: 200.0,
      child: new Container(
        decoration: new BoxDecoration(
          color: Colors.white,
          border: new Border.all(
              color: Colors.green,
              width: 5.0,
              style: BorderStyle.solid
          ),
          boxShadow: [
            new BoxShadow(
              color: Colors.red,
              offset: new Offset(20.0, 10.0),
              blurRadius: 20.0,
              spreadRadius: 40.0
            )
          ],
          shape: BoxShape.circle,
          image: new DecorationImage(
              image: new AssetImage('assets/images/JL-Logo-150.png'),
          )
        ),
      ),
    ),
  );
基本介绍
BoxDecoration 类提供了几种方式来绘制一个容器,主要用于绘制更加复杂的样式。
容器有 border(边框),body(主体),可能还有 boxShadow(阴影)
容器的形状可以是圆形或者矩形,如果是矩形,可以设置 borderRadius 控制角的弧度。
容器主体背景分为多个层级,最底层是填充满容器的背景颜色,再上一层是填充容器的渐变色,最后是图像,由 DecorationImage 类控制,
也就是说背景优先级: 图像 > 渐变色 > 纯色
属性
color (背景颜色)
PS: Container 部件的 color 属性不能和 decoration 属性同时使用
事实上,
是以下 decoration 的简写:
gradient (背景渐变色)
LinearGradient (线性渐变)
LinearGradient.colors
线性渐变颜色列表
begin (默认 Alignment.centerLeft)
线性渐变的起始点
end (默认 Alignment.centerRight)
线性渐变的终止点
由于是线性渐变,所以
这几种都是等价的
tileMode 平铺模式
定义了在 指定的 begin 和 end 之外的区域,渐变色应该如何渲染
TileMode.clamp (默认)
TileMode.clamp表明在 begin - end 区域外,渐变色应该保持 colors 列表内指定的颜色。TileMode.mirror
在 begin - end 区域外,应该保持镜像的渐变色。
TileMode.repeated
在区域外重复进行渐变色的渲染
stops
stops 默认值
如果没有给 stops 赋值, 渐变色区域将会根据颜色数量均匀分割。
即:
自定义 stops 值
这里表示:假定宽度长 100%,从右往左进行 Colors.red(红), Colors.cyan(青), Colors.purple(紫), Colors.lightGreenAccent(绿) 这 4 种颜色的渐变。
RadialGradient (径向渐变)
RadialGradient 有 5 个主要属性:
径向渐变的中心,值为 Alignment
径向渐变的半径,即如果容器半径是 200px,那么 radius=0.5,默认 绘制 半径为 100px 的径向渐变圆。
同上述的线性渐变,不再赘述
同上述的线性渐变,不再赘述
同上述的线性渐变,不再赘述
image
绘制图片背景,图片通常是 AssetImage (应用配置的图片资源),或者是 NetworkImage (网络图片资源)
可以看到,由于图片优先级比较高,渲染在最上层,图片背景绘制覆盖了渐变背景和 纯色背景。
DecorationImage.alignment
同 Container 部件的 alignment,不再赘述
DecorationImage.centerSlice
centerSlice 决定以哪一种方式,按区域对图像进行缩放处理。
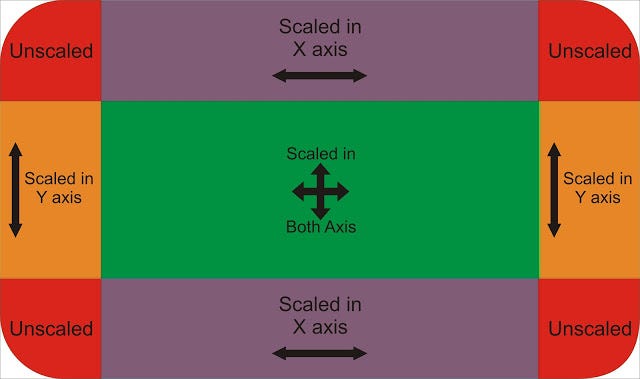
例如,我们有一张图片,可以设置其四个角的区域不进行缩放,其他区域进行缩放(这么说可能有点抽象,以下实例再详细说明)

centerSlice 属性的值为 Rect 类,也就是一个矩形。
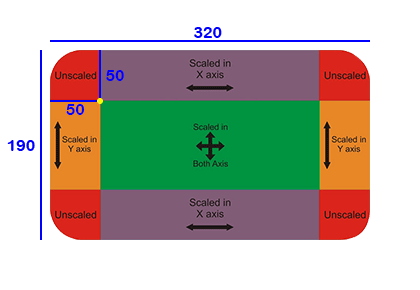
假如我们有一张这样尺寸的图片

当我们的 centerSlice 值为
Rect.fromLTWH(50.0, 50.0, 220.0, 90.0)时,即得到的效果如下(将 320 x 190 尺寸大小的图片拉伸在 110 x 110 的容器中,其中图片四个角 50 x 50 的区域不进行拉伸,其他区域进行拉伸):
扩大容器的大小后:
得到的效果如下(将 320 x 190 尺寸大小的图片拉伸在 350 x 450 的容器中,其中图片四个角 50 x 50 的区域不进行拉伸,其他区域进行拉伸):
这个属性的效果一般比较少用,其中的值大家可以随便测试看看效果。
DecorationImage.colorFilter
给背景图片加上颜色滤镜。值一般为
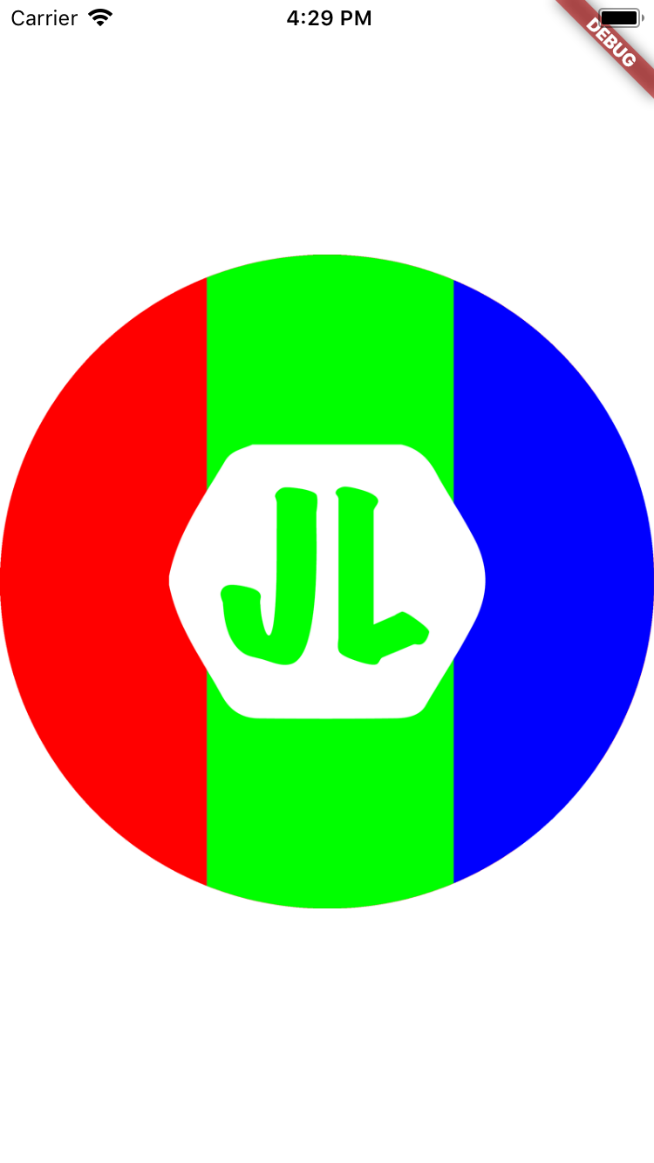
ColorFilter.mode(颜色, 混合模式)。我们将给以下图片

加上粉色滤镜
colorFilter: new ColorFilter.mode(Colors.red.withOpacity(0.5), BlendMode.color), 并以不同的模式进行混合。提取指定颜色的色调和饱和度,给目标图片着色
通过从每个颜色通道中选择最低值来合成源图像和目标图像。
滤镜的混合模式很多,这里就不一一解读了,有兴趣的可以看原文详细解读
DecorationImage.fit
如何渲染图像到盒子中,(PS: 不同于
DecorationImage.centerSlice作用于图片本身,DecorationImage.fit是作用于画布的)值为
BoxFit的枚举值BoxFit.contain
图片尽可能大,并且容器依然包含整个图片资源
以下图片为同一图片资源在不同尺寸的容器中的展示方式。
BoxFit.cover
图片尽可能小,且必须覆盖满整个容器。
BoxFit.fill
通过拉伸图片来覆盖满整个容器
BoxFit.contain
BoxFit.fitHeight
确保图片资源的全部高度都可见,无论图片资源的宽度是不是溢出容器
BoxFit.fitWidth、
类似上,确保图片资源的全部宽度都可见,无论图片资源的高度是不是溢出容器
BoxFit.none
居中对齐图片资源,不缩放大小,丢弃容器之外的部分。
BoxFit.scaleDown
类似于 BoxFit.contain,居中对齐图片资源,并在必要的时候,缩小图片资源以确保整个资源都在容器啊,
DecorationImage.repeat
渲染图片到图片大小之外的容器其他区域。
值为
ImageRepeat枚举值ImageRepeat.noRepeat
其他区域保持透明
ImageRepeat.repeat
在x和y方向上重复图像,直到填充满容器。
ImageRepeat.repeatX
在x轴上重复图像,直到水平填充满容器。
ImageRepeat.repeatY
在y轴上重复图像,直到垂直填充满容器。
DecorationImage.matchTextDirection
是否以
TextDirection的方向渲染图片,值为 true/false;如果是 true。 那么在
TextDirection.ltr的环境下,图片将会以左上角为原点开始绘制(一般情况下的绘制方向),如果是在TextDirection.rtl的环境下, 图片将会以右上角为原点开始绘制。border
在背景颜色(color),渐变色背景(gradient)或图像背景(image)上方绘制的边框。
值为
Border类,Border.all和BorderDirectional类Border.all
设置4边的边框:
参数如下:
Border Class
指定边的边框, 参数分别为 top, bottom, right, left; 值为
BorderSide类(参数同Border.all).BorderDirectional
BorderDirectional类似Border, 同样有 4 个参数(top, bottom, start, end),其中的start/end对应Border的left/right。borderRadius
设置圆角。(仅在
shape: BoxShape.rectangle时有效)。值可以为:
BorderRadius.all,BorderRadius.only,BorderRadius.circular,BorderRadius.horizontal,BorderRadius.vertical.BorderRadius.all
BorderRadius.circular
BorderRadius.circular(20)等价于BorderRadius.all(new Radius.circular(20.0))BorderRadius.horizontal
设置水平方向一边的边框
BorderRadius.vertical
设置垂直方向一边的边框
BorderRadius.only
指定角的圆角弧度
boxShadow
在容器后设置阴影。
值是一个 list , 也就是说可以设置多个阴影的值
值为 BoxShadow 类, 参数为:
仅设置偏移值
设置高斯模糊值
高斯模糊的扩散范围 spreadRadius
多个阴影值(由外向内)
shape
形状,只有矩形和圆形两种
padding
同 Container 中的 padding 值,参考 Flutter: 图解 Container 部件
The text was updated successfully, but these errors were encountered: