-
Notifications
You must be signed in to change notification settings - Fork 51
Z Wave Configuration
The Z-Wave configuration page allows reading and writing of node configuration parameters, association groups, wakeup interval etc. It is designed to support manual configuration of zWave devices without having to resort to third party utilities to configure the network, which requires stopping openHAB.
The Z-Wave device status and configuration is available as additional properties pages in the Bindings configuration. When selecting the Z-Wave binding, you will get two additional pages to display the device configuration and the product explorer.
HABmin uses a Z Wave Product Database to allow configuration of the parameters and associations. The database is linked into the Z-Wave binding and needs to be updated for each device in order that HABmin will work correctly with that device. There are a few places in which this information can be found - product documentation, Open Z-Wave, or online databases (eg. http://www.pepper1.net/zwavedb/ or http://products.z-wavealliance.org/).
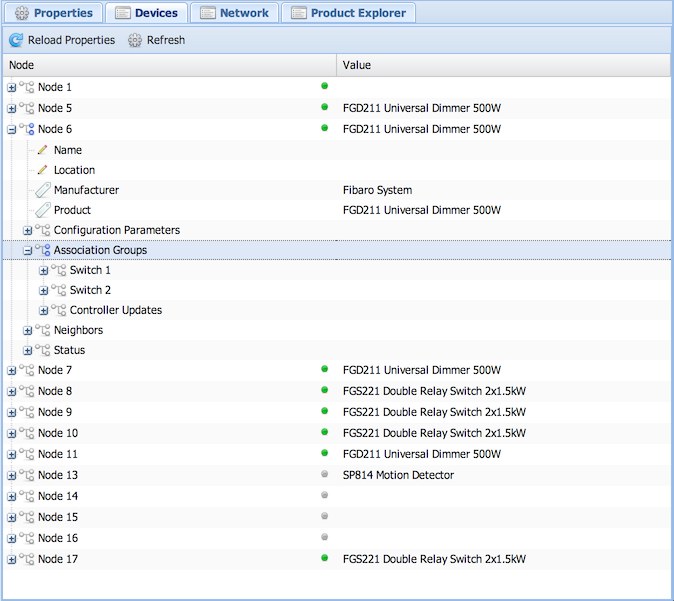
On startup, the interface will just list the nodes and if the node type is found in the z-wave product database, it will list the manufacturer and product types for all known nodes. Clicking on "Parameters" under a node will allow you to click on a "Refresh" button which will request all the parameters for a node. These will then be listed (if you don't click on the "Refresh" button, then no values will be listed since actual values aren't known).
The small indicator next to the device name can be grey, yellow, green or red. If it's grey, then it indicates that the device has not completed its initialisation. If red, the node is DEAD, and if green, it's ALIVE. If it's yellow, then the node is currently operating ok, however it has been dead in the past 24 hours, or has a retry count higher than 5%. Note that for battery devices, it can take some time for a device to complete its initialisation, so battery devices can stay grey for a long time (typically this can be a few hours after the binding starts - depending on the wakeup class configuration).
If the manufacturer and/or product aren't known, then the interface will list the manufacturer ID, device ID and device type. This will allow these devices to be added to the configuration database.
The image below shows the interface. Note that as soon as an item is changed in the GUI, the request will be sent to openHAB and it will be updated in the node. Items with the pen icon, such as Name and Location in the image, can be edited. Items with the tag icon, such as Manufacturer and Product are static information only.
Clicking on some rows will introduce some tool button on the toolbar. These include the following -:
- Node level
- Heal Node - will start a heal on the selected device node only.
- Configuration Parameters
- Refresh - will update the configuration parameters. This requests all known configuration parameters and saves them within the binding.
- Association Groups
- Refresh - will update the association groups. This requests all groups to be updated and saves them within the binding. Note that there is also a Refresh button at each group level which will just request an update for that group.
Associations are used by zWave devices to send commands from one device to another, independent of the controller. This could be used to turn on a light when a movement sensor is triggered. Associations are also used to send state updates to the controller when the state of a device changes. For example, if you turn a light on, the device will let the controller know so that the state of the light is shown correctly within openHAB.
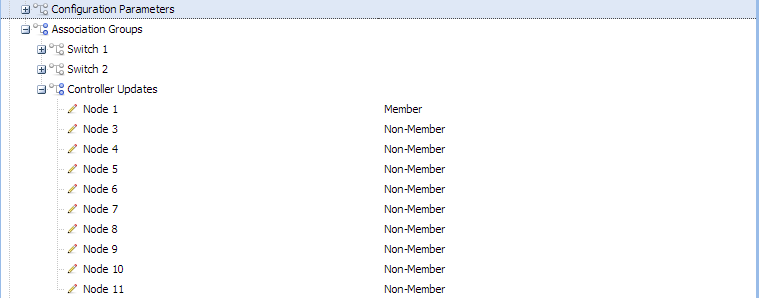
The image above shows the association configuration. For each node, all association groups will be displayed, and within these groups all known nodes will be displayed. It is then possible to select a node as a member or non-member of the group.
To add a node into an association group, the following steps should be followed -:
- Expand the Associations Groups in HABmin for the device you want to configure (ie the sending node)
- Expand the group that you want to modify. You will be presented with a list of all the nodes in your network.
- Change the state of the node that you want to receive the command from Non-Member to Member
After the above steps have been completed, the association should be complete. Note that for battery devices, it can take a number of wakeup periods for the groups to be updated on the device.
To verify that the association is correctly set, click on Association Groups and click the Refresh button on the toolbar. Wait a few seconds, then click the Reload Properties button. Again, for battery devices, this can take a considerable amount of time to update.
As indicated above, battery devices aren't quite so obvious in how they operate. In zWave, battery devices are mostly sleeping, and they only wake up very occasionally (the duration is set in the Wakeup command class configuration). The binding therefore queues any messages to battery devices until they wake up - this can be every 10 minutes or so, or it could be once per day! For most (all?) battery devices, there's a button, or some other way to wake the device up, and this can be useful while configuring the devices.
To be able to set the association for a battery device in HABmin, firstly set the association or configuration as described above - the message will be queued to be sent when the device wakes up. Press the wakeup button on the device, or wait until the device wakes (this can be a long time), and this should wake the device up and cause the association to be set. HABmin also requests a readback of the configuration following the set, so once the configuration has been made, the binding should get updated.
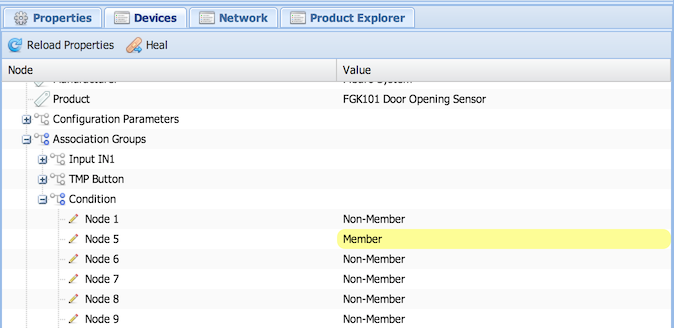
The image above shows that when there's an outstanding request, HABmin will highlight this with a yellow background. This will commonly be seen with battery devices, however it can also occur for mains powered devices (although it should only be for a short time). During this period, HABmin will show the new value that has been requested, however no acknowledgement has been received. Once an update has been received from the device, the yellow background will be removed and the new value will be presented. The yellow background is basically advising you that you have made the setting in HABmin, but this has not been configured in the device yet.
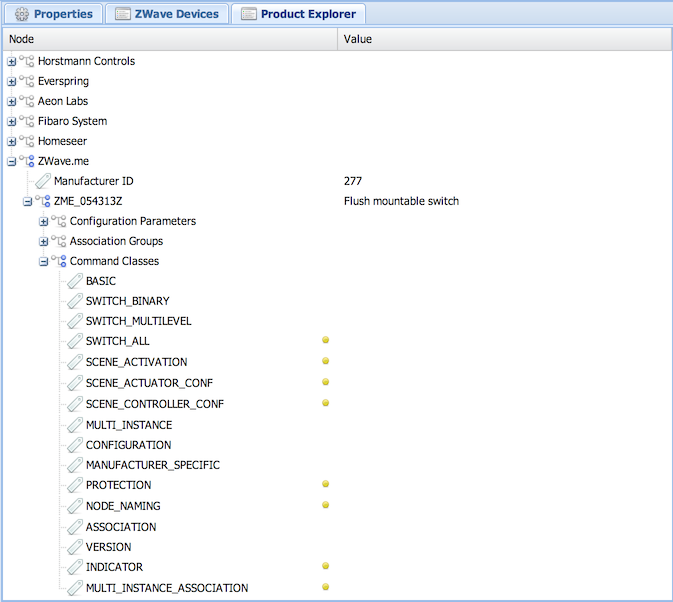
The image above shows the product explorer. This allows you to look at the devices that are currently included in the product database. The image above shows the command class view - classes with the yellow indicator are those that are not currently implemented by the zWave binding. New products can be added to the database - look at the Z-Wave Product Database page.
NOTE: This is still experimental
This allows you to visualise the links between nodes. It builds a neighbor list and when you click on a node, it highlights the nodes that that node can see.
Grey nodes are not listening.
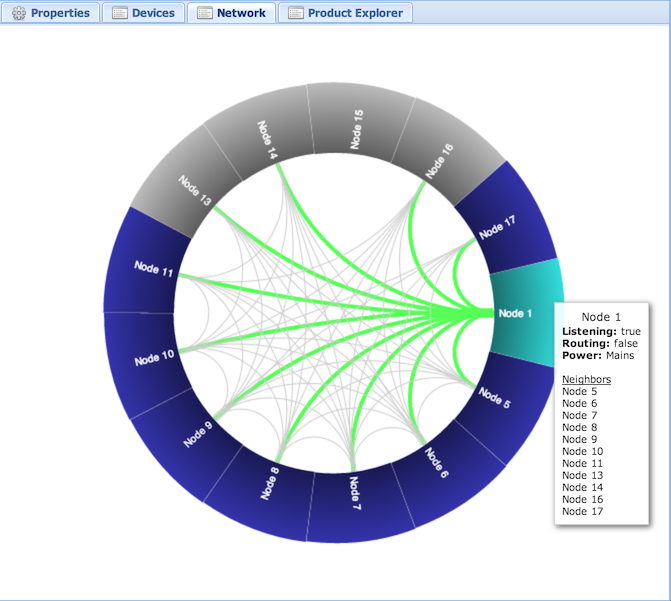
Currently this is experimental. To try it out, you need to go to each node, and click on Neighbors, and click REFRESH. Do this for all nodes, then you can display the graph in the NETWORK tab.
- There is limited checking for values against defined limits.
- There is no check that you are adding more nodes into an association group than is allowed (presumably this won't do anything within the node).
- Home
- General Configuration
- Item Configuration
- Sitemap Configuration
- Binding Configuration
- Charting
- Persistence stores and graphing
- Rules and Automation
- Rule Designer: Overview
- Rule Designer: Building Blocks
- Rule Designer: Example 1
- Rule Designer: Example 2
- Rule Text Editor
- Technical
- Language Support
- Binding descriptor files
- Z Wave Product Database
- REST Item Config
- REST Item Icons
- REST Persistence
- REST Sitemap Config
- Rule Item Library
- Item Rule Configuration