-
Notifications
You must be signed in to change notification settings - Fork 88
devonfw Deploy & Run devonfw locally
This section describes the different ways to run the provided sample application.
There are two way to deploy your application within Eclipse during development time.
The preferred way is the standalone execution via the spring boot framework within eclipse. In this scenario, the spring boot framework runs the sample application using an embedded tomcat server.
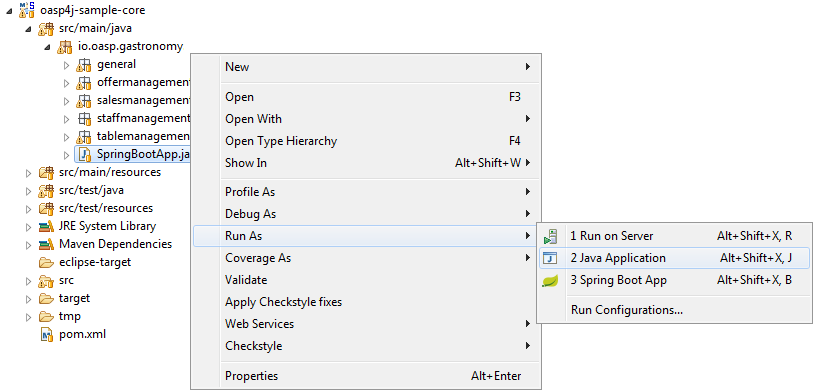
Open eclipse and find class com.devonfw.application.mtsj.SpringBootApp. This class configures the application and contains the main-method to start the sample application.
Select the class and click the left mouse button. In the subsequent open context menu select the entry 'Run as ⇒ Java Application' (or 'Debug as …').

The application should start. Additional configuration settings are not necessary.
Once started, the devonfw server applications runs on http://localhost:8081 with /mythaistar/ as context-root.
-
Base url: http://localhost:8081/mythaistar
-
Service list: http://localhost:8081/mythaistar/services
The contex-path and/or server port can be changed by setting the corresponding properties in the application.properties file:
server.port=8081
server.context-path=/mythaistar
It is also possible to start the application without eclipse with the following maven command '..\samples\core\>mvn spring-boot:run', but this is not the preferred way. The command must be executed within the core project, otherwise the maven 'spring boot' plugin is not available.
Important: If you are always and ever working with the embedded Tomcat deployment, you may remove the ServletInitializer Configuration from your application. This will speed up startup time by a factor of 2.
Another way uses a internal eclipse Tomcat 8 instance that is provided by an eclipse plugin (see xref:"devonfw-Deploy-&-Run-devonfw-locally"#tomcat-8-eclipse-plugin[Tomcat 8 plugin]). An external Tomcat 8 server is needed to provide a runtime environment (it is contained in the IDE-distributions). All configuration files of the external server remain untouched.
This way of deployment is not at all recommended and therefore only briefly described.
Startup Eclipse and go to the servers view. Add a Tomcat 8 and configure it’s port to 8081. Add mythaistar to the tomcat. Startup the tomcat. Try to access the service list via:
Furthermore the sample application could be started/tested outside of Eclipse. This approach is usually not preferred because of the higher deployment time and the additional configuration effort, but may be interesting before staging to a test-environment.
Start a commandline window, go to your workspace and into the project devon4j-sample and build the devon4j-sample-core.jar using maven:
mvn clean install
...
Find the jar file in the target folder of the oasp-sample-core. This jar is executable. Copy the jar to a folder where you want to run the test (recommended is a test folder inside the devonfw distribution package). Run the server by executing the jar.
java -jar devon4j-sample-core.jarYou may also deploy your server into an external Tomcat 8 server instance.
Start a commandline window, go to your workspace and into the project devon4j-sample and build the devon4j-sample-server.war using maven:
mvn clean installFind the war file in the target folder of the oasp-sample-server. Copy the file to your external tomcat webapps folder. Run the tomcat (catalina bat).
Spring Boot 3 is preconfigured with embedded Tomcat 8 (with Java 7). You may however also use Tomcat 7. To switch to Tomcat 7 a tomcat.version property in the pom.xml is not sufficient (this is due to the fact, as oasp.pom does not derive from, but embed spring-boot.pom). It is required to define exclusions of Tomcat 8 jars in the pom.
This documentation is licensed under the Creative Commons License (Attribution-NoDerivatives 4.0 International).
