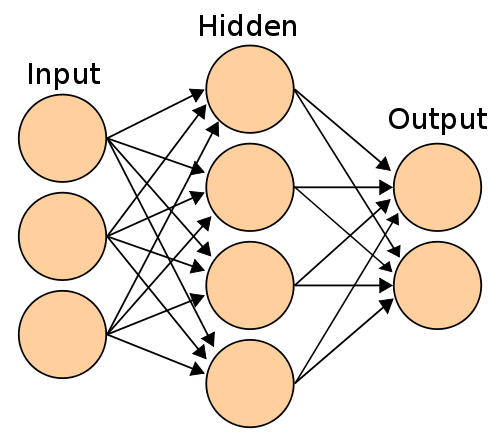
MLPNeuralNet is a fast multilayer perceptron neural network library for iOS and Mac OS X. MLPNeuralNet predicts new examples through trained neural networks. It is built on top of Apple's Accelerate Framework using vectored operations and hardware acceleration (if available).
##Why would you use it?
Imagine that you have engineered a prediction model using Matlab (Python or R) and would like to use it in an iOS application. If that's the case, MLPNeuralNet is exactly what you need. MLPNeuralNet is designed to load and run models in forward propagation mode only.
###Features
- Classification, Multi-class classification and regression output
- Vectorised implementation
- Works with double precision
- Multiple hidden layers or none (in that case it's same as logistic/linear regression)
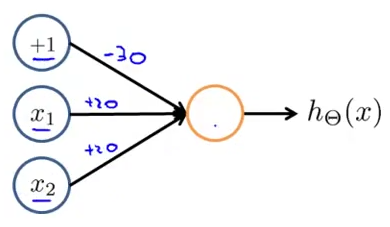
##Quick Example Let's deploy a model for the AND function (conjunction) that works as follows: (of course, you do not need to use a neural network for this in the real world)
| X1 | X2 | Y |
|---|---|---|
| 0 | 0 | 0 |
| 1 | 0 | 0 |
| 0 | 1 | 0 |
| 1 | 1 | 1 |
Our model has the following weights and network configuration:
// Use the designated initialiser to pass the network configuration and weights to the model.
// Note: You do not need to specify the biased units (+1 above) in the configuration.

NSArray *netConfig = @[@2, @1];
double wts[] = {-30, 20, 20};
NSData *weights = [NSData dataWithBytes:wts length:sizeof(wts)];

MLPNeuralNet *model = [[MLPNeuralNet alloc] initWithLayerConfig:netConfig
                                                        weights:weights
                                                     outputMode:MLPClassification];
// Predict output of the model for new sample
double sample[] = {0, 1};
NSData * vector = [NSData dataWithBytes:sample length:sizeof(sample)];
NSMutableData * prediction = [NSMutableData dataWithLength:sizeof(double)];
[model predictByFeatureVector:vector intoPredictionVector:prediction];

double * assessment = (double *)prediction.bytes;
NSLog(@"Model assessment is %f", assessment[0]);
##Extended Example Let's say you trained a net using pybrain or even your own home brewed implementation.
// Use the designated initialiser to pass the network configuration and weights to the model.
// Note: You do not need to specify the biased units (+1 above) in the configuration.

NSArray *netConfig = @[@3, @2, @1];
double wts[] = {b1, w1, w2, w3, b2, w4, w5, w6, b3, w7, w8};
NSData *weights = [NSData dataWithBytes:wts length:sizeof(wts)];

MLPNeuralNet *model = [[MLPNeuralNet alloc] initWithLayerConfig:netConfig
                                                        weights:weights
                                                     outputMode:MLPClassification];
model.hiddenActivationFunction = MLPSigmoid;
model.outputActivationFunction = MLPNone;

// Predict output of the model for new sample
double sample[] = {0, 1, 2};
NSData * vector = [NSData dataWithBytes:sample length:sizeof(sample)];
NSMutableData * prediction = [NSMutableData dataWithLength:sizeof(double)];
[model predictByFeatureVector:vector intoPredictionVector:prediction];

double * assessment = (double *)prediction.bytes;
NSLog(@"Model assessment is %f", assessment[0]);
##Getting Started
The following instructions describe how to setup and install MLPNeuralNet using CocoaPods. It is written for Xcode 5 and the iOS 7.x(+) SDK. If you are not familiar with CocoaPods, just clone the repository and import MLPNeuralNet directly as a subproject.
##Installing through CocoaPods Please add the following line to your Podfile.
pod 'MLPNeuralNet', '~> 1.0.0'
##Installing through Carthage Please add the following line to your Cartfile.
github "nikolaypavlov/MLPNeuralNet" "master"
##Import MLPNeuralNet.h
Do not forget to add the following line to the top of your model:
#import "MLPNeuralNet.h"##How many weights do I need to initialise network X->Y->Z?
Most of the popular libraries (including MLPNeuralNet) implicitly add biased units for each of the layers except the last one. Assuming these additional units, the total number of weights are (X + 1) * Y + (Y + 1) * Z.
##Importing weights from other libs. You can do this for some of the neural network packages available.
###R nnet library:
#Assuming nnet_model is a trained neural network
nnet_model$wts
###Python NeuroLab
#Where net argument is an neurolab.core.Net object
import neurolab as nl
import numpy as np

def getweights(net):
     vec = []
     for layer in net.layers:
         b = layer.np['b']
         w = layer.np['w']
         newvec = np.ravel(np.concatenate((b, np.ravel(w,order='F'))).reshape((layer.ci+1, layer.cn)), order = 'F')
         [vec.append(nv) for nv in newvec]
     return np.array(vec)
###Python neon
import numpy as np

def layer_names(params):
    layer_names = params.keys()
    layer_names.remove('epochs_complete')
    # Sort layers by their appearance in the model architecture
    # Since neon appands the index to the layer name we will use it to sort
    layer_names.sort(key=lambda x: int(x.split("_")[-1]))
    return layer_names

def getweights(file_name):
    vec = []
    # Load a stored model file from disk (should have extension prm)
    params = pkl.load(open(file_name, 'r'))
    layers = layer_names(params)

    for layer in layers:
        # Make sure our model has biases activated, otherwise add zeros here
        b = params[layer]['biases']
        w = params[layer]['weights']

        newvec = np.ravel(np.hstack((b,w)))
        [vec.append(nv) for nv in newvec]
    return vec

# An example call
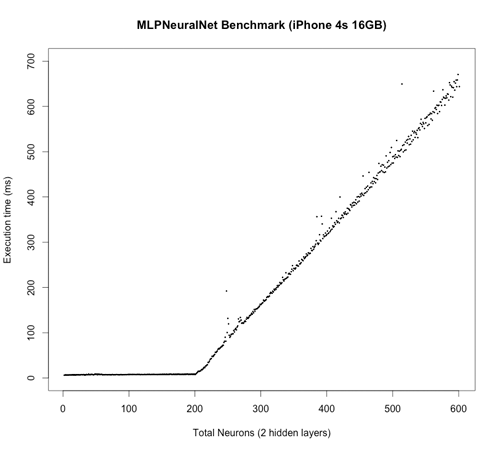
getweights(expanduser('~/data/workout-dl/workout-ep100.prm'))In this test, the neural network has grown layer by layer from a 1 -> 1 configuration to a 200 -> 200 -> 200 -> 1 configuration. At each step, the output is calculated and benchmarked using random input vectorisation and weights. Total number of weights grow from 2 to 80601 accordingly. I understand that the test is quite synthetic, but I hope it illustrates the performance. I will be happy if you can propose a better one! :)
##Unit Testing
MLPNeuralNet includes a diverse suite of unit tests in the /MLPNeuralNetTests subdirectory. You can execute them using the MLPNeuralNet scheme within Xcode.
##Acknowledgements
MLPNeuralNet was inspired by:
Credits:
- Neural Network image was taken from Wikipedia Commons.
##Contact Me Maintainer: Mykola Pavlov ([email protected])
Please let me know on how you use MLPNeuralNet for some real world problems.
##Licensing
MLPNeuralNet is released under the BSD license. See the LICENSE file for more information.


