| 模型名称 | deepvoice3_ljspeech |
|---|---|
| 类别 | 语音-语音合成 |
| 网络 | DeepVoice3 |
| 数据集 | LJSpeech-1.1 |
| 是否支持Fine-tuning | 否 |
| 模型大小 | 58MB |
| 最新更新日期 | 2020-10-27 |
| 数据指标 | - |
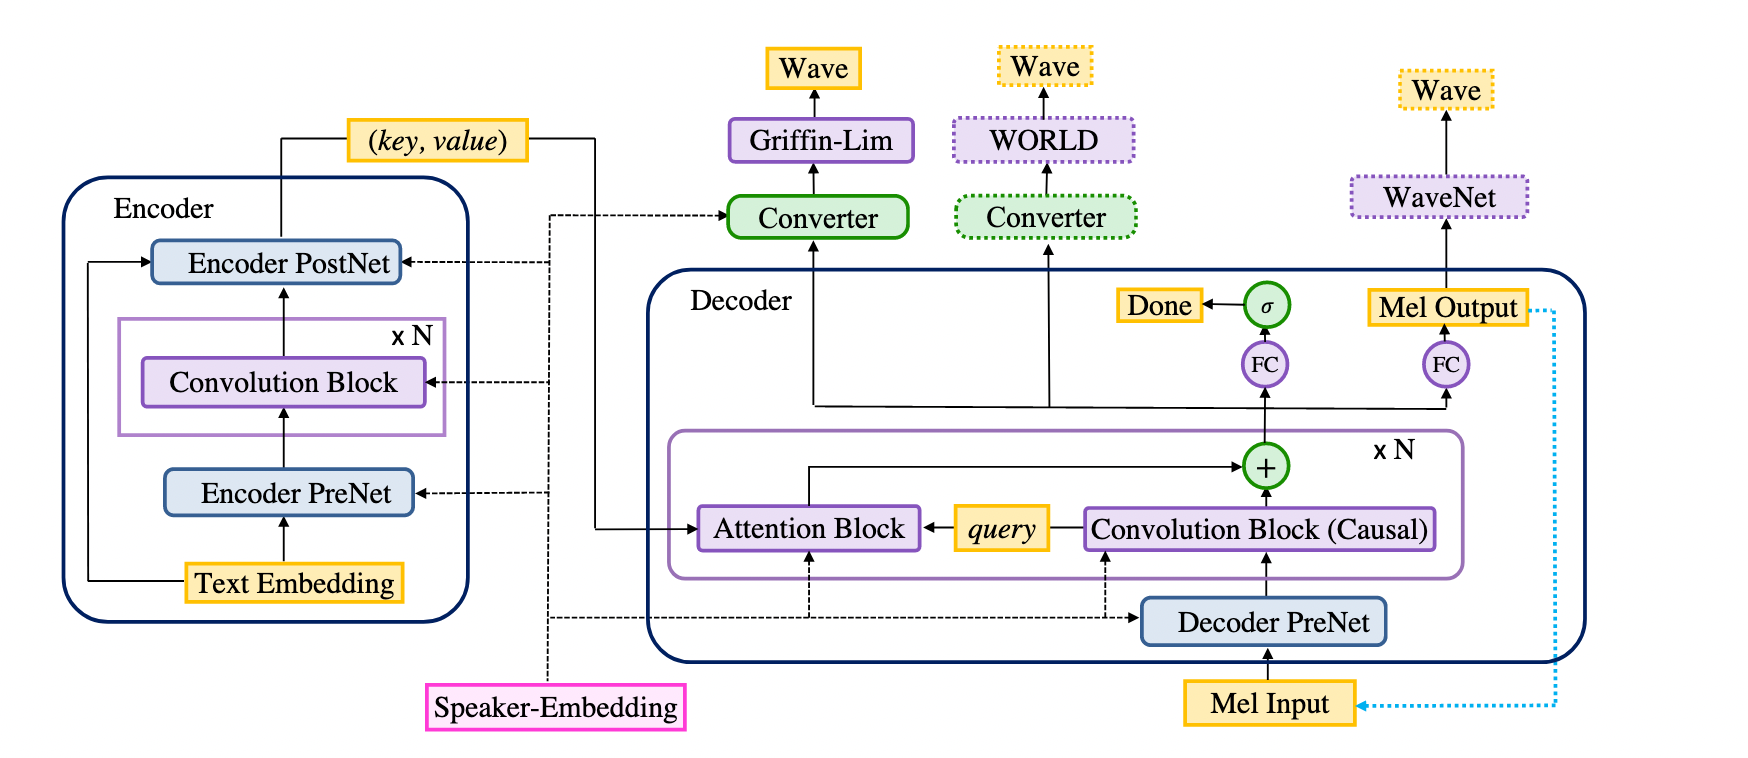
Deep Voice 3是百度研究院2017年发布的端到端的TTS模型(论文录用于ICLR 2018)。它是一个基于卷积神经网络和注意力机制的seq2seq模型,由于不包含循环神经网络,它可以并行训练,远快于基于循环神经网络的模型。Deep Voice 3可以学习到多个说话人的特征,也支持搭配多种声码器使用。deepvoice3_ljspeech是基于ljspeech英文语音数据集预训练得到的英文TTS模型,仅支持预测。
更多详情参考论文Deep Voice 3: Scaling Text-to-Speech with Convolutional Sequence Learning
-
对于Ubuntu用户,请执行:
sudo apt-get install libsndfile1对于Centos用户,请执行:
sudo yum install libsndfile -
-
2.0.0 > paddlepaddle >= 1.8.2
-
2.0.0 > paddlehub >= 1.7.0 | 如何安装PaddleHub
-
-
-
$ hub install deepvoice3_ljspeech
- 如您安装时遇到问题,可参考:零基础windows安装 | 零基础Linux安装 | 零基础MacOS安装
-
-
-
$ hub run deepvoice3_ljspeech --input_text='Simple as this proposition is, it is necessary to be stated' --use_gpu True --vocoder griffin-lim - 通过命令行方式实现语音合成模型的调用,更多请见PaddleHub命令行指令
-
-
-
import paddlehub as hub
import soundfile as sf

# Load deepvoice3_ljspeech module.
module = hub.Module(name="deepvoice3_ljspeech")

# Predict sentiment label
test_texts = ['Simple as this proposition is, it is necessary to be stated',
            'Parakeet stands for Paddle PARAllel text-to-speech toolkit']
wavs, sample_rate = module.synthesize(texts=test_texts)
for index, wav in enumerate(wavs):
    sf.write(f"{index}.wav", wav, sample_rate)
-
-
-
def synthesize(texts, use_gpu=False, vocoder="griffin-lim"):
-
预测API,由输入文本合成对应音频波形。
-
参数
- texts (list[str]): 待预测文本;
- use_gpu (bool): 是否使用 GPU;若使用GPU,请先设置CUDA_VISIBLE_DEVICES环境变量;
- vocoder: 指定声码器,可选 "griffin-lim"或"waveflow"
-
返回
- wavs (list): 语音合成结果列表,列表中每一个元素为对应输入文本的音频波形,可使用
soundfile.write进一步处理或保存。 - sample_rate (int): 合成音频的采样率。
- wavs (list): 语音合成结果列表,列表中每一个元素为对应输入文本的音频波形,可使用
-
-
-
PaddleHub Serving可以部署一个在线语音合成服务,可以将此接口用于在线web应用。
-
- 运行启动命令
-
$ hub serving start -m deepvoice3_ljspeech
- 这样就完成了服务化API的部署,默认端口号为8866。
- NOTE: 如使用GPU预测,则需要在启动服务之前,请设置CUDA_VISIBLE_DEVICES环境变量,否则不用设置。
-
-
配置好服务端,以下数行代码即可实现发送预测请求,获取预测结果
-
import requests
import json

import soundfile as sf

# 发送HTTP请求

data = {'texts':['Simple as this proposition is, it is necessary to be stated',
                'Parakeet stands for Paddle PARAllel text-to-speech toolkit'],
        'use_gpu':False}
headers = {"Content-type": "application/json"}
url = "http://127.0.0.1:8866/predict/deepvoice3_ljspeech"
r = requests.post(url=url, headers=headers, data=json.dumps(data))

# 保存结果
result = r.json()["results"]
wavs = result["wavs"]
sample_rate = result["sample_rate"]
for index, wav in enumerate(wavs):
    sf.write(f"{index}.wav", wav, sample_rate)
-
-
1.0.0
初始发布
$ hub install deepvoice3_ljspeech
