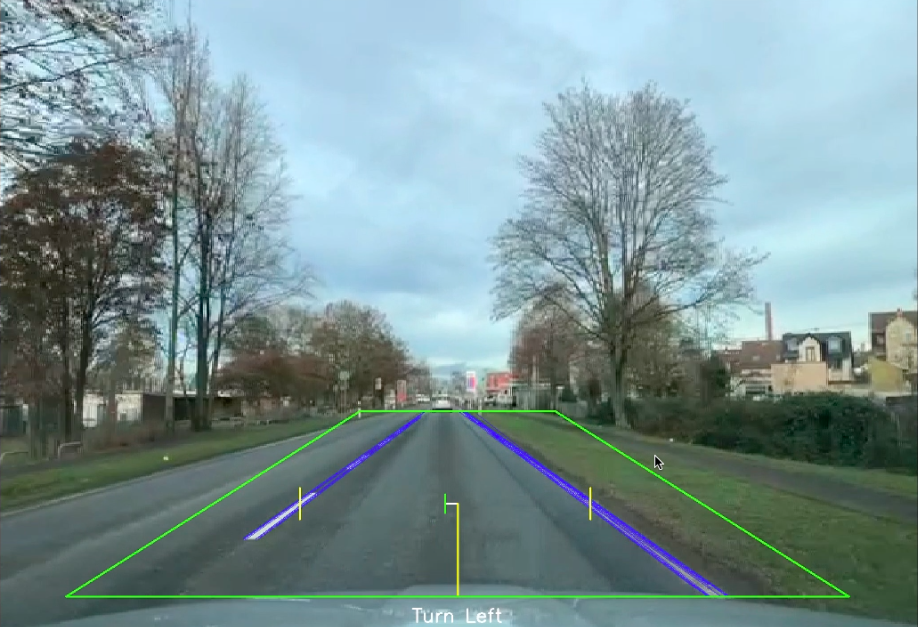
The idea behind this project was to create a simple lane detection, which would provide steering advisory to the user to keep the car in the mid of the lane. The optimal use therefore would be to install the system on a Head Up Display (HUD) and provide the information to the user without creating to much of a distraction. To build the system I decided to use openCV, an open source computer vision library that implements most of the algorithms that I need for my approach (Edge Detection, Hough Lines Probability).
Essentially there are 4 core steps to identify the lines marking the lanes on the image:
- Get the next video frame
- Copy the frame and grayscale the copy
- Use John Francis Canny's algorithm to detect edges in the grayscale
- Create a mask to reduce the search only to the area of a polygon
- Search for lines using the probabilistic version of the Hough Lines algorithm
If we detected lines in the frame we try to calculate the approximate lane middle. All these lines will be drawn onto the frame using openCV's line() method.
To try this script yourself install it either through:
- Download it directly from GitHub
- Or use cli
- via Git -
git clone https://github.com/jonas-weimar/LaneDetection.git - via GitHub -
gh repo clone jonas-weimar/LaneDetection
- via Git -
Usage: index.py [-h] [-v CAMERA] [-t THRESHOLD] [-l LINES] [-m MIN_LINE_LENGTH]
                [-g MAX_LINE_GAP]

Optional arguments:
  -h, --help            show this help message and exit
  -v CAMERA, --camera CAMERA
                        Pass the camera id. Let empty for standard (0).
  -t THRESHOLD, --threshold THRESHOLD
                        Pass a threshold for the HoughLines Probability
                        function. Best used between 25-50.
  -l LINES, --lines LINES
                        Output vector of lines for the HoughLines Probability
                        function. Best used 30.
  -m MIN_LINE_LENGTH, --min-line-length MIN_LINE_LENGTH
                        Pass a minimum line length in px for the HoughLines
                        Probability function. Best used between 25-40.
  -g MAX_LINE_GAP, --max-line-gap MAX_LINE_GAP
                        Pass a maximum line gap in px for the HoughLines
                        Probability function. Best used between 40-55.
Run the script on your machine either by configuring it by your self (have a look in the Usage section) or by using on of the predefined commands specified in the examples file.
Following you see a picture of the script running under the command python index.py -v 1 -t 25 -m 40 -g 90. For more exmaples have a look into the images/ folder.
I wrote this algorithm in python because its easier and faster to write then C or C++. For usages outside of playing around with the mentioned algorithms I would recomend to write the script in a non interpreted language like C or C++ as the speed difference especially in the image processing part will be significant.
Have fun!🥳
