-
Notifications
You must be signed in to change notification settings - Fork 37
Tutorials: Virtual Robot
The Python API allowing to interact with a virtual robot is voluntarily close to the one provided by the NAOqi framework in order to minimize the amount of work required to interface an existing code with our simulation.
The joints of a virtual robot can be controlled using the setAngles method:
pepper.setAngles(["HeadYaw", "HeadPitch"], [0.5, 0.3], [0.1, 0.1])
time.sleep(2.0)
pepper.setAngles("HeadYaw", 0.6, 0.6)
The joints can be controlled independently or simultaneously. The desired angular position has to be specified in radians, along with the percentage of the max speed to be applied on the movement.
Typical NAOqi postures can be applied onto the robot with the goToPosture method:
pepper.goToPosture("Stand", 0.6)The name of the posture has to be specified, along with the percentage of the max speed to be applied onto the movement. The following postures are currently available for the virtual Pepper robot:
- "Crouch"
- "Stand"
- "StandZero" (or "StandInit")
The following postures are currently available for the NAO robot:
- "Stand"
- "StandInit"
- "StandZero"
- "Crouch"
- "Sit"
- "SitRelax"
- "LyingBelly"
- "LyingBack"
The following postures are currently available for the Romeo robot:
- "Crouch"
- "Stand"
- "StandZero" (or "StandInit")
The base of the Pepper robot can be controlled via the moveTo method, using positions:
# Move to the specified [x, y, theta] coordinates in the robot frame,
# synchronous call
pepper.moveTo(1.0, 1.0, 0.0, frame=PepperVirtual.FRAME_ROBOT)

# Move to the specified [x, y, theta] coordinates in the robot frame,
# asynchronous call
pepper.moveTo(0.0, -1.0, 1.39, frame=PepperVirtual.FRAME_WORLD, _async=True)
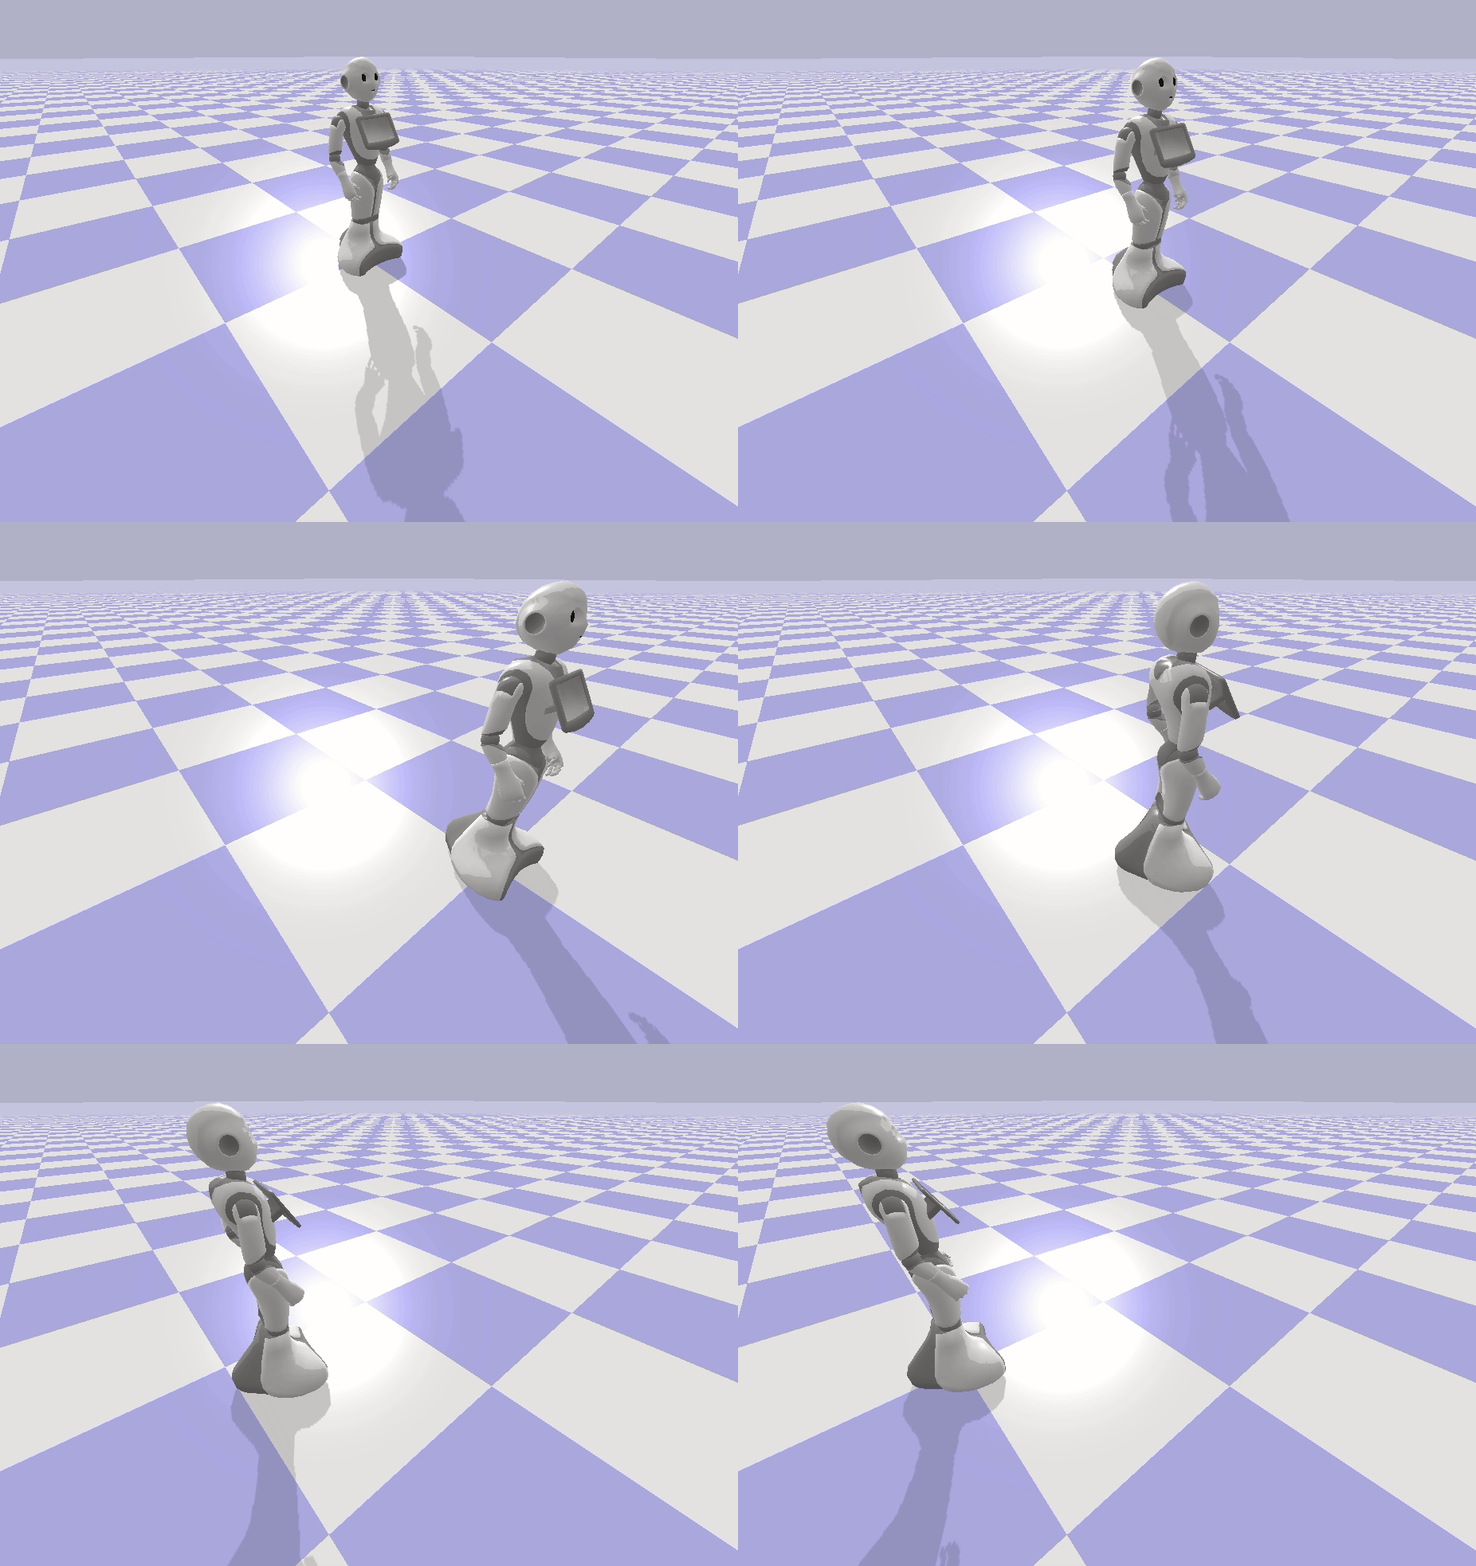
The base can be controlled in the WORLD frame or in the ROBOT frame, synchronously or asynchronously. The user can also specify a speed in m/s, using the speed parameter.
The base of the robot can also be controlled using speeds, through the move method:
# Apply a speed [x_vel, y_vel, theta_val] on the robot's base, in the
# robot frame. It is an asynchronous call
pepper.move(1.0, 0.5, 0.1)
The parameters are expressed in m/s for the translational speeds, and in rad/s for the rotational speed.
To retrieve information from a robot's camera, you have to subscribe to that specific camera:
import cv2
from qibullet import SimulationManager
from qibullet import PepperVirtual
from qibullet import Camera


if __name__ == "__main__":
    simulation_manager = SimulationManager()
    client = simulation_manager.launchSimulation(gui=True)
    pepper = simulation_manager.spawnPepper(client, spawn_ground_plane=True)

    # Subscribing to the bottom RGB camera, with a QVGA resolution at 15 frames
    # per second. When subscribing, the resolution and the fps are respectively
    # set to QVGA and 30 fps by default
    handle = pepper.subscribeCamera(
        PepperVirtual.ID_CAMERA_TOP,
        resolution=Camera.K_QVGA,
        fps=30.0)

    # Add other objects to the simulation...

    try:
        while True:
            # Retrieving and displaying the synthetic image using the subscription
            # handle and OpenCV
            img = pepper.getCameraFrame(handle)
            cv2.imshow("synthetic top camera", img)
            cv2.waitKey(1)
    except KeyboardInterrupt:
        pass
    finally:
        pepper.unsubscribeCamera(handle)
        simulation_manager.stopSimulation(handle)
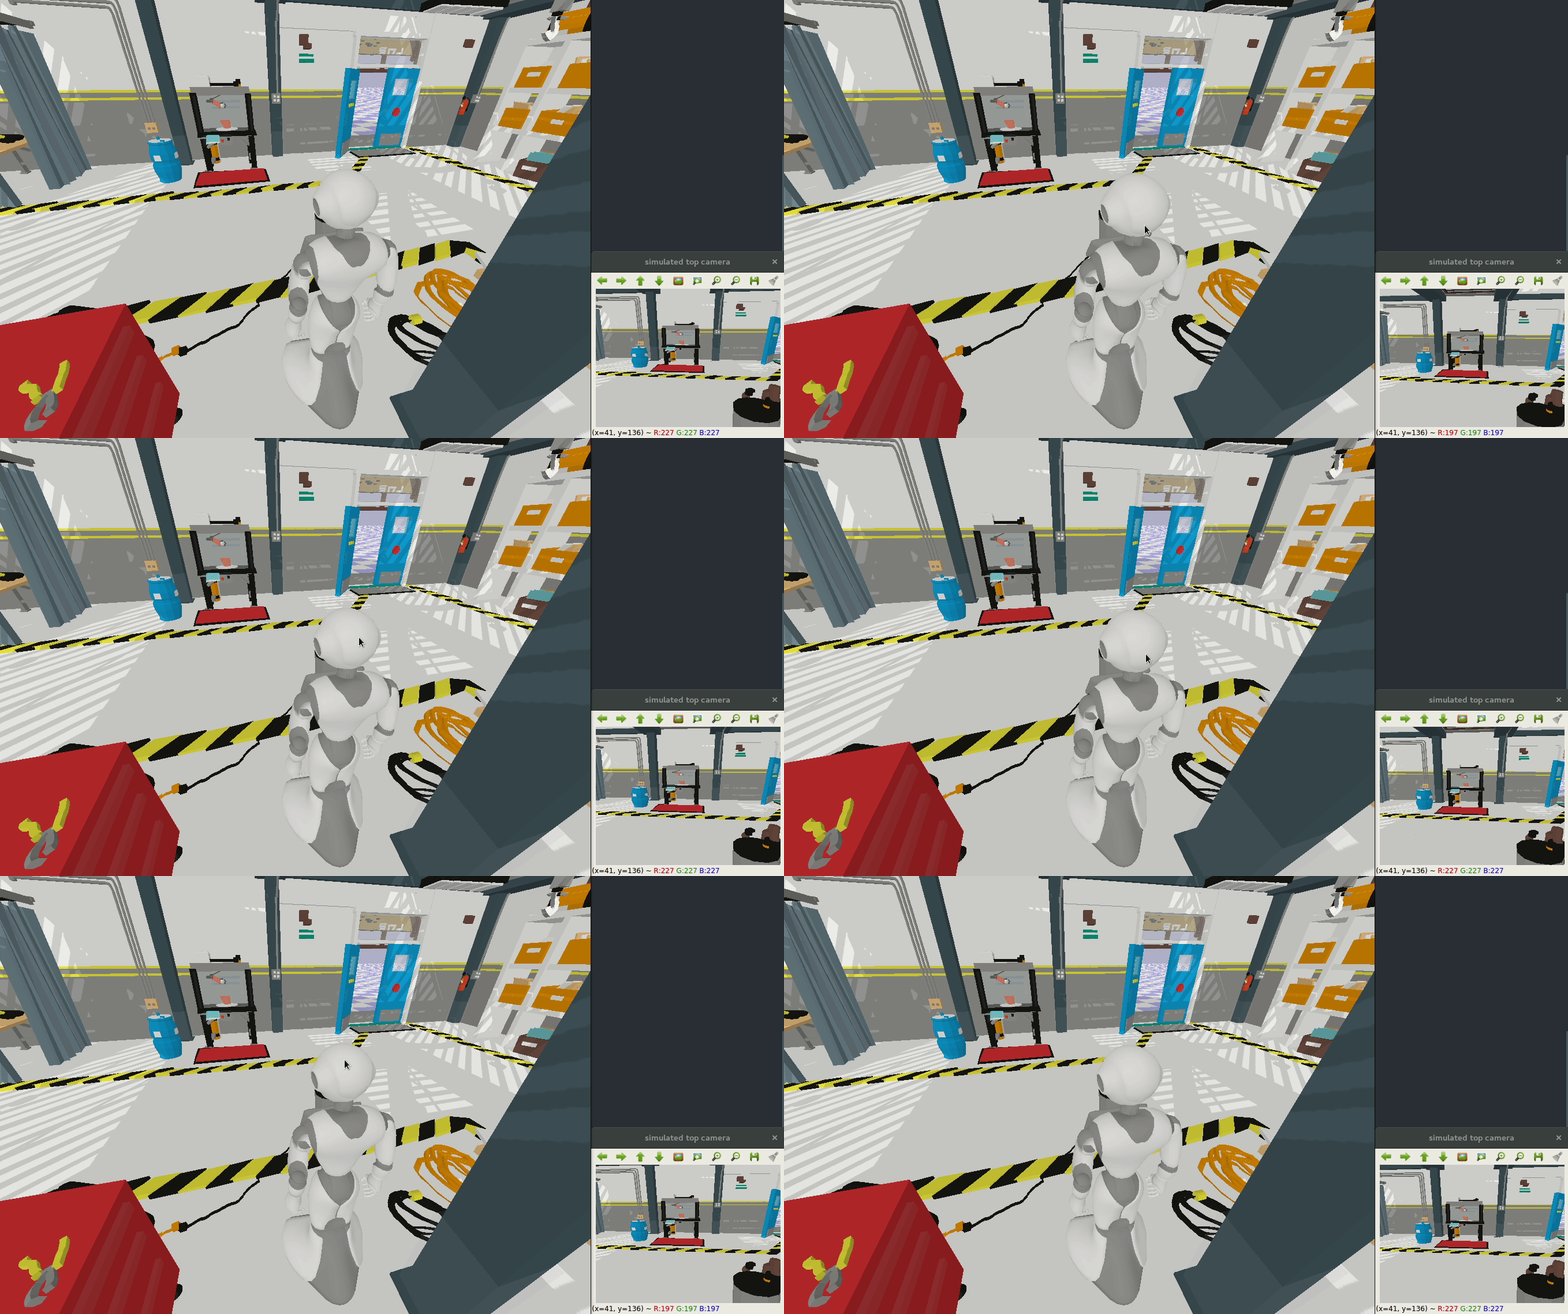
The RGB top and bottom cameras and the depth camera can be subscribed to using the subscribeCamera method with one of the following parameters, on Pepper:
- ID_CAMERA_TOP
- ID_CAMERA_BOTTOM
- ID_CAMERA_DEPTH
The RGB top and bottom cameras can be subscribed to on NAO using the following parameters:
- ID_CAMERA_TOP
- ID_CAMERA_BOTTOM
The RGB right and left cameras and the depth camera can be subscribed to on Romeo using the following parameters:
- ID_CAMERA_RIGHT
- ID_CAMERA_LEFT
- ID_CAMERA_DEPTH
The getCameraFrame method can then be used to retrieve a synthetic camera frame. The obtained RGB images have a np.uint8 type, and the obtained depth images a np.uint16 type. When subscribing to the camera, the resolution and the framerate can be specified:
handle = pepper.subscribeCamera(
    PepperVirtual.ID_CAMERA_BOTTOM,
    resolution=Camera.K_QVGA,
    fps=15.0)
The available resolutions are listed below:
- K_VGA: 640 * 480
- K_QVGA: 320 * 240
- K_QQVGA: 160 * 120
The resolution of the subscribed camera can be retrieved using the getCameraResolution method:
resolution = pepper.getCameraResolution(handle)
print(resolution.width)
print(resolution.height)
The method will return a CameraResolution object, containing the width and height information of the synthetic images generated by the camera.
The framerate of the subscribed camera can be retrieved using the getCameraFps method:
# The framerate is returned as a float
framerate = pepper.getCameraFps(handle)
Other methods can be used to interact with the cameras, please see the API documentation
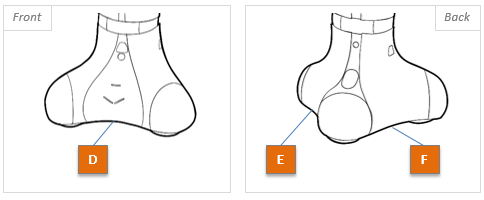
The lasers of the Pepper's base are represented in the following picture. When calling the subscribeLaser method, the base lasers are turned on. The lasers data can then be retreived using three different methods:
pepper.subscribeLaser()
right_scan = pepper.getRightLaserValue()
front_scan = pepper.getFrontLaserValue()
left_scan = pepper.getLeftLaserValue()
print(right_scan)
print(front_scan)
print(left_scan)
pepper.unsubscribeLaser()
The following result will be obtained if no object is detected (The range of the laser sensors is set to 3.0 meters, since no object is detected with the lasers, the returned lists will contain the value 3.0 for each laser). The unsubscribeLaser method will turn the lasers off.
[3.0, 3.0, 3.0, 3.0, 3.0, 3.0, 3.0, 3.0, 3.0, 3.0, 3.0, 3.0, 3.0, 3.0, 3.0]
[3.0, 3.0, 3.0, 3.0, 3.0, 3.0, 3.0, 3.0, 3.0, 3.0, 3.0, 3.0, 3.0, 3.0, 3.0]
[3.0, 3.0, 3.0, 3.0, 3.0, 3.0, 3.0, 3.0, 3.0, 3.0, 3.0, 3.0, 3.0, 3.0, 3.0]
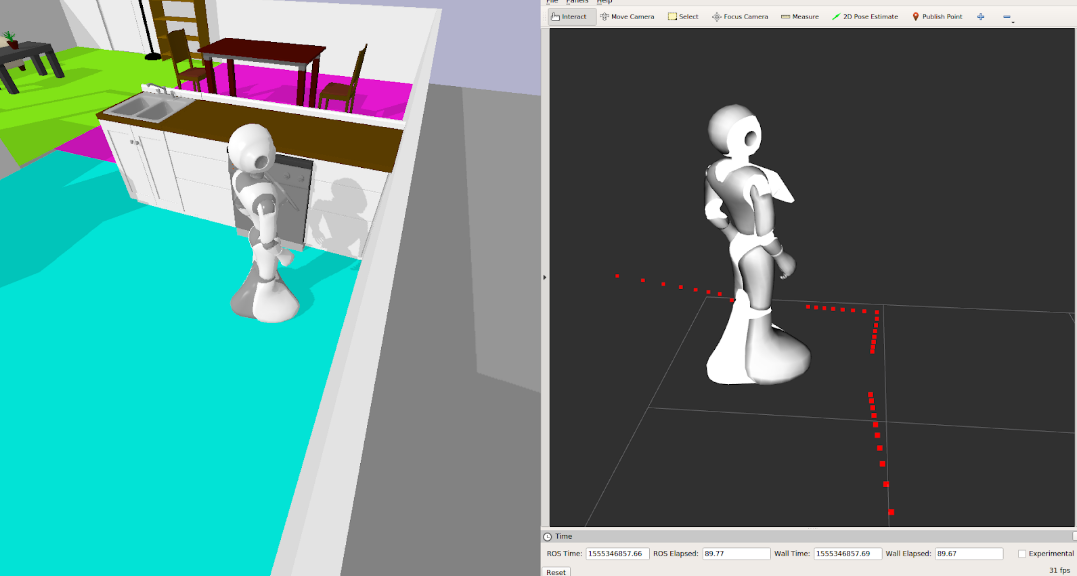
The showLaser method allows to display the lasers in the bullet simulation, to better understand the obtained data:
pepper.subscribeLaser()

# Display the lasers
pepper.showLaser(True)

# Your code...

# You don't need to visualize the lasers anymore
pepper.showLaser()

# Your code again...
pepper.unsubscribeLaser()
The ROS framework and RViz can be used to display the laser scans (see the ROS Interface turorial):
The Inertial Measurement Unit (IMU) of the Pepper robot is located in its base, while the IMUs of the NAO and Romeo robots are located in their torsos.
The IMU will measure:
- The angular velocity of the associated link (in rad/s in the world frame)
- The linear acceleration of the associated link (in m/s^2 in the world frame)
The following code snippet illustrates how to retrieve the IMU data (with a simulated NAO):
# Subscribe to the IMU. By default, the frequency of the IMU is set to 100Hz
nao.subscribeImu(frequency=100)

# Get the angular velocity values
gyro_values = nao.getImuGyroscopeValues()

# Get the linear acceleration values
acc_values = nao.getImuAccelerometerValues()

# Or get both values at the same time
gyro_values, acc_values = nao.getImuValues()

# Unsubscribe from the IMU. Stopping the simulation will automatically
# unsubscribe from the IMU
nao.unsubscribeImu()

# The user can also decide to directly use the IMU object of the robot. The IMU
# object can be obtained with nao.getImu()The virtual NAO robot is equiped with Force Sensitive Resistors (FSRs) on its feet (8 FSRs, 4 per foot). These sensors measure a resistance change according to the pressure applied on them.
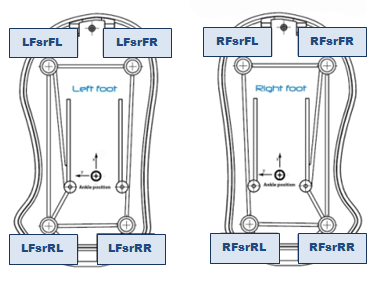
⚠️ The returned value is an approximation. Good practice: instead of the value itself, take into account the variation of the value, in order to detect any change at foot contact level.
The following snippet illustrate how to retrieve the FSR values:
from qibullet import NaoFsr  # Contains the id of the FSRs of the nao robot

# code...

# Get the value of the front left FSR of the left foot
value = nao.getFsrValue(NaoFsr.LFOOT_FL)

# Get the value of the rear right FSR of the right foot
value = nao.getFsrValue(NaoFsr.RFOOT_RR)

# Get all of the values of the FSRs of the left foot
values = nao.getFsrValues(NaoFsr.LFOOT)

# Get the total weight value on the FSRs of the right foot
weight = nao.getTotalFsrValues(NaoFsr.RFOOT)

# The user can retrieve the FSR handler of the robot and directly work with it.
# The FsrHanlder object can be retrieved with nao.getFsrHandler()The angular positions of the robot's joints can be retrieved independently or simultaneously through the getAnglesPosition method:
angle_value = pepper.getAnglesPosition("HeadYaw")
angle_list = pepper.getAnglesPosition(["HeadYaw", "HeadPitch"])

print(angle_value)
print(angle_list)The angular velocities of the robot's joints can be retrieved independently or simultaneously through the getAnglesVelocity method:
angle_value = pepper.getAnglesVelocity("HeadYaw")
angle_list = pepper.getAnglesVelocity(["HeadYaw", "HeadPitch"])

print(angle_value)
print(angle_list)The position of the base in the WORLD frame can be retrieved through the getPosition method:
x, y, theta = pepper.getPosition()The isSelfColliding method specifies if a link is colliding with the rest of the virtual robot:
# Test if the r_wrist link is colliding with the model
pepper.isSelfColliding("r_wrist")

# Test if the RForeArm or LForeArm link is colliding with the model
pepper.isSelfColliding(["RForeArm", "LForeArm"])
The method will return a Boolean value, true if a self collision is detected, false otherwise.
For a more complete overview of the qiBullet API, please see the API documentation.
qibullet is under the Apache-2.0 License