The CLI utility’s --jig-mode parameter causes the utility to
output a model of a tool, instead of the default model of a keycap.
This tool is intended for use in the manual finishing of printed keycaps. It
includes a rounded pad. The pad is convex, to match the inside of the bowl that
curves inward on a minimal-style keycap. You strap sandpaper on the pad to
get a jig for making the inside of the bowl smoother.
A smooth bowl looks good and stays clean, all without the need for paint or varnish. Sanding the inside of the bowl is more important than sanding the sides. The jig will not help you do the latter.
The curvature of the bowl is determined by the --bowl-radii parameter to the
CLI utility. This is the same parameter that governs the bowl of a keycap, and
it has the exact same default value. For best results, override that default.
Make all the radii about 0.6 mm smaller for the jig than for the keys. That
way, there’s space for rough sandpaper in between the two.
The following parameters to the CLI utility affect only its jig mode:
--jig-lanes. Leave this at the default value for a test print. Set it to 2 or higher to allow for multiple strips of sandpaper at once, which saves time in serial production.--jig-angle. You might need to adjust this for your workshop, but the default value is probably OK.--paper-width. Try to keep this close both to twice the size of the middle number in yourbowl-radiiand to the actual width of any sandpaper strips you already have lying around. Minor differences won’t matter.
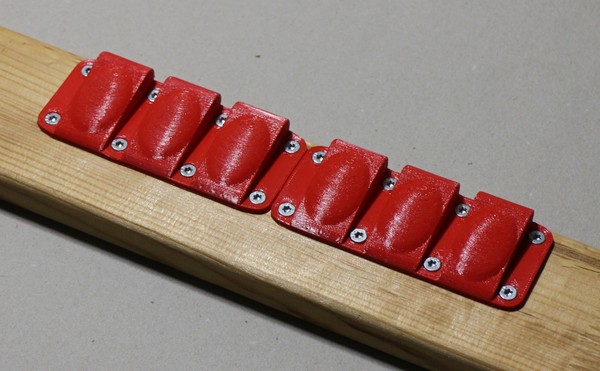
The jigs shown in the image above were made with lein run --jig-mode --jig-lanes 3 --paper-width 22.
Sanding blocks are commonly made of cork or rubber to help make a smooth finish. The jig itself should ideally be printed in TPC, TPU, or any similar, middling-soft material. A tire-like Shore hardness around D45 works well, with up to 1 mm top shell thickness and 15–20% gyroid infill. Keep the layers thin for a smooth pad.
By mounting a printed jig on a spare piece of wooden board and wrapping a strip of sandpaper around it, you complete the jig. You then take a printed cap and rub it on the curved pad.
More detailed instructions are available in this illustrated build guide.