Quick Tutorial
- Motivation
- Prerequisites
- Creating UI elements
- Adding your UUIDs to the Service Registry
- Manifest
- Initializing GUI elements and TabView
- Initialize BLE services and characteristics
- Read and write BLE data
This step-by-step is for users that want to learn quickly the usage of the ABLE framework. Therefore, an example with an IoT device is used to describe how to add your own device to the framework. We will use a platform of the company Cypress® with a capacitive touch sensor and a RGB LED for this tutorial.
The ABLE app starts with a start screen, where you can scan BLE devices in your radius. You can connect to BLE devices and read their services and characteristics by default. For this view you need no additional coding.
If you want to build up your own custom control page, then you can register your service UUID in ABLE.
By clicking your own device, which you will have registered in ABLE, you will be redirected to your control page.
In this example you will develop a custom page, where you can toggle a RGB led and read sensor data from a capacitive sensor.
|

|
Before you start this tutorial make sure, that you have installed the following softwares.
- JDK 8: Download
- Android Studio: Download | Installation tutorial
- Android SDK 26 & Android Build Tools v26
- ABLE framework: Choose here the latest
ABLE_##_MyProject.zip, where##stands for the latest release number.
Important: If you want the ABLE framework including the solution for this tutorial, you can download the extended ABLE framework here.
As a first step import the framework from the folder able-master/android inside the Able archive and start Android Studio. Select in Android Studio Open an existing Android Studio project you will be prompted to navigate to the project directory. Choose able-master/android if you downloaded the archive. Follow the instructions receiving from the IDE considering setup, the initialization might take time.
Android Studio will ask you to update Grade, but don't update your gradle plugin and choose Don't remind me again for this project.

Activate the developer mode on your phone to install Able on your device. Here is shown how you can activate the developer mode in Android.
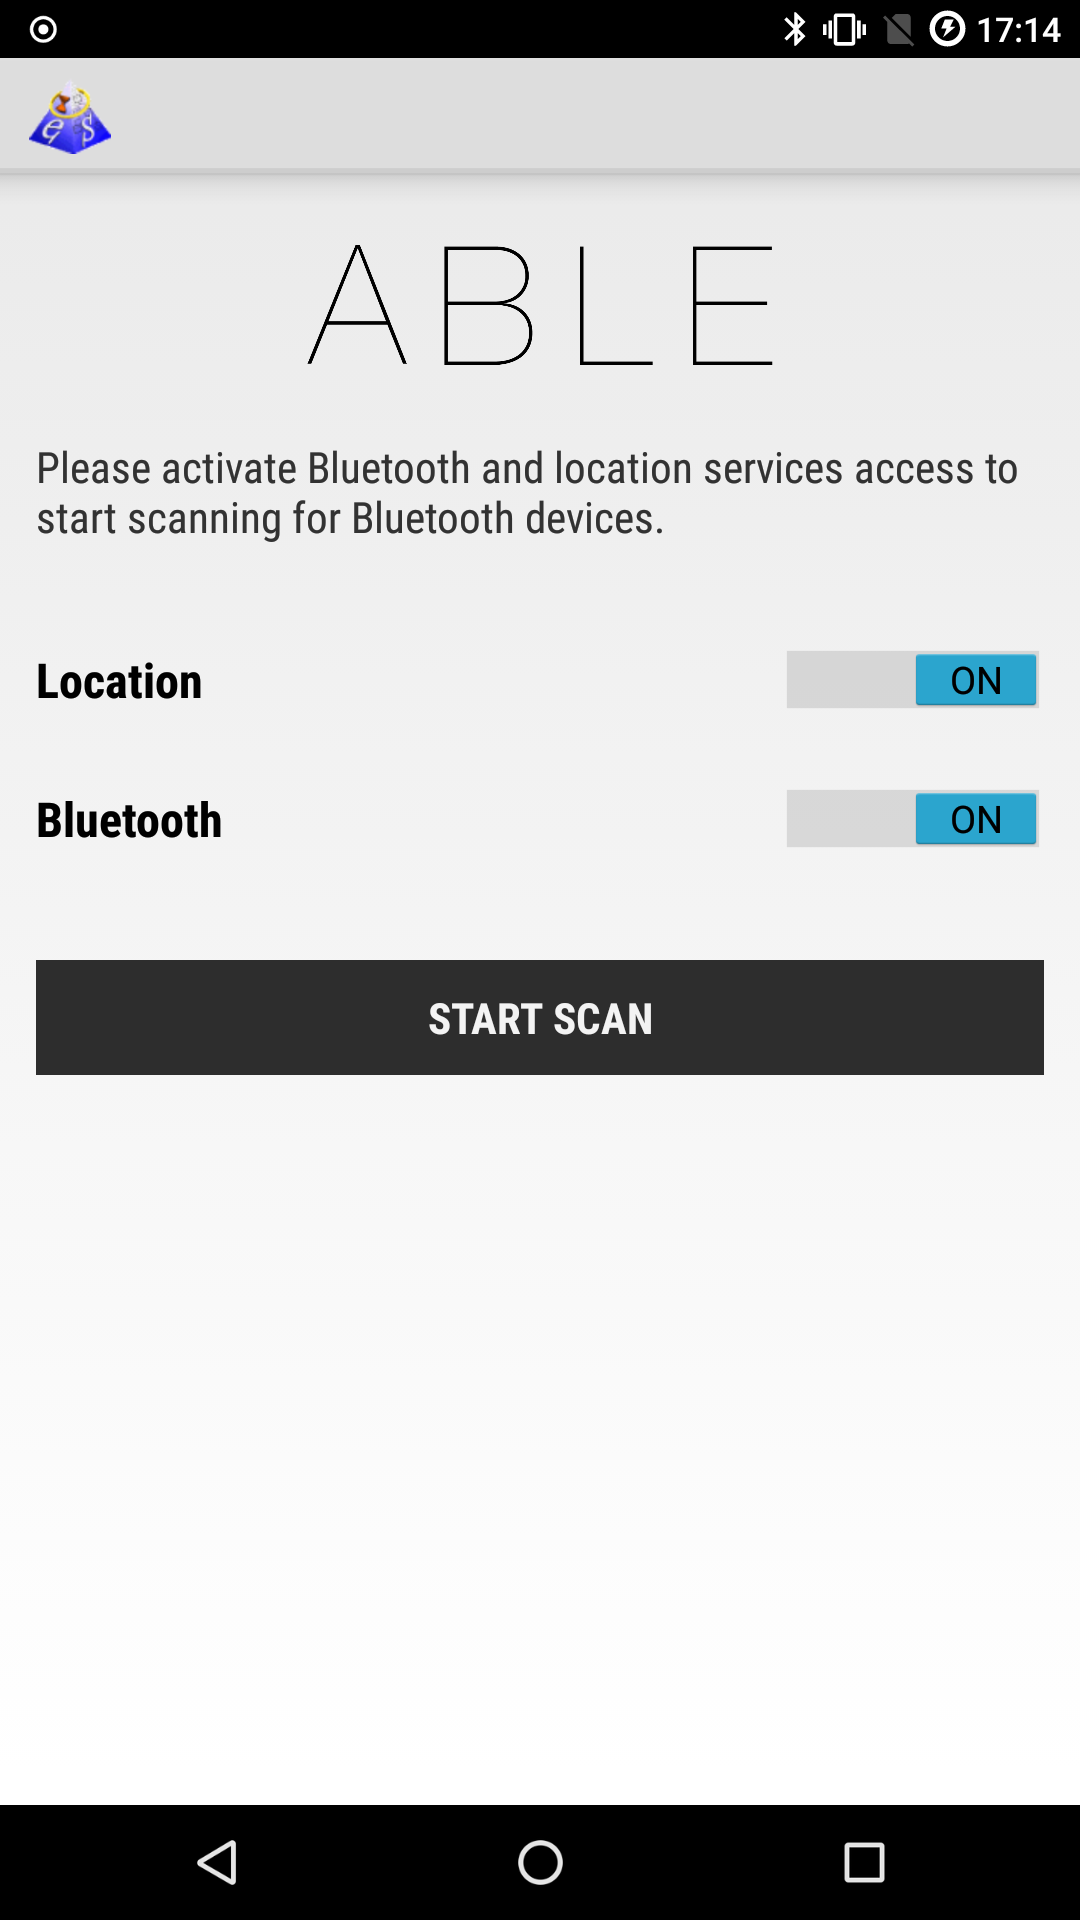
Connect your device to your computer and ensure that your android device is in developer mode. You can deploy that imported project to your device via Run -> Debug Application and choosing your device. On the home screen of the ABLE app activate location permissions and bluetooth. Then you can test the BLE scan and connect to a BLE device to read its services and characteristics. This concludes the initial setup for Android Studio.
Next step will introduce how you can build your own activity to observe and control your BLE hardware.
To separate the frontend and backend you will use the concept of fragments in Android. In combination with PageViewer you will build a UI, that will have a VIEW section and a SETTINGS section.
In VIEW you will implement a toggle for the LED and a progress bar to display the status of the capacitive sensor.
In SETTINGS you will implement a toggle that will activate notifications for new capacitive sensor values and button to disconnect the connection.
The result should look like this:

|

|
Android layouts are described as XML files and build up from basic elements.
In Application/res/layout) you find three XML files related to your project myproject_activity, myproject_tab_view and myproject_tab_settings.
-
myproject_activityis the parent view of the two tabsSETTINGSandVIEWtogether. You don't need to edit anything here. -
myproject_tab_viewsets the UI elements of theVIEWtab. -
myproject_tab_settingssets the UI elements of theSETTINGStab.
For your myProject example the following layout elements will be interesting for you:
-
TextViewis used to printStringobjects on the UI. -
ImageViewis used to include images to the UI. -
LinearLayoutis used to group UI elements horizontally or vertically. -
Switchis a switch button which you can toggle to set a boolean. -
Buttonis a clickable button, whose behaviour you can program. -
ProgressBaris a UI elements, which you can use to display the capacitive sensor touch position.
Open myproject_tab_view and add using drag and use the GUI tools of Android Studio and create the UI of the view tab.
In the following picture the important tools of Android Studio are marked in green and orange.
The palette (green) offers you the UI elements, which you insert into the component tree (orange).

|
Use a LinearLayout to group your elements and add the following structure to your LinearLayout.
- ImageView: A welcome image, which you can add to the
reffolder and refer via XML. - TextView: A welcome text to the
VIEWtab. - Switch: Add a switch for the Red LED, which you want to control later.
- TextView: Add a Textview which will represent the sensor value of the capacitive sensor later.
Simplified your structure will look like this:
<LinearLayout> <!-- group element for all vertical elements  -->
    <ImageView> <!-- CapLED welcome image -->
    </ImageView>
    <TextView> <!-- CapLED welcome text -->
    </TextView>
    <Switch> <!-- Red LED switch -->
    </Switch>
    <TextView>
    </TextView>
</LinearLayout>
Important: Use the following ids for the switch and the sensor TextView, to minimize problems understanding this tutorial.
- RED LED Switch:
myProject_led_switch - Capacitive sensor:
myProject_capSenseValue
You can define text attributes of UI elements by android:text="Your Text here". For a better structure you should use the predefined strings.xml in Application/res/values and define a constant for your string.
In this XML-file a string can be defined for example by this code:
<string name="disconnected">Disconnected</string>
Optionally: For the images you can also download the ones used in this tutorial here.
Optionally: You can use paddings and margins to position your UI elements more aesthetically pleasing for the user. Therefore you can compare your code to our solution.
<?xml version="1.0" encoding="utf-8"?>
<LinearLayout xmlns:android="http://schemas.android.com/apk/res/android"
xmlns:app="http://schemas.android.com/apk/res-auto"
android:layout_width="match_parent"
android:layout_height="wrap_content"
android:fontFamily="sans-serif-condensed"
android:orientation="vertical"
android:switchTextAppearance="@style/TextAppearance.AppCompat.Light.SearchResult.Subtitle"
android:scrollbars="vertical">
    <ImageView
        android:layout_width="fill_parent"
        android:layout_height="70dp"
        android:layout_marginBottom="0dp"
        android:layout_marginLeft="50dp"
        android:layout_marginRight="50dp"
        android:layout_marginTop="30dp"
        android:src="@drawable/capled" />

    <TextView
        android:id="@+id/myProjectTextView"
        android:layout_width="match_parent"
        android:layout_height="wrap_content"
        android:layout_marginTop="15dp"
        android:layout_marginBottom="15dp"
        android:fontFamily="sans-serif-condensed"
        android:paddingLeft="15dp"
        android:paddingRight="15dp"
        android:paddingTop="15dp"
        android:text="@string/capledWelcome"
        android:textSize="18sp" />

    <Switch
        android:id="@+id/myProject_led_switch"
        android:layout_width="match_parent"
        android:layout_height="wrap_content"
        android:layout_marginBottom="15dp"
        android:layout_marginLeft="15dp"
        android:layout_marginRight="15dp"
        android:layout_marginTop="15dp"
        android:fontFamily="sans-serif-condensed"
        android:switchTextAppearance="@style/TextAppearance.AppCompat.Light.SearchResult.Subtitle"
        android:text="@string/RedLED"
        android:textOff="OFF"
        android:textOn="ON"
        android:textSize="20sp"
        android:textStyle="bold" />

    <TextView
        android:id="@+id/myProject_capsense_status"
        android:layout_width="match_parent"
        android:layout_height="wrap_content"
        android:layout_marginTop="15dp"
        android:fontFamily="sans-serif-condensed"
        android:paddingLeft="15dp"
        android:paddingRight="15dp"
        android:layout_marginBottom="10dp"
        android:paddingTop="0dp"
        android:text="@string/capSenseHeader"
        android:textColor="#000"
        android:textSize="20sp"
        android:textStyle="bold" />

    <LinearLayout
        android:layout_width="match_parent"
        android:layout_height="match_parent"
        android:layout_marginLeft="15dp"
        android:layout_marginRight="15dp"
        android:layout_marginTop="15dp"
        android:orientation="horizontal">

        <TextView
            android:layout_width="wrap_content"
            android:layout_height="wrap_content"
            android:text="@string/capSenseValue"
            android:textSize="18sp" />

        <TextView
            android:id="@+id/myProject_capSenseValue"
            android:layout_width="match_parent"
            android:layout_height="wrap_content"
            android:layout_marginBottom="20dp"
            android:layout_marginLeft="10dp"
            android:text="@string/no_data"
            android:textAlignment="textEnd"
            android:textSize="18sp" />
    </LinearLayout>

</LinearLayout>
In the settings tab you already have a welcome message as a TextView and predefined Connect/Disconnect button.
Open myproject_tab_settings and add a Switch to acitvate/deactivate BLE notifications later.
Use for the Switch the id myProject_capsense_switch.
Your final layout should look like this.
<?xml version="1.0" encoding="utf-8"?>
<LinearLayout xmlns:android="http://schemas.android.com/apk/res/android"
xmlns:app="http://schemas.android.com/apk/res-auto"
android:layout_width="match_parent"
android:layout_height="wrap_content"
android:fontFamily="sans-serif-condensed"
android:orientation="vertical"
android:switchTextAppearance="@style/TextAppearance.AppCompat.Light.SearchResult.Subtitle"
android:scrollbars="vertical">

<TextView
    android:id="@+id/myProjectTextView"
    android:layout_width="match_parent"
    android:layout_height="wrap_content"
    android:layout_marginTop="15dp"
    android:layout_marginBottom="15dp"
    android:fontFamily="sans-serif-condensed"
    android:paddingLeft="15dp"
    android:paddingRight="15dp"
    android:paddingTop="15dp"
    android:text="@string/capledWelcomeSettings"
    android:textSize="18sp" />


<LinearLayout
    android:layout_width="match_parent"
    android:layout_height="wrap_content"
    android:orientation="horizontal"
    android:layout_marginTop="5dp"
    android:layout_marginLeft="15dp"
    android:layout_marginRight="15dp">

    <TextView
        android:layout_width="wrap_content"
        android:layout_height="wrap_content"
        android:fontFamily="sans-serif-condensed"
        android:switchTextAppearance="@style/TextAppearance.AppCompat.Light.SearchResult.Subtitle"
        android:text="@string/label_device_address"
        android:textSize="18sp" />

    <TextView
        android:id="@+id/myProject_device_address"
        android:layout_width="match_parent"
        android:layout_height="wrap_content"
        android:fontFamily="sans-serif-condensed"
        android:switchTextAppearance="@style/TextAppearance.AppCompat.Light.SearchResult.Subtitle"
        android:textSize="18sp"
        android:layout_marginLeft="10dp"/>
</LinearLayout>

<LinearLayout
    android:layout_width="match_parent"
    android:layout_height="wrap_content"
    android:orientation="horizontal"
    android:layout_marginLeft="15dp"
    android:layout_marginRight="15dp">

    <TextView
        android:layout_width="wrap_content"
        android:layout_height="wrap_content"
        android:fontFamily="sans-serif-condensed"
        android:switchTextAppearance="@style/TextAppearance.AppCompat.Light.SearchResult.Subtitle"
        android:text="@string/label_state"
        android:textSize="18sp" />


    <TextView
        android:id="@+id/myProject_connection_state"
        android:layout_width="match_parent"
        android:layout_height="wrap_content"
        android:text="@string/disconnected"
        android:textAlignment="textEnd"
        android:textSize="18sp"
        android:layout_marginLeft="10dp"/>
</LinearLayout>

<LinearLayout
    android:layout_width="match_parent"
    android:layout_height="wrap_content"
    android:orientation="horizontal"
    android:layout_marginLeft="15dp"
    android:layout_marginRight="15dp">

    <TextView
        android:layout_width="wrap_content"
        android:layout_height="wrap_content"
        android:text="@string/label_data"
        android:textSize="18sp" />

    <TextView
        android:id="@+id/myProject_data_value"
        android:layout_width="match_parent"
        android:layout_height="wrap_content"
        android:text="@string/no_data"
        android:textAlignment="textEnd"
        android:textSize="18sp"
        android:layout_marginLeft="10dp"
        android:layout_marginBottom="20dp"/>
</LinearLayout>

    <Switch
    android:id="@+id/myProject_capsense_switch"
    android:layout_width="match_parent"
    android:layout_height="wrap_content"
    android:layout_marginBottom="15dp"
    android:layout_marginLeft="15dp"
    android:layout_marginRight="15dp"
    android:layout_marginTop="15dp"
    android:fontFamily="sans-serif-condensed"
    android:switchTextAppearance="@style/TextAppearance.AppCompat.Light.SearchResult.Subtitle"
    android:text="@string/Notify"
    android:textSize="20sp"
    android:textStyle="bold"
    android:textOff="OFF"
    android:textOn="ON"/>

    <Button
        android:id="@+id/myProject_capled_connect"
        style="@android:style/Widget.Holo.Button"
        android:layout_width="match_parent"
        android:layout_height="wrap_content"
        android:layout_marginBottom="15dp"
        android:layout_marginLeft="15dp"
        android:layout_marginRight="15dp"
        android:layout_marginTop="30dp"
        android:fontFamily="sans-serif-condensed"
        android:text="@string/menu_connect"
        android:textStyle="bold" />
</LinearLayout>
Your UI is now complete and next you will add your BLE Service UUID to your project, so that you can enter your created activity. Now you will start to implement the Java and XML code for the application.
** Important: ** For your app there is a project called MyProject which is prepared for this tutorial.
The extension points where you have to write your own code are tagged with //TODO CUSTOM ABLE PROJECT:.
So that you can easily find the places where you have write your code inside the project.
To speed up the search you can use the //TODO: search function inside Android Studio as displayed below.
In MyProjectActivity you can initialize as many tabs as you need for your application.
Add a new case to getItem with a call of newInstance of your Fragment class.
getCount should return the number of your tabs, by default there are 2 tabs in this example.
In getPageTitle you map the case number of your Fragment class from getItem to representative String name.
Declare your GUI elements in MyProjectViewTab and MyProjectSettingsTab.
// MyProjectViewTab
private static Switch sRedLedSwitch;
private static boolean sRedLedSwitchState = false;

private static String sCapSenseValue = "-1"; // This is the No Touch value (0xFFFF)
private static ProgressBar sCapSenseProgressBar;
private static TextView sCapSenseDataView;
// MyProjectSettingsTab
private static Switch sCapSenseSwitch;
private static boolean sCapSenseNotifyState = false;
In the constructor onCreateView you should initialize the GUI element variables by mapping them to their XML ids inside your layout file.
Furthermore OnCheckedChangeListener should be activated for all switches, to have a callback, if a switch is toggled.
// MyProjectViewTab
sRedLedSwitch = rootView.findViewById(R.id.myProject_led_switch);
sCapSenseProgressBar = rootView.findViewById(R.id.myProject_capledProgressBar);
sCapSenseDataView = rootView.findViewById(R.id.myProject_capSenseValue);
sCapSenseProgressBar.setProgressTintList(ColorStateList.valueOf(Color.rgb(0, 159, 227)));
sCapSenseProgressBar.setProgressBackgroundTintList(ColorStateList.valueOf(Color.rgb(19, 77, 101)));
sCapSenseProgressBar.setProgress(0);

sRedLedSwitch.setOnCheckedChangeListener(new CompoundButton.OnCheckedChangeListener() {
    public void onCheckedChanged(CompoundButton buttonView, boolean isChecked) {
        writeLedCharacteristic(isChecked);
    }
});

sGreenLedSwitch.setOnCheckedChangeListener(new CompoundButton.OnCheckedChangeListener() {
    public void onCheckedChanged(CompoundButton buttonView, boolean isChecked) {
        writeGreenLedCharacteristic(isChecked);
    }
});
// MyProjectSettingsTab
sCapSenseSwitch = rootView.findViewById(R.id.myProject_capsense_switch);
sCapSenseSwitch.setOnCheckedChangeListener(new CompoundButton.OnCheckedChangeListener() {
    public void onCheckedChanged(CompoundButton buttonView, boolean isChecked) {
        writeCapSenseNotification(isChecked);
        sCapSenseNotifyState = isChecked;
    }
});
Every new Activity should be registered in the AndroidManifest.xml of the ABLE app.
Therefor add your ActivityClass to the <application> ... </applciation> part of the AndroidManifest.xml.
Also register a receiver for the Service Registry intent message to add your BLE Service to the Servie Registry.
For the CapLED example we add:
<activity android:name="de.tudarmstadt.es.capled.CapLEDActivity" />
<receiver
    android:name="org.able.myProject.MyProjectServiceRegistryUpdater"
    android:enabled="true">
    <intent-filter>
        <action android:name="org.able.core.action.RegisterUuidToActivityMapping" />
    </intent-filter>
</receiver>
Further details about the AndroidManifest.xml you can find here.
If you are using Android version 8.0 (Oreo) and above, broadcast receiver definitions inside the Android Manifest aren't supported anymore. Therefore you should declare your broadcast receiver inside core/AbleServiceRegistry.java in the initializeServices(Context context) method.
Here is a code example how your broadcast receiver could look like.
BroadcastReceiver brMyProject = new MyProjectServiceRegistryUpdater();
IntentFilter myProjectFilter = new IntentFilter("org.able.myproject.MyProjectServiceRegistryUpdater");
myProjectFilter.addAction(AbleServiceRegistryUpdatingBroadcastReceiver.INTENT_ACTION_UPDATE_UUID_MAPPING);
context.registerReceiver(brMyProject, myProjectFilter);
More details about broadcast receiver in Android Java you can find [here].(https://developer.android.com/guide/components/broadcasts#java)
MyProjectConstants add all UUIDs of your services and characteristics.
For example you can use these UUIDs and change the UUIDs inside your GATT Server.
UUID MYPROJECT_SERVICE_UUID = UUID.fromString("00000000-0000-1000-8000-00805f9b34f0");
UUID MYPROJECT_LED_CHARACTERISTIC_UUID = UUID.fromString("00000000-0000-1000-8000-00805f9b34f1");
UUID MYPROJECT_GREEN_LED_CHARACTERISTIC_UUID = UUID.fromString("00000000-0000-1000-8000-00805f9b34f3");
UUID MYPROJECT_CAP_CHARACTERISTIC_UUID = UUID.fromString("00000000-0000-1000-8000-00805f9b34f2");
UUID MYPROJECT_NOTIFICATION = UUID.fromString("00002902-0000-1000-8000-00805f9b34fb");
In MyProjectViewTab deactivate the LED switch and set it to false for the disconnected GATT state in gattDisconnected.
sRedLedSwitch.setChecked(false);
sRedLedSwitch.setEnabled(false);
Similar to that add this code for MyProjectSettingsTab to deactivate the CapSense switch.
sCapSenseSwitch.setChecked(false);
sCapSenseSwitch.setEnabled(false);
Now you need to initialize the BLE GATT variables in gattServiceDiscovered`.
// MyProjectViewTab
BluetoothGattService mService = BLEService.mBluetoothGatt.getService(MyProjectConstants.MYPROJECT_SERVICE_UUID);

sRedLedCharacteristic = mService.getCharacteristic(MyProjectConstants.MYPROJECT_LED_CHARACTERISTIC_UUID);
sCapsenseCharacteristic = mService.getCharacteristic(MyProjectConstants.MYPROJECT_CAP_CHARACTERISTIC_UUID);
sCapsenseNotification = sCapsenseCharacteristic.getDescriptor(MyProjectConstants.MYPROJECT_NOTIFICATION);

readLedCharacteristic();

sRedLedSwitch.setEnabled(true);
// MyProjectSettingsTab
BluetoothGattService mService = BLEService.mBluetoothGatt.getService(MyProjectConstants.MYPROJECT_SERVICE_UUID);

mCapsenseCharacteristic = mService.getCharacteristic(MyProjectConstants.MYPROJECT_CAP_CHARACTERISTIC_UUID);
mCapsenseNotification = mCapsenseCharacteristic.getDescriptor(MyProjectConstants.MYPROJECT_NOTIFICATION);

sCapSenseSwitch.setEnabled(true);
As soon as data from the GATT server arrive dataAvailable will be called.
In MyProjectViewTab update the switches and read the CapSense value.
// MyProjectViewTab

if (sRedLedSwitchState) {
    sRedLedSwitch.setChecked(true);
} else {
    sRedLedSwitch.setChecked(false);
}
if(sGreenLedSwitchState)
    sGreenLedSwitch.setChecked(true);
else
    sGreenLedSwitch.setChecked(false);

String uuid = BLEService.getmCharacteristicToPass().getUuid().toString();

if (uuid.equals(MyProjectConstants.MYPROJECT_CAP_CHARACTERISTIC_UUID.toString())) {
    sCapSenseValue = BLEService.getmCharacteristicToPass().getIntValue(BluetoothGattCharacteristic.FORMAT_SINT16, 0).toString();
    int capSensePosition = Integer.parseInt(sCapSenseValue);
    setCapSenseView(capSensePosition);
}
Using ABLE a simple read characteristic looks like this.
BLEService.genericReadCharacteristic(mLedCharacteristic);
If you want for example to write a value of a characteristic to turn on a LED you can call this functions:
mLedCharacteristic.setValue(byteVal);
BLEService.genericWriteCharacteristic(mLedCharacteristic);
Similar to that descriptions of a characteristic can be changed:
mCapsenseNotification.setValue(byteVal);
BLEService.mBluetoothGatt.writeDescriptor(mCapsenseNotification);
So add to writeLedCharacteristic():
byte[] byteVal = new byte[1];
if (value) {
    byteVal[0] = (byte) (1);
} else {
    byteVal[0] = (byte) (0);
}
Log.i(TAG, "LED " + value);
sRedLedSwitchState = value;
sRedLedCharacteristic.setValue(byteVal);
BLEService.genericWriteCharacteristic(sRedLedCharacteristic);
readLedCharacteristic() should look like this:
if (BLEService.existBluetoothAdapter() == false ||
        BLEService.existBluetoothGatt() == false) {
    Log.w(TAG, "BluetoothAdapter not initialized");
    return;
}
BLEService.genericReadCharacteristic(sRedLedCharacteristic);
Finally the progress bar of the CapSense should be updated in setCapSenseView regarding to the actual sensor data.
if (sCapSenseValue.equals("-1")) {
    sCapSenseProgressBar.setProgress(0);
    sCapSenseDataView.setText(R.string.no_data);
} else {
    sCapSenseProgressBar.setProgress(capSensePosition);
    sCapSenseDataView.setText(sCapSenseValue);
}
In MyProjectSettingsTab write a solution like this, to change the descriptior value.
BLEService.mBluetoothGatt.setCharacteristicNotification(mCapsenseCharacteristic, value);
byte[] byteVal = new byte[1];
if (value) {
    byteVal[0] = 1;
} else {
    byteVal[0] = 0;
}
Log.i(TAG, "CapSense Notification " + value);
mCapsenseNotification.setValue(byteVal);
BLEService.mBluetoothGatt.writeDescriptor(mCapsenseNotification);
You can now build your project and run it on your device.