Welcome to the ERNI Embedded Community! Today we will work with Turtlebot3 robots. Here you will find some documentation and some tips to perform the tests.
Are you ready? Let's go!
- Access to the Raspberry SD card with Linux
- VM tip: Connect it with an USB reader, and activate it in Devices->USB
- Edit the /etc/network/interfaces file:
COMPUTER$ sudo nano /etc/network/interfaces- And add the following text:
Auto wlan0
iface wlan0 inet dhcp
wpa-ssid “Network_name”
wpa-psk “password”$ ifconfig #Network
$ nmap -sP 192.168.0.1-255 # Example to check connected devices
$ ssh [email protected] # Example to access the robot (user@ip)- VM tips:
- In Settings -> Network -> Enable a second Adapter
- Attached to: Bridged adapter
- NOTE: VM from EPD has:
- User: student
- Password: EPD_2018
- NOTE: ERNI robots have:
- User: ubuntu
- Password: ubuntu
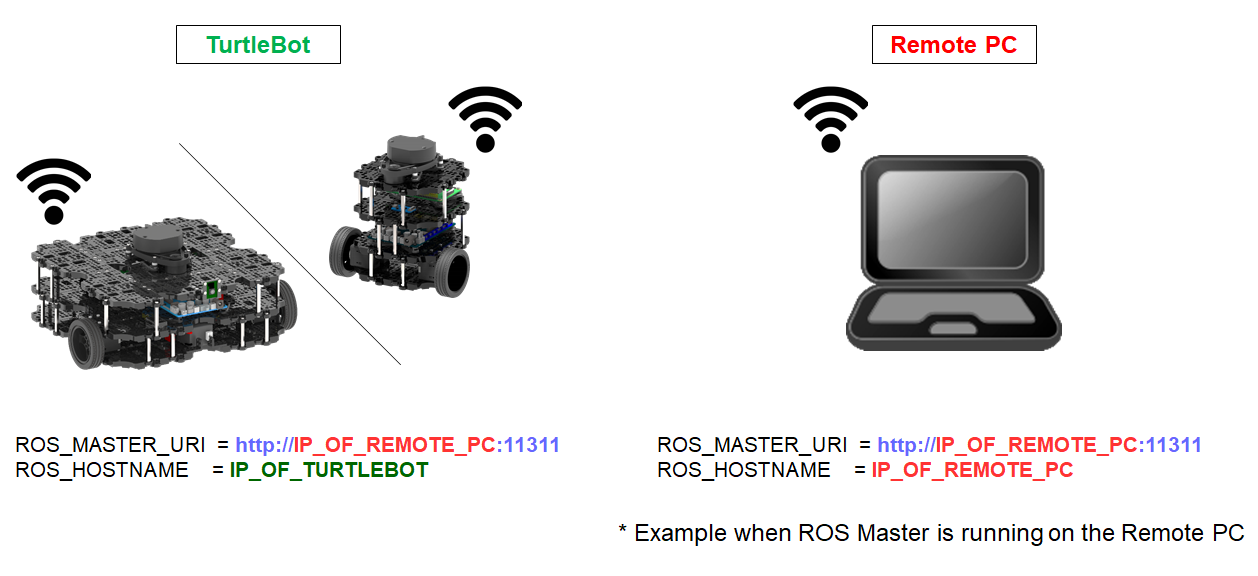
- Set ROS connection to the remote computer:
ROBOT$ export ROS_MASTER_URI=http://COMPUTER_IP:11311
ROBOT$ export ROS_HOSTNAME=ROBOT_IP # export ROS_HOSTNAME=$(hostname -I)
ROBOT$ export TURTLEBOT3_MODEL=burger- Note: This change only affects the current terminal window, if you want to keep changes with new terminals:
ROBOT$ echo "export ROS_MASTER_URI=http://COMPUTER_IP:11311" >> ~/.bashrc
ROBOT$ echo "export ROS_HOSTNAME=ROBOT_IP" >> ~/.bashrc
ROBOT$ echo "export TURTLEBOT3_MODEL=burger" >> ~/.bashrc
ROBOT$ source ~/.bashrc- Change robot name:
ROBOT$ sudo gedit /etc/hosts
ROBOT$ sudo gedit /etc/hostname- Set ROS connection to your own ROS master:
COMPUTER$ export ROS_MASTER_URI=http://COMPUTER_IP:11311
COMPUTER$ export ROS_HOSTNAME=COMPUTER_IP # export ROS_HOSTNAME=$(hostname -I)
COMPUTER$ export TURTLEBOT3_MODEL=burger- Note: This change only affects the current terminal window, if you want to keep changes with new terminals:
COMPUTER$ echo "export ROS_MASTER_URI=http://COMPUTER_IP:11311" >> ~/.bashrc
COMPUTER$ echo "export ROS_HOSTNAME=COMPUTER_IP" >> ~/.bashrc
COMPUTER$ echo "export TURTLEBOT3_MODEL=burger" >> ~/.bashrc
COMPUTER$ source ~/.bashrc- Change computer name:
COMPUTER$ sudo gedit /etc/hosts
COMPUTER$ sudo gedit /etc/hostname- First start the ROS master in the computer:
COMPUTER$ roscore- In the robot, introduce this command to start the robot sensors:
ROBOT$ roslaunch turtlebot3_bringup turtlebot3_robot.launch- Now the robot is ready to be controlled by any computer ROS node.
Control the robot from keyboard:
COMPUTER$ roslaunch turtlebot3_teleop turtlebot3_teleop_key.launchControl the robot from PS3 controller:
COMPUTER$ sudo apt-get install ros-kinetic-joy ros-kinetic-joystick-drivers ros-kinetic-teleop-twist-joy- To configure the enabling button:
COMPUTER$ roscd teleop_twist_joy
COMPUTER$ sudo nano config/ps3.config.yaml- Enable button to 7: R2 button
COMPUTER$ roslaunch teleop_twist_joy teleop.launch joy_dev:=/dev/input/js2Note: Remember to activate the USB device in the VM, in Devices->PS3 Controller
COMPUTER$ roslaunch turtlebot3_slam turtlebot3_slam.launch slam_methods:=gmapping- Move the robot around and scan the environment (with teleop nodes). Once you have successfully created your map:
COMPUTER$ rosrun map_server map_saver -f ~/map_name- To perform Frontier exploration:
COMPUTER$ sudo apt-get install ros-kinetic-frontier-exploration ros-kinetic-navigation-stage #needed packages
COMPUTER$ roslaunch turtlebot3_slam turtlebot3_slam.launch slam_methods:=frontier_exploration
If you want to tune the SLAM parameters you can check the official guide: http://emanual.robotis.com/docs/en/platform/turtlebot3/slam/#tuning-guide
COMPUTER$ roslaunch turtlebot3_navigation turtlebot3_navigation.launch map_file:=$HOME/map_name.yaml- After that, estimate the initial pose with the Rviz button: “2D Pose Estimate”
- To fine tune the Pose estimation, move the robot using the teleop_node until the green arrows are concentrated in a small area around the robot.
- After that, you will be able to send navigation goals with the “2D Nav Goal” button.
If you want to tune the navigation parameters you can check the official guide: http://emanual.robotis.com/docs/en/platform/turtlebot3/navigation/#tuning-guide
We have to install the turtlebot3_applications and turtlebot3_applications_msgs packages in the Computer.
COMPUTER$ sudo apt-get install ros-kinetic-ar-track-alvar
COMPUTER$ sudo apt-get install ros-kinetic-ar-track-alvar-msgs
COMPUTER$ mkdir ~/catkin_ws && mkdir ~/catkin_ws/src
COMPUTER$ cd ~/catkin_ws/src
COMPUTER$ git clone https://github.com/ROBOTIS-GIT/turtlebot3_applications.git
COMPUTER$ git clone https://github.com/ROBOTIS-GIT/turtlebot3_applications_msgs.git
COMPUTER$ cd ~/catkin_ws && catkin_make
Install scikit-learn, NumPy and ScyPy packages with below commands in the Computer:
COMPUTER$ sudo apt-get install python-pip
COMPUTER$ sudo pip install -U scikit-learn numpy scipy
COMPUTER$ sudo pip install --upgrade pip
This time, we have to bring up the robot in a slightly different way:
- First start the ROS master in the computer:
COMPUTER$ roscore- In the robot, introduce this command to start the robot sensors. Now we need to change the frame_id of the robot from base_scan to odom:
ROBOT$ roslaunch turtlebot3_bringup turtlebot3_robot.launch set_lidar_frame_id:=odom- After that, execute the turtlebot3_follow_filter and turtlebot3_follower nodes in the Computer, in separated terminals:
COMPUTER$ roslaunch turtlebot3_follow_filter turtlebot3_follow_filter.launch
COMPUTER$ roslaunch turtlebot3_follower turtlebot3_follower.launchCOMPUTER$ rostopic list
COMPUTER$ rostopic info /topic_name
COMPUTER$ rostopic echo /topic_name
COMPUTER$ rosnode list
COMPUTER$ rosnode info /node_name
COMPUTER$ rosnode kill /node_name
rosbag record topic_name1 topic_name2
rosbag record -o session1 -a #prefix: session1, all topics
rosbag play rosbag_name- One of the most useful tools is the RViz visualizer, that allows a good visualization and interaction with the robot.
COMPUTER$ rviz #or rosrun rviz rviz- Another useful tool is rqt_graph, where you can check the running ROS structure in a graph:
COMPUTER$ rqt_graph #or rosrun rqt_graph rqt_graph- Another tool to better understand the structure in robots is rqt_tf_tree. This one shows the relationship between the transformation frames (Our tf structure is quite simple).
COMPUTER$ rosrun rqt_tf_tree rqt_tf_tree
