-
Notifications
You must be signed in to change notification settings - Fork 3
Adding a Ready To Begin Dialog
In this tutorial, we'll add a Ready-to-begin dialog, which will prompt the user to begin the configuration process. Once again, this tutorial will cover a lot of the same material as have previous tutorials. It will demonstrate some advanced setting-store and dialog-action techniques, though.
Setup
This tutorial assumes that you have completed the tutorial, Adding a License Dialog, and have a version of the engine that will start and attempt to contact your web-server.
A note on examples
Our xml files are starting to get too long to include their full text inline in these tutorials. When you see this symbol  in the text, you can click on it to view the xml in question.
Creating the basic dialog and wiring it into the tasklist
- Add the following xml to the
Bannersblock of your banners.xml file:
<SimpleBanner name="ReadyBanner" height="450" width="500">
   <Content>
     <SimpleParagraph margin="0,24,0,36">
       <Content>
         <DirectTextContent/>
       </Content>
     </SimpleParagraph>
     <FramedButton defaultButton="true" verticalAlignment="Center" fontSize="24" alignment="Center">
       <Content>
         <DirectTextContent>Start</DirectTextContent>
       </Content>
     </FramedButton>
     <SimpleParagraph alignment="Center" margin="20,24,20,0" fontSize="14">
       <Content>
         <DirectTextContent>Click start to begin the !ApplicationTitle! process.</DirectTextContent>
       </Content>
     </SimpleParagraph>
   </Content>
   <Buttons>
     <DisabledButton>
       <Target>NextButton</Target>
       <Text>Next</Text>
     </DisabledButton>
     <ResultButton>
       <Target>BackButton</Target>
       <Text>Back</Text>
       <Result>ControlResults.BackResult</Result>
     </ResultButton>
     <UrlButton>
       <Target>HelpButton</Target>
       <Text>Help</Text>
       <Value>https://certdev0.incommontest.org/incommon/index.html</Value>
     </UrlButton>
   </Buttons>
</SimpleBanner>-
Add the following xml block to the end of
mainrole-branch in yourtasklist.xmlfile:<UserInterface.ShowBorderedBannerModal> <Properties> <Dialog>Main dialog</Dialog> <Banner>ReadyBanner</Banner> </Properties> </UserInterface.ShowBorderedBannerModal>
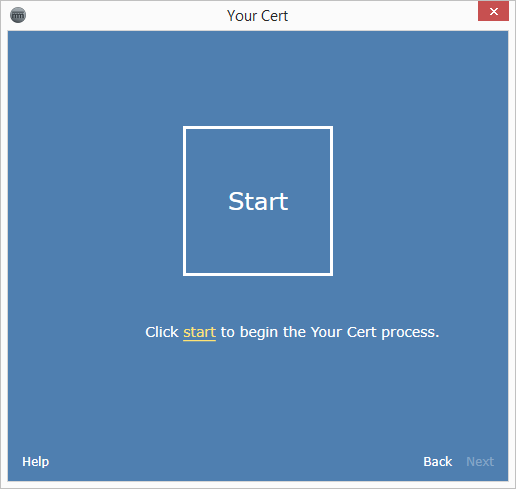
3. Upload tasklist.xml [](examples/0803_tasklist.xml) and banners.xml [](examples/0803_banners.xml) to your server and run the engine. The engine should now show our ready-to-begin dialog after we authenticate and accept the license agreement:

As you can see, there's not much to this dialog. The start button will light up if you hover over it, but clicking it doesn't do anything yet.
4. We need to enable our start button. Bottom dialog buttons ('Next', 'Back', 'Help', etc.) are controlled by the `<Buttons>` block of a banner's xml, but 'content' buttons (our new start button, for example) are controlled by temporary settings. This gives us a lot of flexibility in terms of controlling the user experience using banner content, but it's slightly more complicated to wire up.
First, we need to associate our start button with a settings key. To do this, modify the button's xml as follows:
```xml
<FramedButton settingKey="normal install mode" controlKey="normal install mode" defaultButton="true" verticalAlignment="Center" fontSize="24" alignment="Center">
<Content>
<DirectTextContent>Start</DirectTextContent>
</Content>
</FramedButton>
Here, we've specified a settings key and a control key. The control key is necessary because actions are associated internally with controls.
Now, when the user clicks our start button, it will set the value of the temporary setting 'normal install mode' to 'true.'
- Next, we need to add an action to our banner that will watch the 'normal install mode' temporary settings key and take action if its value equals 'true.'
To do this, modify the ReadyBanner xml to add the following action block:
<Actions>
  <ReturnResultAction result="ControlResults.NextResult">
    <Conditions.Any>
      <Settings.SettingEquals key="normal install mode" value="true" ignoreCase="true"/>
    </Conditions.Any>
    <ControlKey>normal install mode</ControlKey>
  </ReturnResultAction>
</Actions>
You'll want to add this block to the end of the banner, after its Buttons element:
<SimpleBanner name="ReadyBanner" height="450" width="500">
  <Content>
    <SimpleParagraph margin="0,24,0,36">
      <Content>
        <DirectTextContent/>
      </Content>
    </SimpleParagraph>
    <FramedButton settingKey="normal install mode" defaultButton="true" verticalAlignment="Center" fontSize="24" alignment="Center">
      <Content>
        <DirectTextContent>Start</DirectTextContent>
      </Content>
    </FramedButton>
    <SimpleParagraph alignment="Center" margin="20,24,20,0" fontSize="14">
      <Content>
        <DirectTextContent>Click start to begin the !ApplicationTitle! process.</DirectTextContent>
      </Content>
    </SimpleParagraph>
  </Content>
  <Buttons>
    <DisabledButton>
      <Target>NextButton</Target>
      <Text>Next</Text>
    </DisabledButton>
    <ResultButton>
      <Target>BackButton</Target>
      <Text>Back</Text>
      <Result>ControlResults.BackResult</Result>
    </ResultButton>
    <UrlButton>
      <Target>HelpButton</Target>
      <Text>Help</Text>
      <Value>https://certdev0.incommontest.org/incommon/index.html</Value>
    </UrlButton>
  </Buttons>
  <Actions>
    <ReturnResultAction result="ControlResults.NextResult">
      <Conditions.Any>
        <Settings.SettingEquals key="normal install mode" value="true" ignoreCase="true"/>
      </Conditions.Any>
      <ControlKey>normal install mode</ControlKey>
    </ReturnResultAction>
  </Actions>
</SimpleBanner>
This action block will wait until the temporary setting value associated with 'normal install mode' equals 'true' and then return a Next result. This, in turn, will close the dialog and move to the next task in our task list.
Again, note that our new action specifies the control key associated with our button.
- We can also use settings and action blocks to enable hyperlinks in the content. While we're here, let's add a link to our start text that will serve as the equivalent of clicking the start button.
To do this, modify the 'Click start to begin the !ApplicationTitle! process.' paragraph as follows:
<SimpleParagraph alignment="Center" margin="20,24,20,0" fontSize="14">
  <Content>
    <DirectTextContent>Click start to begin the !ApplicationTitle! process.</DirectTextContent>
  </Content>
  <Links>
    <SettingsLink target="normal install mode">
      <DirectTextContent>start</DirectTextContent>
    </SettingsLink>
  </Links>
</SimpleParagraph>
This will turn the word 'start' of 'Click start to begin the !ApplicationTitle! process.' into a hyperlink that, when clicked, will set the value of the 'normal install mode' temporary setting to true.
You might be wondering why we don't need to specify a control key here, like we did for our start button. It's complicated, but we don't need to define a separate action for our link, because the action we created for the start button is already monitoring the 'normal install mode' temporary setting.
- Upload tasklist.xml
 and banners.xml
  to your server and run the engine. The start button of your Ready-To-Begin dialog should now work, as should its start link:

Conclusion
In this tutorial we learned how to use temporary settings values and banner actions together. This was a relatively simple tutorial -- we created a banner with a button and a link that manipulated the same temporary settings value.
It would not be difficult to extend the concepts here to create a banner with multiple buttons that would then drive different task list outcomes. For example, we could create one button for a normal install mode and another for an advanced install mode. We could then configure our task list to run different branches depending on the value of the temporary settings associated with each button, etc.