-
Notifications
You must be signed in to change notification settings - Fork 848
2.1. Debugging
Alas 的入口文件有两个:调度器 alas.py 和网页后端 gui.py。由于很多游戏玩法会消耗游戏帐号上的大量资源,或者消耗大量时间,甚至一些内容一天只能操作一次,调试的时候不能像平时使用一样执行完整流程。大多数时候调试都是脱离游戏,根据一张或者几张游戏截图进行的。为此,Alas 所有的模块都是可以独立运行的,不依赖 GUI 也不依赖用户配置。
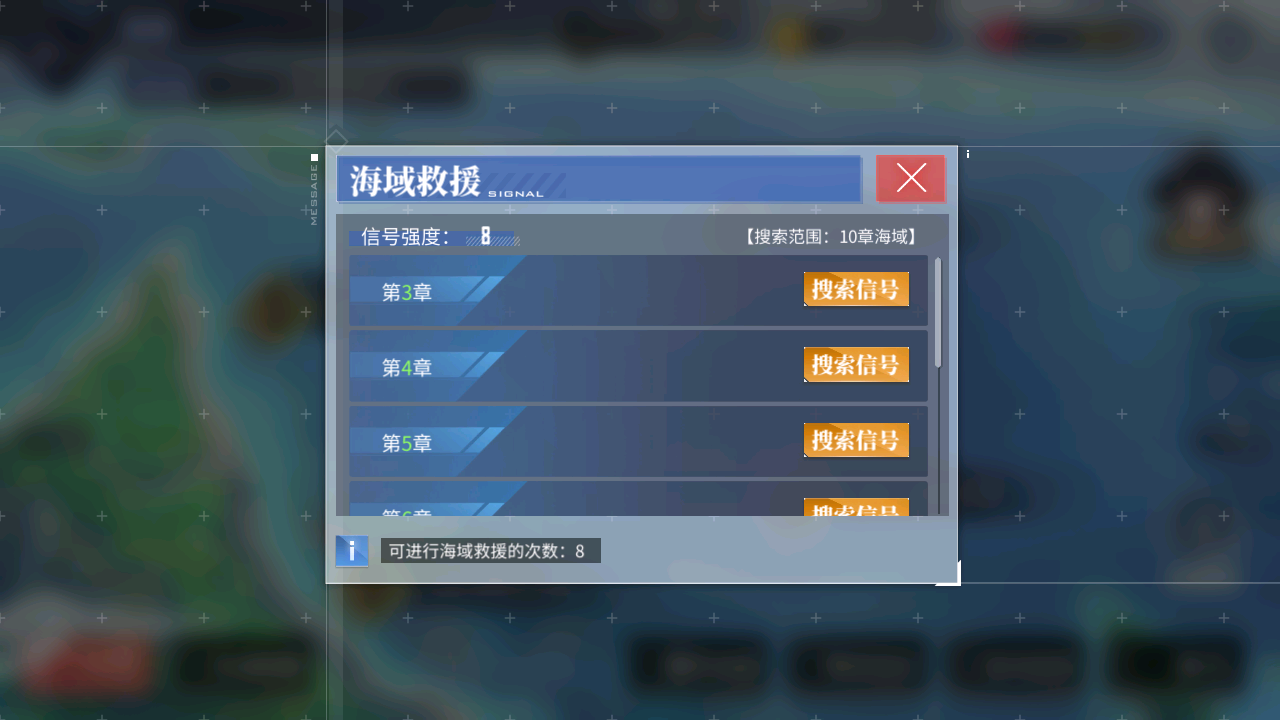
假设 Alas 无法识别 SOS 模块中的 SIGNAL_LIST_CHECK。

那么你需要将游戏切换到 SOS 信号列表的界面,截图(使用模拟器的截图功能即可)。

在 module/sos/sos.py 文件的末尾添加这些并运行:
当然,你也可以新建一个文件,导入 SOS 模块和相关 assets,并在
if __name__ == '__main__':下运行,这会更加严谨。不加if __name__ == '__main__':问题不大,因为 Alas 是单进程单线程的。
az = CampaignSos('alas', task='Sos')
az.image_file = r'xxxxx.png'

print(az.appear(SIGNAL_LIST_CHECK))
INFO | +---------------------------------------------+
INFO | | START |
INFO | +---------------------------------------------+
INFO | [Server] cn
read: ./config\alas.json
read: ./module/config/argument/args.json
INFO | Bind task Sos
INFO | <<< DEVICE >>>
INFO | [Adb_binary] adb.exe
INFO | already connected to 127.0.0.1:59865
newCommandTimeout updated to 168h0m0s
True
结果是 True,识别没有问题。同时调试过程中产生的 log 会单独保存,比如直接运行 test.py,log 将保存至 log/2021-11-06_test.log。
逐句讲解。
创建 CampaignSos 对象。Alas 模块都继承自 ModuleBase 类,这是 ModuleBase 的定义。
def __init__(self, config, device=None, task=None):-
config,用户配置名称,对应
config/{config}.json。也可以使用template。 - device,Device 对象,一般不需要输入,会根据 config 自动创建。
-
task,任务名称。对应任务的用户设置将绑定到变量上。一般来说,可以绑定为
Alas,也就是用户界面中的 “Alas 设置”,包含模拟器Serial,游戏包名等。
读取本地文件,存入 Alas 的截图缓存中,免去从模拟器截图。简单粗暴却又实用,这是它的定义。
@property
def image_file(self):
    return self._image_file

@image_file.setter
def image_file(self, value):
    """
    For development.
    Load image from local file system and set it to self.device.image
    Test an image without taking a screenshot from emulator.
    """
    if isinstance(value, np.ndarray):
        value = Image.fromarray(value)
    elif isinstance(value, str):
        value = Image.open(value).convert('RGB')

self.device.image = value在导入任何 Alas 内容之前,切换服务器。
import module.config.server as server
server.server = 'en'
假设我们正在重构剧情选项的识别,收集到了不同选项数量的图片,希望测试 _story_option_buttons() 是否都能正确识别。
from module.statistics.utils import load_folder
from module.handler.info_handler import InfoHandler

# 存放截图的目录
folder = r'xxxxx'
az = InfoHandler('alas', task='Alas')
for file in load_folder(folder).values():
    az.image_file = file
    print(az._story_option_buttons())
[STORY_OPTION_1_OF_2, STORY_OPTION_2_OF_2]
[STORY_OPTION_1_OF_2, STORY_OPTION_2_OF_2]
[STORY_OPTION_1_OF_2, STORY_OPTION_2_OF_2]
[STORY_OPTION_1_OF_1]
[STORY_OPTION_1_OF_1]
假设你想了解 Alas 的章节切换是如何工作的。
from module.campaign.campaign_ui import CampaignUI

# 在运行之前,需要手动将游戏切换至主线章节界面。
az = CampaignUI('alas', task='Alas')
# 出于优化目的,Alas 许多方法会复用上一张截图,因此需要先截一张图。
az.device.screenshot()
# 切换至第 7 章。
az.campaign_ensure_chapter(index=7)与大多数脚本需要先切换至第一章对齐,再切换至需要的章节不同,campaign_ensure_chapter 是基于 OCR 的,不会有多余的操作。你也可以故意搞事,比如手动点击反方向,观察 Alas 是如何纠错的。
Alas 所有的模块都是可以独立运行的,不依赖 GUI 也不依赖用户配置,每个模块通常只有一个方法是依赖用户配置的,这一点在开发新模块的时候尤其需要注意。
以委托模块(module.commission)为例。在 commission.py 中,只有 run() 方法是给调度器使用的,其他方法例如收委托(commission_receive)和派委托(commission_start)都可以直接调用。不会因为某个选项没有开启,导致测试内容被跳过。
一些方法也会提供两份。例如,大世界中的 fleet_repair 必然会将舰队移动至港口并维修。handle_port_repair 则会根据用户配置和当前舰队的血量决定是否进行维修。
from PIL import Image

from module.config.config import AzurLaneConfig
from module.map_detection.view import *

# 截图文件
file = r'xxxxx'

class Config:
    # 把地图文件中的 Config 粘贴到这里
    pass

md = View(AzurLaneConfig('template').merge(Config()))
image = np.array(Image.open(file).convert('RGB'))

# 如果 log 里有 homo_storage 的值,可以在这里载入。
# sto = (...)
# md.backend.load_homography(storage=sto)

md.load(image)
md.predict()
md.show()
md.backend.draw()Getting Started
- Installation [EN]
- Installation [CN]
- Installation With Docker [EN]
- Emulator Support [CN]
- FAQ [EN/CN]
- FAQ [JP]
- Troubleshooting [EN]
- Another Installation guide
- Research Filter String [EN]
- Research Filter String [CN]
- Reward Shop Filter String [EN/CN]
- Onepush Configuration [EN]
- Onepush Configuration [CN]
Development
- Perspective [CN]
- Perspective [EN]
- Debug perspective [CN]
- Debug perspective [EN]
- Item Statistics [EN]
- 1. Start
- 2.1. Debugging
- 2.2. Multi-server support
- 3.1. Utils
- 3.2. Decorators
- 3.3. Log
- 3.4. Exception
- 4.1. Detection objects
- 4.2. UI control
- 4.3. OCR
- 4.4. State loop
- 5.1. Local Map
- 5.2. Create globe Map
- 5.3. Globe Map
- 6.1. GUI Option
MISC