-
Notifications
You must be signed in to change notification settings - Fork 6
Creating a basic simulation
This post will take you through the process of creating a basic simulation with Presage2. This guide assumes you have a project based off the eclipse-quickstart project (see Setting up Eclipse for a guide on setting this up).
We will be writing the following classes in this guide:
- A basic agent who implements a random walk in the environment.
- A simulation specification which defines the simulation parameters and required modules and initialises a simulation scenario based on these.
To create an agent we create a class which extends AbstractParticipant. If you are using Eclipse or similar IDE the new class wizard will generate something like the following code:
package myagents;

import uk.ac.imperial.presage2.core.messaging.Input;
import uk.ac.imperial.presage2.util.participant.AbstractParticipant;

public class MyAgent extends AbstractParticipant {

	@Override
	protected void processInput(Input arg0) {
		// TODO Auto-generated method stub

	}

}
We can ignore the processInput method for the moment. Firstly, as we want our agent to be mobile, it will have a Location associated with it. Therefore we should create a variable to store this information. We will also need a class constructor to initialise the agent with a starting location, as well as it’s name and identifier:
Location myLoc;

MyAgent(UUID id, String name, Location myLoc) {
	super(id, name);
	this.myLoc = myLoc;
}
As our location is shared state the agent should share this with the environment when it registers. This is because all shared state is stored by the environment, which controls access to it to ensure the rules of the environment are upheld. Any state the agent wishes to send to the environment is put in a set of ParticipantSharedState objects generated by the agent’s getSharedState function. We override this to add our location state to the set:
@Override
protected Set<ParticipantSharedState> getSharedState() {
	Set<ParticipantSharedState> ss = super.getSharedState();
	ss.add(ParticipantLocationService.createSharedState(getID(), myLoc));
	return ss;
}
Note we are careful to preserve any state generated in the super class. This is good practice if we wish to create agent hierarchies.
Generally we do not have to manually create the ParticipantSharedState object as most EnvironmentServices will have utility methods to generate the shared state they use. In this case the ParticipantLocationService does this for us.
Data in our shared state are modified externally, through actions and other influences. Therefore we have to continually query the environment each time step for its value. To do this the agent needs an instance of ParticipantLocationService which provides utility functions for retrieving our up to date location. The agent can load services such as this when it is initialised by the simulation, in its initialise method:
// variable to keep the location service.
ParticipantLocationService locationService;

@Override
public void initialise() {
	super.initialise();
	// get the ParticipantLocationService.
	try {
		this.locationService = getEnvironmentService(ParticipantLocationService.class);
	} catch (UnavailableServiceException e) {
		logger.warn(e);
	}
}
Note that when getting an environment service an exception may be thrown if the environment has not provided this service. This may be intentional if you want agents who are able to dynamically adjust to the presence of different environmental conditions.
Now we can write the agent’s execute method, which is called every time cycle and thus represents the core workings of the agent. Here we can query the environment for our current location. The agent should also generate actions to order to create its behaviour. In this case we are implementing a random walk, so we create a Move in a random direction then submit it to the environment:
@Override
public void execute() {
	myLoc = locationService.getAgentLocation(getID());

	logger.info("My location is: "+ this.myLoc);

	// Create a random Move.
	int dx = Random.randomInt(2) - 1;
	int dy = Random.randomInt(2) - 1;
	Move move = new Move(dx, dy);

	// submit move action to the environment.
	try {
		environment.act(move, getID(), authkey);
	} catch (ActionHandlingException e) {
		logger.warn("Error trying to move", e);
	}
}
The environment may throw an exception when we submit the action. This could be either due to a lack of an ActionHandler which can handle the action, or that the action handler which was handling it refused to do so (usually due to a violation of the environment rules). If the move is accepted then the agent should expect that his location will have changed in accordance with the move magnitude when we read it’s value in the next timestep.
The simulation specification is the actual runnable part of Presage2. It draws together various components, plus your code, into a scenario to simulate. There are three pieces to the simulation specification:
- Parameters: These are externally instantiated variables. They are the variables you want to control in your simulation.
- Modules: These define what to load into your simulation.
- Scenario modification: The modules given above will create the majority of your scenario, however some parts you will need more direct control over, for example, instantiating the agents in the scenario based on your simulation parameters.
Extend InjectedSimulation and add a public constructor from the super class as follows:
package myagents;

import uk.ac.imperial.presage2.core.simulator.InjectedSimulation;

public class MySimulation extends InjectedSimulation {

	public MySimulation(Set<AbstractModule> modules) {
		super(modules);
	}

}Parameters are created by simply annotating public fields with @Parameter. Values will be dynamically loaded in when the simulation is run.
For our simple system we want to have a parameter for the size of the environment which the agents can move in and one to specify how many agents to create:
@Parameter(name="size")
public int size;

@Parameter(name="agents")
public int agents;Presage2 uses Google Guice for dependency injection to define and dynamically load the components used in a simulation. Mappings of components to use are defined in modules, and we can combine as many of these modules as we want to use (as long as they don’t conflict). Presage2 provides factories to create modules in common configurations to make things easier.
We define a set of modules to use in the getModules method. For our system we need the following:
- A 2D simulation Area whose size is dictated by the size parameter.
- An environment with a MoveHandler and which provides a ParticipantLocationService to agents.
- No network (as we’re not using it).
We define this with the following:
@Override
protected Set<AbstractModule> getModules() {
	Set<AbstractModule> modules = new HashSet<AbstractModule>();

	// 2D area
	modules.add(Area.Bind.area2D(size, size));
	// Environment with MoveHandler and ParticipantLocationService
	modules.add(new AbstractEnvironmentModule()
		.addActionHandler(MoveHandler.class)
		.addParticipantEnvironmentService(ParticipantLocationService.class));
	// No network
	modules.add(NetworkModule.noNetworkModule());

	return modules;
}Finally we need to add our agents to the scenario. We use the parameters we defined to choose how many agents to create and instantiate them with a location within the simulation area.
@Override
protected void addToScenario(Scenario s) {
	for (int i = 0; i < agents; i++) {
		int initialX = Random.randomInt(size);
		int initialY = Random.randomInt(size);
		Location startLoc = new Location(initialX, initialY);
		s.addParticipant(new MyAgent(Random.randomUUID(), "agent"+ i, startLoc));
	}
}Now we’re ready to simulate the system. To do so we run the simulation specification class with parameters matching the following, with relevant values substituted in.
{simulation class name} finishTime={no. of time steps to execute} ({parameter}={value})*
In our case we might run something like this:
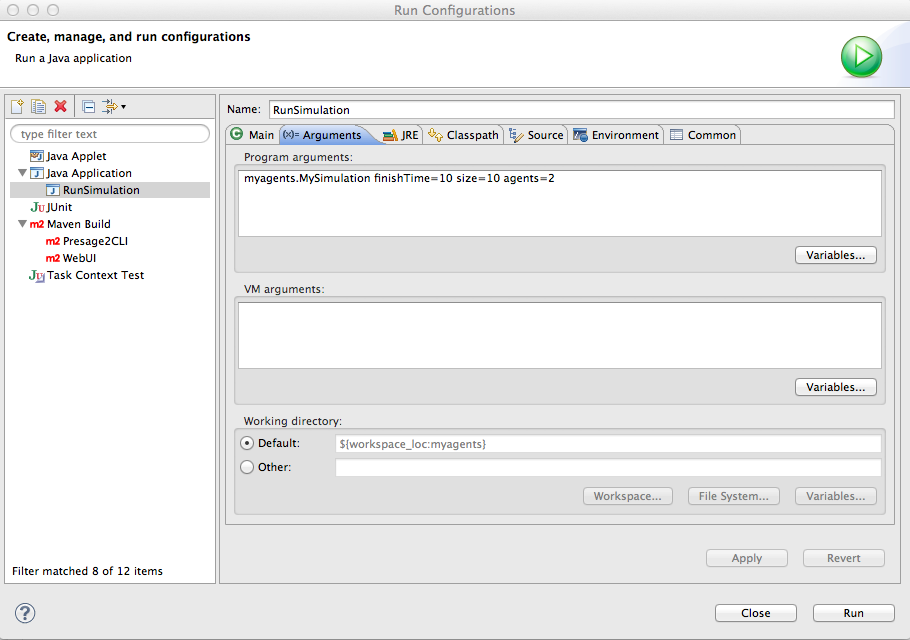
myagents.MySimulation finishTime=10 size=10 agents=2
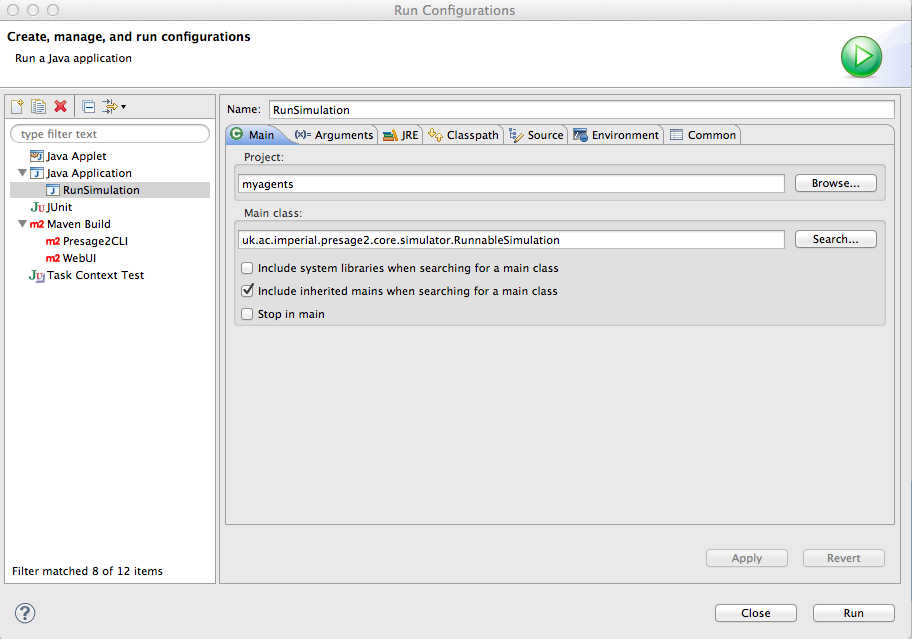
If you are using the eclipse quickstart project there is a run configuration already set up, which just needs parameters to be set. To configure this go to the ‘Run Configurations’ menu in eclipse (accessible from ‘Run’ in the top menu). Select ‘RunSimulation’ in the left menu. You should see something like this:

Click on the parameters tab to add the parameters for your simulation:

Once you have put your parameters in simply hit run and the simulation will run. We can verify the agents are working by looking at the log output in the console. You should see output like this:
...
683  [main] INFO  uk.ac.imperial.presage2.core.simulator.MultiThreadedSimulator  - Time: 0
683  [main] INFO  uk.ac.imperial.presage2.core.simulator.MultiThreadedSimulator  - Executing Participants...
684  [main] INFO  uk.ac.imperial.presage2.core.simulator.MultiThreadedSimulator  - Executing TimeDriven...
685  [pool-1-thread-4] INFO  agent1  - My location is: {9; 4; 0}
685  [pool-1-thread-3] INFO  agent0  - My location is: {2; 3; 0}
685  [main] INFO  uk.ac.imperial.presage2.core.simulator.MultiThreadedSimulator  - Executing Plugins...
685  [pool-1-thread-2] INFO  uk.ac.imperial.presage2.util.environment.MappedSharedState  - Updating state.
685  [main] INFO  uk.ac.imperial.presage2.core.simulator.MultiThreadedSimulator  - Time: 1
685  [main] INFO  uk.ac.imperial.presage2.core.simulator.MultiThreadedSimulator  - Executing Participants...
686  [main] INFO  uk.ac.imperial.presage2.core.simulator.MultiThreadedSimulator  - Executing TimeDriven...
686  [pool-1-thread-1] INFO  agent0  - My location is: {2; 2; 0}
686  [pool-1-thread-4] INFO  agent1  - My location is: {8; 4; 0}
...
In this post we’ve gone through creating and running a very basic simulation with Presage2. In the next post we will look at how to connect the platform to a database to save your simulation results, and then launch the web interface to manage batches of simulations and view their results.