Project repository with helper scripts for deploying a raspberry cluster using MongoDB
The contents of this repository help creating a cluster of multiple Raspberry Pi Computers running a MongoDB Database Software to show the fundamentals of Replication (splitting the same data on multiple machines for redunancy) and Sharding (splitting the datasets on several machines to distribute storage and computing power). Using the Cluster, also effects of network partitions (unplugging single computers from the cluster) and performance measurements can be observed. The PoC-Setup uses a Cisco SF250-48 Switch.
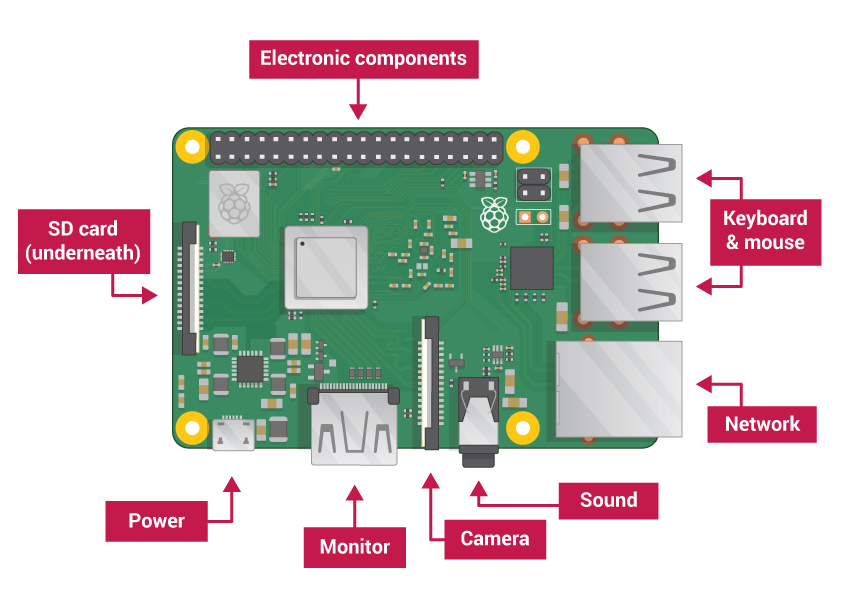 Source: https://projects-static.raspberrypi.org/projects/raspberry-pi-setting-up/3addc4ca2ca0b7c999bdb03a46801a729614b235/en/images/pi-labelled.png)
The Raspberry Pi is a cheap single-board computer developed by the Raspberry Pi Foundation. The (at the beginning of this project) latest model, the Pi 3 B+ is the size of a credit card and equipped with an ARMv8-Processor, multiple USB-Ports, a LAN-Port, a WiFi-Module, an HDMI and audio output as well as several programmable GPIO-Pins. The Raspberry is used in many tinker-projects and prototypes as it is cheap, has a relatively low power consumption and various communication interfaces to integrate it into different environments. The mostly used operating system is Raspbian Linux, which is derived from Debian.
 Source: https://upload.wikimedia.org/wikipedia/commons/thumb/9/93/MongoDB_Logo.svg/1920px-MongoDB_Logo.svg.png
MongoDB is a NoSQL database software that is mainly focused on scalability. It's source code is available under SSPL License and is free to use, as long as all modifications are made publicly available (as of july 2019).
 Source: https://docs.mongodb.com/manual/_images/replica-set-primary-with-two-secondaries.bakedsvg.svg
Replication means the distribution of the same data on several servers (redundancy). In MongoDB, for each Replication set, there is one primary instance. All actions, inserts and reads, are performed over that primary node. All nodes periodically send heartbeat messages to each other to detect if one node is not available. In case the primary node is out of order, the others elect a new primary node that takes over. No data is lost as all servers contain the same data.
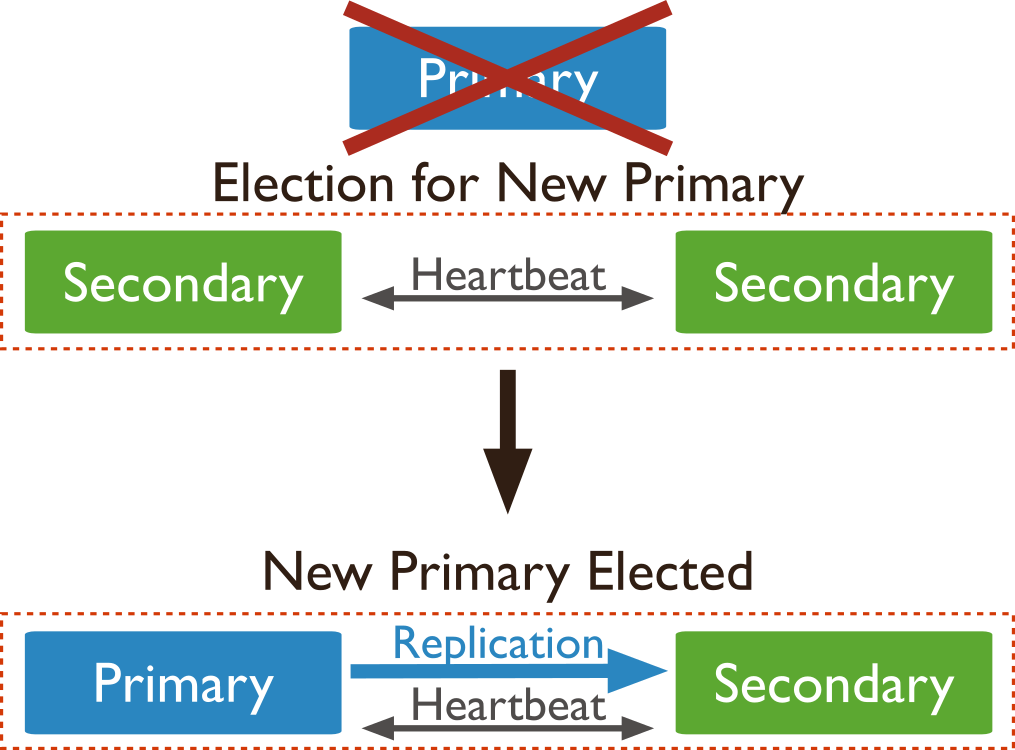 Source: https://docs.mongodb.com/manual/_images/replica-set-trigger-election.bakedsvg.svg
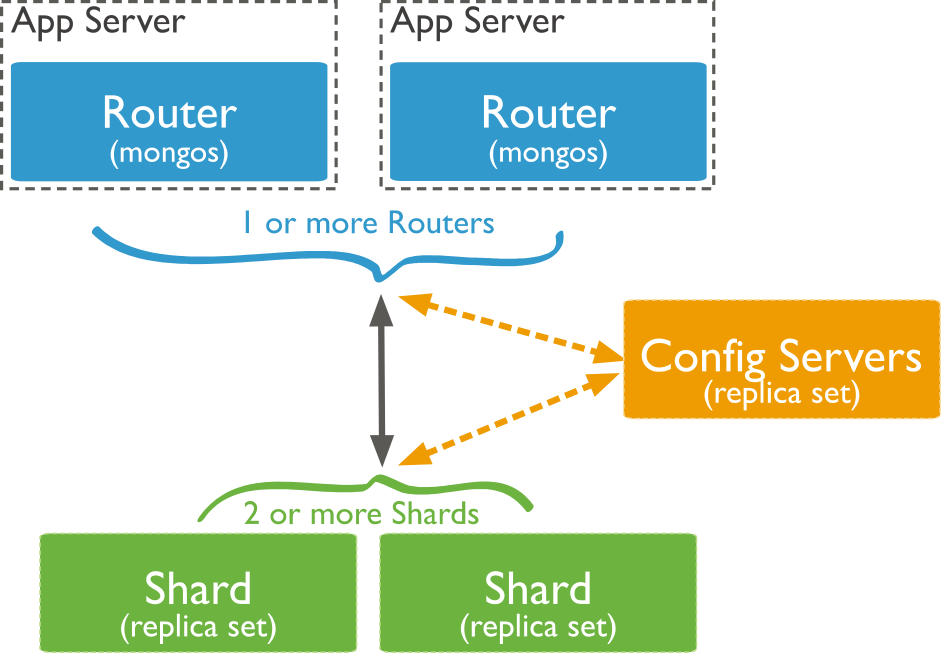 Source: https://docs.mongodb.com/manual/_images/sharded-cluster-production-architecture.bakedsvg.svg
Sharding means the splitting of data over several servers. Each shard only contains a part of the data. A routing instance, which knows where to find which datasets, is needed as a central "entry point" to the cluster. For redundancy, a replication set can be used within each cluster.
mongod is the service to run the actual database instance.
mongos is the shard router. Per database cluster, there is at least one mongos-instance needed that serves an endpoint to the actual application using the database. It will route the request to the shard where the required data is located.
mongoc is a configuration server for a sharded setup. Usually, multiple mongoc-instances are used for redundancy. They all have to be known to the mongos-instances to allow the sharding to work correctly.
To setup the cluster, all Raspberrys have to be prepared for remote access. One Raspberry has to be configured manually:
- (recommended) Change default password for user "pi"
- sudo raspi-config
- Localization Options -> Change Locale -> de_DE.UTF-8 UTF-8 (choose appropriate)
- Localization Options -> Change Timezone -> Europe/Berlin (choose appropriate)
- Localization Options -> Change Keyboard Layout -> Generic 105-key -> German (choose appropriate)
- Enable SSH Server
- Edit /etc/network/interfaces
auto eth0 allow-hotplug eth0 iface eth0 inet static address 192.168.1.1 - Generate an SSH-Keypair (privatekey will be needed later for ansible)
Once the first Raspberry is configured, an image of the SD-Card must be created. Refer to http://www.aoakley.com/articles/2015-10-09-resizing-sd-images.php. It is highly recommended to shrink the image file after creation as described in the article above.
For quickly replicating this ready configured OS on all other SD Cards, the script image-manager can be used. The IP Adresses (-modip) must be set consecutive or at least unique to allow all Raspberrys to be operated in the same network.
Usage:
> ./image-manager
Usage: image-manager [-modip 1.1.1.1] [-flash /dev/sdb] -img file.img

-modip:  Image will be mounted and the IP Address in
         /etc/network/interfaces will be modified before flashing
-flash:  The device to flash to, usually /dev/sdb
         (the option '/dev/sda' will be blocked)
-img:    the image file used
To make all Raspberrys easily accessible, the computer from where the cluster should be configured (also connected to the network switch, together with all raspberrys) must also have a static IP Address in the same Subnet (e.g. 192.168.1.2). A file ~/.ssh/config has to be created, containing a block for each raspberry of the cluster, see below:
Host raspi1_1
  HostName 192.168.1.1
  User pi
  IdentityFile ~/.ssh/raspi.priv
For each Device, the Host (e.g. raspi1_1) and the IP-Address (e.g. 192.168.1.1) have to be modified. The Privatekey used for the configuration of the initial Raspberry must be present at the IdentityFile-Path. For more information on ssh config, refer here.
The IP Configuration used for the project is the following (any ip range can be used as long as the addresses are unique):
| IP-Address(-range) | Usage |
|---|---|
| 192.168.1.1 | "Master"-Raspberry (Monitoring, mongos router) |
| 192.168.1.2 | Computer used for configuring the cluster, running ansible |
| 192.168.1.10-29 | 20 Cluster Nodes |
| 192.168.1.30 | Separate Raspberry running mongodb for reference measurements |
If the IP-Addresses are chosen out of a free range in an existing network, the cluster can be directly attached to the LAN by connecting them all over a network switch. As this is a bit confusing and may cause security issues, it is recommended to run the cluster in a separate network over a network switch, where just one computer for configuration is connected to. This computer also needs a connection to the public internet to allow MongoDB being pulled from the packet sources. Therefore, this computer is also used as a router between the cluster-network and the public one. For example, a notebook can be used, which is connected to the Internet over Wifi and via LAN to the cluster switch. start_router.sh is a script to start NAT forwarding on that computer to route outgoing traffic from the cluster to the public internet. ipv4 forwarding has to be activated seperately (add net.ipv4.ip_forward = 1 to /etc/sysctl.conf and reboot, check with cat /proc/sys/net/ipv4/ip_forward, refer here)
In the case of this script, wlan0 has access to an external network and eth0 is connected to the cluster, modify as appropriate if needed.
General Usage
cd ansible
ansible-playbook -i <inventory file> <playbook file>
Ansible is a tool for automated deployment of applications on many servers at once. It is available over standard package sources. It works with using inventory-files, where remote computers are listed and categorized into groups, which can be used for executing specific actions. These actions are idempotent, which means that they can be executed many times with the same result, as ansible always checks, if the required state is already present. In a Playbook-File, it is defined, which actions should be performed on the groups of hosts. These actions are defined in roles, which are like playbooks for each group. The syntax of Ansible Playbooks can be understood quickly through the official documentation. There are modules for many different actions. This is an extract of a role file that installs mongodb via apt:
- name: Install mongodb-package   # each action has a name, which makes ansible self-documenting
  apt:                            # use the apt-module to install an application
    name: mongodb                 # the name of the application to be installed
    state: present                # the application should be installed at the end
    update_cache: yes             # execute apt-get update before
  become: yes                     # become root user for the execution
These are the groups used for deploying the cluster
- mongo_servers: all servers where the mongodb will be installed
- mongod_servers: servers for replication without sharding
- replication_master: initial masters for each shard
- shard_masters: initial masters for each shard
- shard_servers: servers contained in shards/replica sets
- rs1: servers in replica set 1 (compare replSet=rs1)
- rs2: servers in replica set 2
- mongos: server(s) where mongos should be running
- mongoc: server(s) where mongoc should be running
- monitoring: server where the nodejs monitoring should be deployed
setup_raspberry-role will fail during the step of setting up the hosts file for each first time it is executed after a reboot of the cluster. When it fails, the playbook has to be executed a second time and will work then.
For quick setup of the full cluster, navigate to the ansible/ and execute
ansible-playbook -i fullcluster.hosts setup_monitoring.yml
ansible-playbook -i fullcluster.hosts setup_repsharding.yml
ansible-playbook -i fullcluster.hosts setup_repsharding.yml
The second line is intentionally executed two times, see above!
This Playbook will setup a cluster that only uses replication. All servers of the group mongod_servers will be in the same replication set.
- All hosts
- Role setup_raspberry
- Setting the correct gateway to access the internet
- Setting hostnames
- execute expand_rootfs if needed
- reboot if necessary
- Role setup_raspberry
- Hosts mongod_servers
- Role setup_mongod
- install mongodb via apt
- create mongodb.conf and data directory
- start mongodb and initialize replication set on master
- Role setup_mongod
- Hosts replication_master
- Role setup_replication_master
- initialize whole replica set
- Role setup_replication_master
This Playbook resets the whole database. It is done by removing and recreating the directory where the database is stored.
- Hosts mongo_servers
- Role reset_replication
- removing and recreating the whole database directory
- restart mongodb service
- Role reset_replication
This Playbook sets up a sharded cluster (without replication)
- All Hosts
- Role setup_raspberry
- Setting the correct gateway to access the internet
- Setting hostnames
- execute expand_rootfs if needed
- reboot if necessary
- Role setup_raspberry
- Hosts mongod_servers
- Role setup_mongod
- Install Mongodb via apt
- create mongod.conf and database directory
- start mongodb
- execute rs.initiate() on master
- Role setup_mongod
- Hosts shard_masters
- Role init_single_rs
- add replSet to config
- execute rs.initiate()
- Role init_single_rs
- Hosts mongoc
- Role setup_mongoc
- create database directory, init.d-file, logfile, service file and mongoc.conf
- start mongoc
- Role setup_mongoc
- Hosts mongos
- Role setup_mongos
- create init.d-file and service-file
- start mongos service
- Role setup_shards
- execute addShard for all shard servers
- create database 'testdb' and sharded collection 'testCol'
- set chunk size to 1MB for demo purposes (default 64MB)
- insert random test data
- Role setup_mongos
This Playbook resets a sharded cluster by removing and recreating the database directories of all mongod, mongos and mongoc-instances
- Hosts shard_servers
- Role reset_replication
- removing and recreating the whole database directory
- restart mongodb service
- Role reset_replication
- Hosts mongoc
- Role reset_configsrv
- removing and recreating the whole configsrv database directory
- Role reset_configsrv
- Hosts mongos
- Role reset_sharding
- executing reset script removing all shards
- Role reset_sharding
This is the main playbook to setup the whole cluster using replication and sharding
- Execute Playbook
reset_sharding.yml - Hosts mongos
- Role setup_mongos
- create init.d-file and service-file
- start mongos service
- Role setup_mongos
- Hosts shard_servers
- Role repshards_config
- set correct replSet in mongodb.conf
- restart mognodb
- Role repshards_config
- Hosts shard_masters
- Role setup_repshards
- add all hosts of replica set to set
- Role setup_repshards
- Hosts mongoc
- Role setup_mongoc
- create database directory, init.d-file, logfile, service file and mongoc.conf
- start mongoc
- Role setup_mongoc
- Hosts mongos
- Role init_repshards
- restart mongos
- execute script adding shards
- inserting test data
- Role init_repshards
This Playbook puts up the monitoring server that is available under <IP>:3000
- Host monitoring
- Role monitoring
- copy and install node.js-project for cluster monitoring
- enable service on boot
- Role setup_performance_test
- copy performance measurement server script
- enable service on boot
- Role monitoring
This Playbook deploys the server application needed for performance measurements.
- Host dbperf_test
- Role setup_performance_test
- Copy Test Data Script to /opt/insert_random.js
- Copy the Server script to /opt/dbperf.py
- Setup a script in /etc/init.d/ to make the server available as a service
- enable the service on startup
- reboot
- Role setup_performance_test
For easier monitoring of the cluster, /cluster-monitor contains a node.js-Application to allow viewing the stats of the cluster in realtime. The application has to be deployed on the Device running the mongoc-service (routing). Deployment is done by the ansible playbook setup_monitoring.yml
After deployment, you can access the application under http://192.168.1.1:3000.
It offers several views that can be switched using the links on top.
This Section will show a visualization of the distribution of all Data on the Shards. It visualizes it using a bar chart, as well, the result of db.testCollection.getShardDistribution() is shown, which is about the graphics in exact numbers.
This View will display the output of sh.status({verbose:true}). It shows the member nodes of each shard and gives detailed information on the key value that is used to shard the collection.
Outputs the result of db.testCollection.count() to monitor the total number of documents in the database.
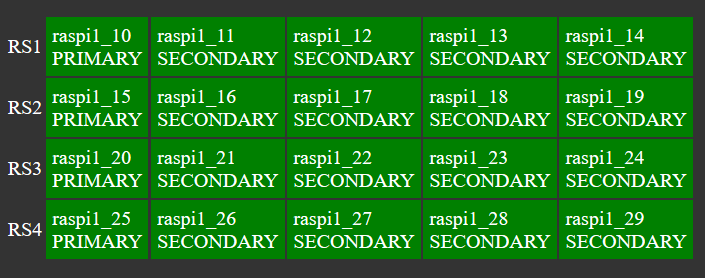
This view gives a visual representation of which nodes are available in the cluster and what role they have (Primary/Secondary). It will detect when nodes are unplugged, so the election process can be visualized. The data is collected by executing rs.status() on every node of the cluster.
This shows the results of a periodic ping to all nodes to show whether they are online, independent from the database instance.
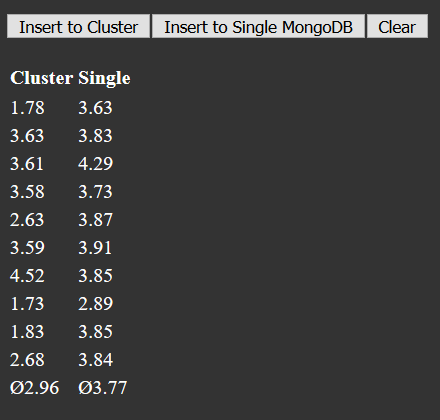
A part of the monitoring is the performance test, which compares the time of inserting a fixed number of random datasets into either the cluster or a single instance of mongodb. The performance test is deployed using the playbook setup_performance_test.yml. It is important that the insert process is executed locally on the raspberry running the database, or the raspberry running mongos in case of the cluster. That avoids a high network load that would distort the results as the monitoring system is running on the same raspberry as the mongos-instance, whereas the single instance for reference runs on a separate raspberry. For measurement, a lightweight TCP-Server written in Python is deployed, that is listening on TCP port 8080. When it gets a connection, it calls the insert process for 20.000 random entries and measures the time until it is finished. After that, the time in seconds is responded to the client and the connection is closed.
Besides using the functions on the monitoring application, the measurement can be manually triggered by navigating to the IP-Address of the device on port 8080 using a browser or a TCP client.

