a web remote control for the players out there! ✨

In a nutshell, I had to desperately get out of the bed to turn down the volume of a TV show episode I was watching and that got me really mad at the universe. So I've built Clicker, a JavaScript application powered by socket.io and React – for fun and profit.
Since this is a JavaScript application, make sure you have Node.js installed.
Then git clone this repository or download the package, and go to the project's folder using your terminal. If you've called it clicker, just:
$ cd clickerYou'll need to install the project's dependencies and start the server.
$ cd server
$ npm install
$ npm start
The server will start under
https://localhost:4001.
Again, installing dependencies and starting the server, but in the client folder.
$ cd client
$ npm install
$ npm start
The front-end will start under
https://localhost:3000.
Remember to set up the server's external IP environment variable (REACT_APP_SERVER_IP) in the .env file so Clicker will connect to it instead of localhost. After that, you should be able to use Clicker in any device connected your network, such as your smartphone!
https://localhost:4001 and https://localhost:3000 (replace localhost with the external IP if that applies).
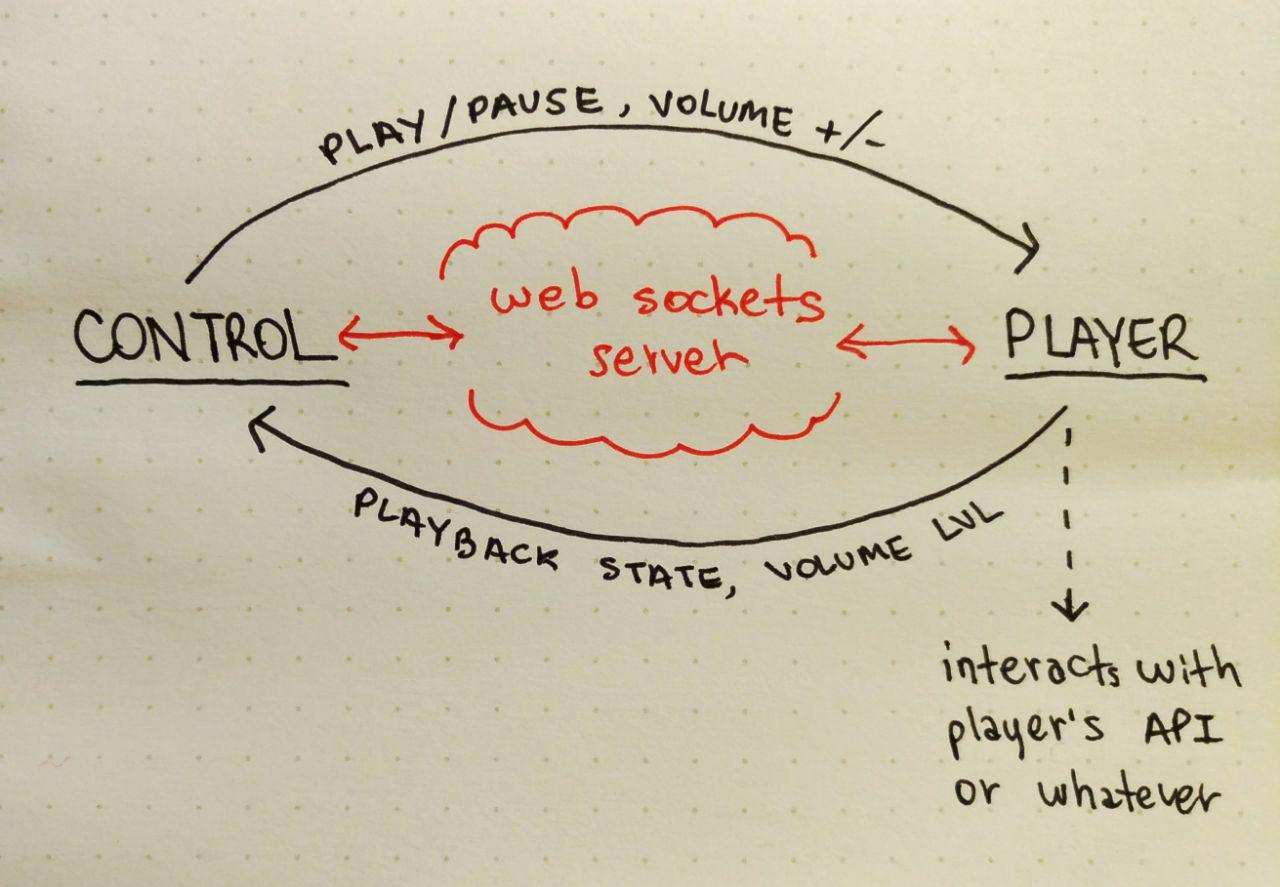
It's time to get the external player ready for Clicker! The website's player should react to the following events triggered by Clicker:
play_donepause_donevolume_set_done
To get Clicker to know about the initial player state, it's important to react to volume_get, volume_get_done, volume_set_done, playback_get as well.
The code below shows an integration with the JW Player, a popular web player, by making use of its API, exposed in the website's window object.
const socket = io("https://localhost:4001")

socket.on("play_done", () => {
    window.jwplayer().play()
})
socket.on("pause_done", () => {
    window.jwplayer().pause()
})
socket.on("volume_get", () => {
    const volume = window.jwplayer().getVolume()
    socket.emit("volume_get_done", volume)
})
socket.on("volume_set_done", volume => {
    window.jwplayer().setVolume(volume)
})
socket.on("playback_get", () => {
    const playback = window.jwplayer().getState()
    socket.emit("playback_get_done", playback)
})
That code should be appended to the website along with the socket.io client. You can use browser extensions such Custom Style Script, for Firefox, or Custom JavaScript for websites, for Chrome, to achieve that.
The final example is provided below.
<script src="https://cdnjs.cloudflare.com/ajax/libs/socket.io/2.0.4/socket.io.js"></script>
<script>
    const socket = io("https://localhost:4001")

    socket.on("play_done", () => {
        window.jwplayer().play()
    })
    socket.on("pause_done", () => {
        window.jwplayer().pause()
    })
    socket.on("volume_get", () => {
        const volume = window.jwplayer().getVolume()
        socket.emit("volume_get_done", volume)
    })
    socket.on("volume_set_done", volume => {
        window.jwplayer().setVolume(volume)
    })
    socket.on("playback_get", () => {
        const playback = window.jwplayer().getState()
        socket.emit("playback_get_done", playback)
    })
</script>
See final script
✨ Have fun!
I'll write a (hopefully fun) in-depth blog post on how it works on my blog. For now, this might help you to get the flow:
MIT