-
Notifications
You must be signed in to change notification settings - Fork 182
The matRad GUI
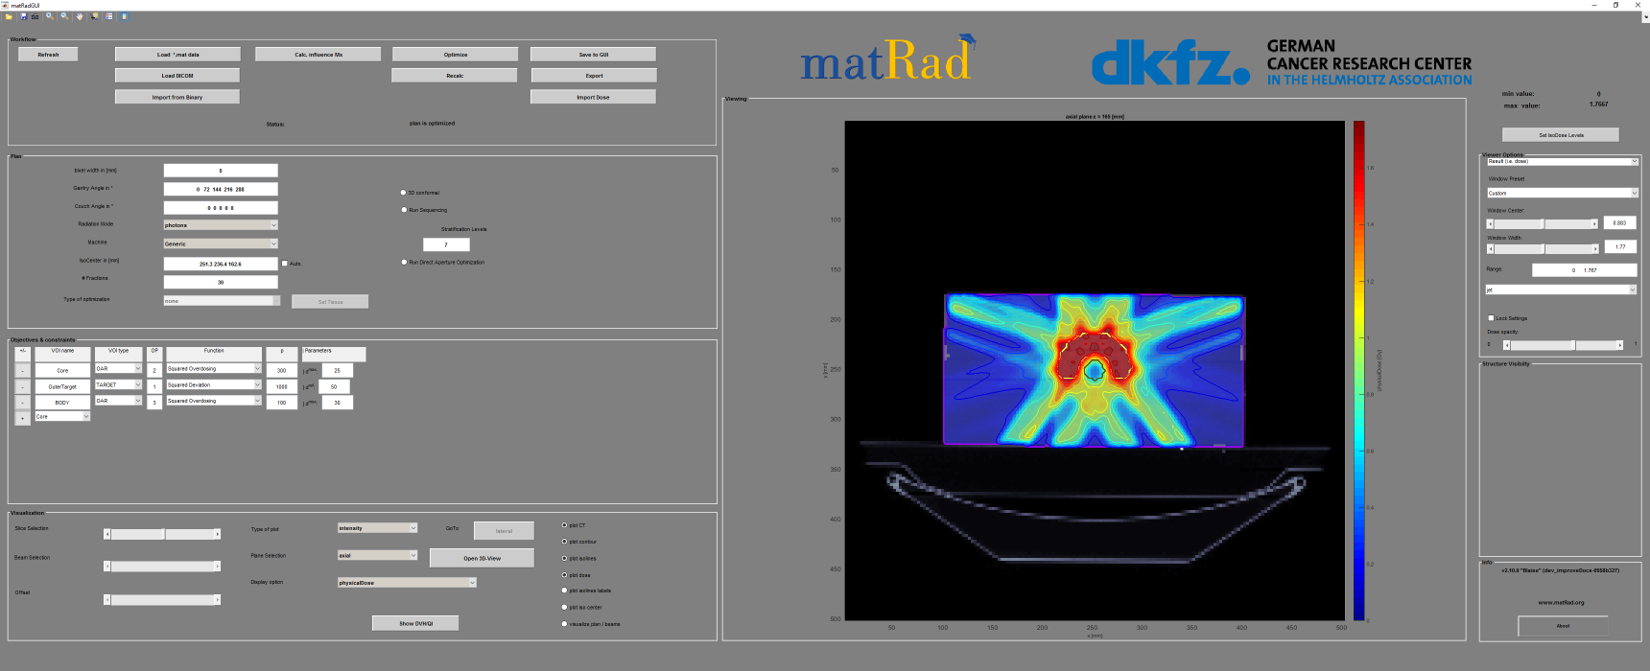
The GUI is used for the treatment plan visualization and the adjustment of the plan and optimization parameters. It is possible to execute the matRad script using only the GUI (see matRad-GUI guide).
<a name="overview" /a>
The matRad GUI consists of 6 main sections:
| Section | Content |
|---|---|
| Workflow | These are the main steps that need to be executed for treatment planning. |
| Plan Parameters | Here the plan parameters like beam direction and radiation mode can be selected. |
| Command Window | Here the output of the Command Window is displayed inside the GUI. |
| Optimization Parameters | Using the optimization parameters the constraints of the VOIs can be adjusted. |
| Visualization Parameter | Here the visualization can be adjusted to show different planes/slices of plot types. |
| Visualization | The information specified in the Visualization Parameters is displayed in this section. |

<a name="workflow" /a>
The Workflow is initially used to load the patient data. You can also start the dicom import from here. After the adjustment of all parameters the dose calculation and the fluence optimization can be started from here:

<a name="planParameters" /a>
In this section the plan parameters are adjusted before calculating the dose-influence-matrix.
| Parameter | Description |
|---|---|
| SAD | Source-axis distance (SAD), default value: 1000 mm |
| bixel width | Photons: width of a photon bixel. Particles: lateral spot distance. Default value: 5 mm |
| Gantry angle | Here the set of desired gantry angles (in degree) can be specified. For the seperation of the values you can either use ',' or a space ' '. |
| Couch angle | Here the set of desired couch angles (in degree) can be specified. For the seperation of the values you can either use ',' or a space ' '. Make sure that you always have the same amount of couch and gantry angles. |
| Radiation mode | You can choose between photons, protons and carbon ions. |
| IsoCenter | Use this to set the iso center (in mm). |
| # Fractions | Here the desired number of fractions can be specified. |
| Biological optimization | For carbon ions you can apply a biological optimization. You can choose between an optimization of the biological effect ('effect') or the RBE-weighted dose ('RBExD'). |
| Run Sequencing | Check this if you want to run a MLC sequencing. The number of stratification levels can be adjusted. |
| Run Direct Aperture Optimization | Check this if you want to run an additional direct aperture optimization. |

<a name="optParameters" /a>
The optimization parameters regarding the volumes of interest (VOIs) are stored in the variable cst. For more detailed information about the parameters stored in the cell please hava a look at the documentation of the cst-cell array. Using the GUI you can adjust the settings and save them into cst by clicking the save-button. To add or delete volumes you can use the '+' and '-' buttons.
| Field | Description |
|---|---|
| VOI | Via a drop-down menu you can select a VOI by clicking it's name. |
| VOI Type | You can specify whether the VOI is an organ at risk (OAR) or a target volume |
| Overlap | This value defines how overlapping structures are handled during optimization. Consider two structures A and B with priorities pA and pB. If A and B both include voxel i, voxel i will be treated to belong only to structure A if pA < pB. If pA = pB the voxel will be considered for both structures. An extension to more than two structures is trivial. |
| Objective Function | This field allows you to specify how the VOI will be considerd during the optimization. You can choose between square underdosing, square overdosing, square deviation, mean or EUD. You can find more detailed information about this in the section 'Dose objectives' of the page: The cst cell |
| Penalty | For the objective function value a weighted sum is calculated. The penalty value corresponds to the weighting factor for this VOI with respect to the defined constraint (e.g. overdosing). By adjusting this value you can stress the importance of these constraints with respect to each other. |
| Parameters | For square underdosing, square overdosing and square deviation this value corresponds to the threshold dose above/below which the penalty will apply. For the mean-option this value is not needed, as the mean dose within this VOI will be minimized. For the EUD method the parameter corresponds to the exponent. |
<a name="visualization" /a>
After the optimization the treatment plan can be visualized within the GUI. Using the visualization parameters you can change the view. The radio buttons can be used to turn off/on the plotting of contours, dose (isolines) and isoline labels.

| Type of plot | Display option | Plane | Resulting image |
|---|---|---|---|
| intensity | Dose | axial | [[/images/doseVisAxialIntensity.png |
| sagital | [[/images/doseVisSagitalIntensity.png | ||
| coronal | [[/images/doseVisCoronalIntensity.png | ||
| effect | axial | [[/images/doseVisAxialEffect.png | |
| RBEWeightedDose | axial | [[/images/doseVisAxialRBExD.png | |
| RBE | axial | [[/images/doseVisAxialRBE.png | |
| alpha | axial | [[/images/doseVisAxialAlpha.png | |
| beta | axial | [[/images/doseVisAxialBeta.png | |
| RBETruncated10Perc | axial | [[/images/doseVisAxialRBEtruncated.png | |
| profile | lateral | [[/images/doseVisLateralProfile.png | |
| longitudinal | [[/images/doseVisLongitudinalProfile.png |
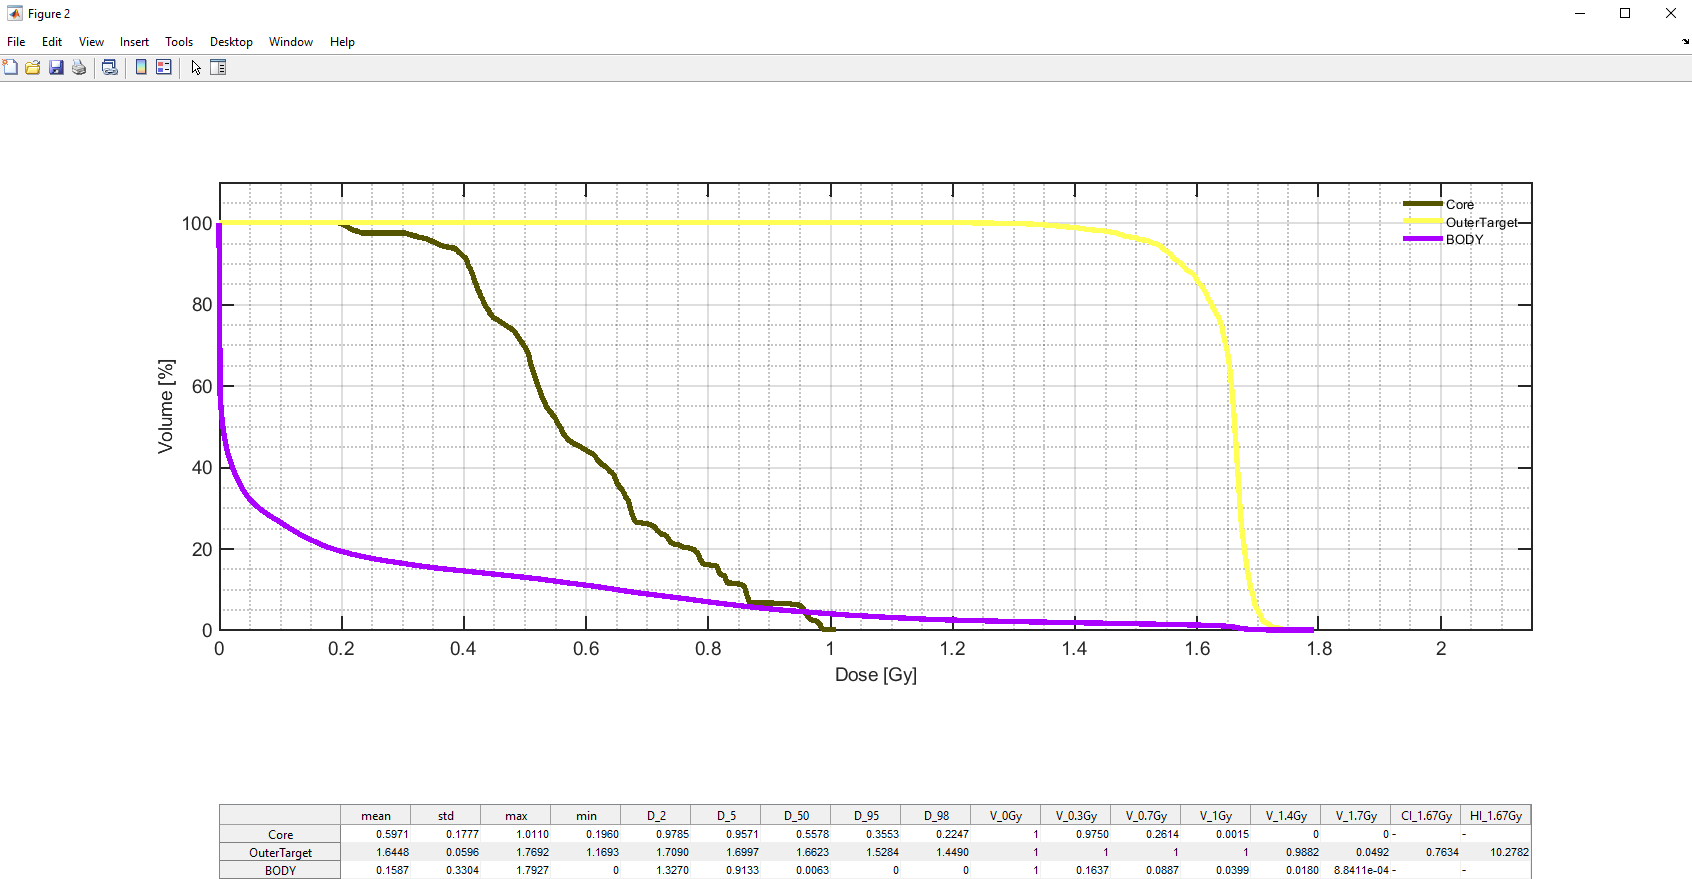
To draw a DVH of the current treatment plan you can click the 'Show DVH' button:


Home > matRad Setup Guide > Overview of the matRad GUI
Useful resources