-
Notifications
You must be signed in to change notification settings - Fork 69
Home
Simple steps to run the trackers on Windows 7, 8.1 using Visual Studio 2013, cmake and OpenCV 3.0. It is assumed that a 64bit Windows is installed. If you use a 32bit Windows, update to 64bit.
- Download "OpenCV for Windows" from www.opencv.org.
- Execute the file. It is a self-extracting archive. Throughout this tutorial,
H:\opencv-3-0-0-releaseis used as install path for opencv: - Setup the required OpenCV Paths:
- Right-click on Computer -> Properties -> Advanced System Settings -> Environment Variables
- On the
System variablesscroll list, selectPathand clickEdit. CAUTION: if you screw up your environment variables, you can break your system. Thus, ensure that you do not change anything else!: Prepend:H:\opencv-3-0-0-release\opencv\build\x64\vc12\bin;and clickok. - Click on
newand create a system variable with nameOPENCV_DIRand valueH:\opencv-3-0-0-release\opencv\build\x64\vc12
- Download cmake Windows Installer from http://www.cmake.org/
- Execute it. Install it anywhere on your system. Use default options for the rest of the dialogues.
- If you don't have Visual Studio: Microsoft provides a free version for individual developers (Read the license terms and ensure that these apply to you!): https://www.visualstudio.com/en-us/products/visual-studio-community-vs.aspx
- Install it anywhere on your system.
-
Download https://github.com/klahaag/cf_tracking/archive/master.zip to
H:\ -
Extract the zip files to
H:\cf_tracking-master -
Create the directory
H:\cf_tracking-master\buildThe directoryH:\cf_tracking-mastershould look like this: -
Run
cmake-gui. -
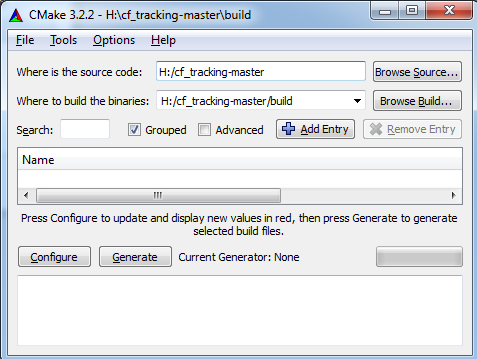
Enter the src and build folder in the cmake gui like it is shown in the screenshot:
-
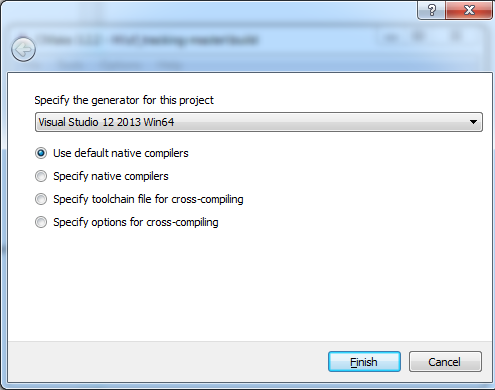
Click on configure. A popup will open: Select
Visual Studio 12 2013 Win64from the generator dropdown. -
Click on Finish.
-
You will see a couple of messages in the cmake-gui.
-
Click above the messages on
Generate. This will create aCfTracking.slnVisual Studio solution file in the folderH:\cf_tracking-master\build\. -
Open
CfTracking.slnin Visual Studio. -
Select
Releaseand build. -
The trackers are now located in
H:\cf_tracking-master\build\Release. -
Copy the contents of
H:\cf_tracking-master\sampletoH:\cf_tracking-master\build\Release. -
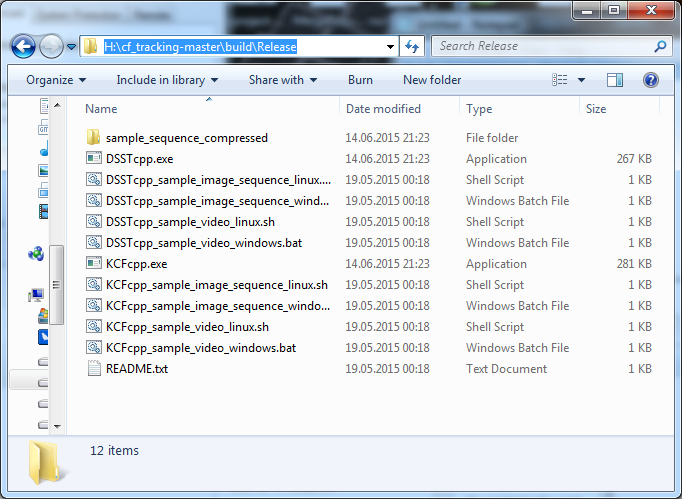
`H:\cf_tracking-master\build\Release``should now look like this:
-
Execute
KCFcpp_sample_image_sequence_windows.batto testKCFcpporDSSTcpp_sample_image_sequence_windows.batto testDSSTcpp. -
Execute
KCFcpporDSSTcppwithout arguments to use your webcam.
Guide based on http://docs.opencv.org/doc/tutorials/introduction/linux_install/linux_install.html:
sudo apt-get install build-essential cmake git libgtk2.0-dev pkg-config libavcodec-dev libavformat-dev libswscale-devgit clone https://github.com/Itseez/opencv.gitcd opencvgit checkout tags/3.0.0mkdir build && cd buildcmake -D CMAKE_BUILD_TYPE=RELEASE -D CMAKE_INSTALL_PREFIX=/usr/local ../make -j 8sudo make install
cd ~ && mkdir trackers && cd trackersgit clone https://github.com/klahaag/cf_tracking.gitmkdir -p cf_tracking/build && cd cf_tracking/buildcmake -DCMAKE_BUILD_TYPE=Release -DWITH_OPENMP=ON ../make -j 8cp -r ../sample/* ./
This guide is provided "as is" and any express or implied warranties, including, but not limited to, the implied warranties of merchantability and fitness for a particular purpose are disclaimed. In no event shall copyright holders or contributors be liable for any direct, indirect, incidental, special, exemplary, or consequential damages (including, but not limited to, procurement of substitute goods or services; loss of use, data, or profits; or business interruption) however caused and on any theory of liability, whether in contract, strict liability, or tort (including negligence or otherwise) arising in any way out of the use of this guide, even if advised of the possibility of such damage.


