This codebase contains code to create and maintain a CloudFormation, AWS CodePipeline/CodeBuild/CodeDeploy powered Rig on AWS.
Please see Bookit Production Riglet wiki page for details on the running production Bookit Rig.
Bookit was rebooted in Sept 2017, and we decided to start from scratch. We did decide to use the Bookit Riglet (implementation of Bare Metal Rig) as a starting point however.
This guide has all the steps for creating a "Bookit riglet instance". The riglet is capable of doing builds, pushing to docker and deploying the docker images using blue/green deployment in to ECS.
The major components of this riglet are:
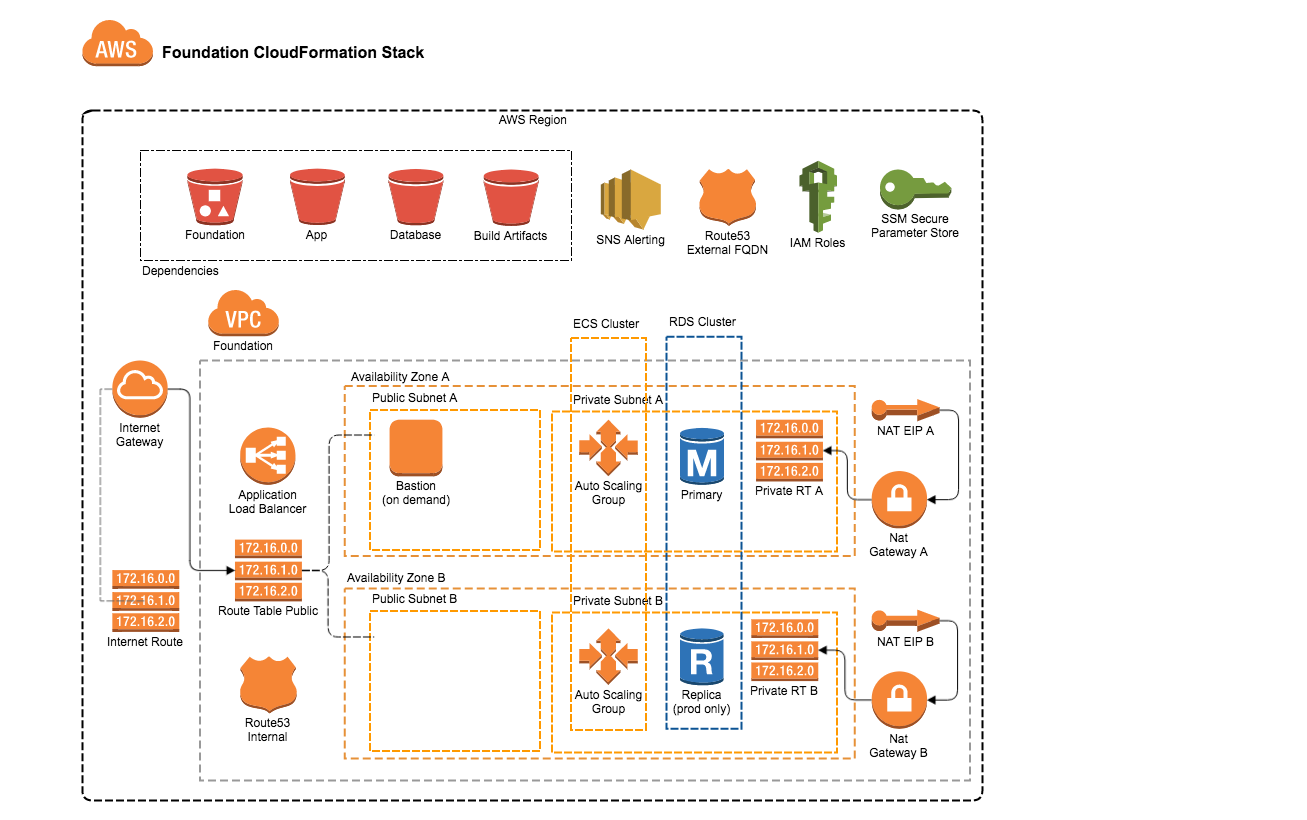
- A "foundational" stack running in Amazon: 1 of these is created for each environment (integration, staging, production, etc)
- a VPC with the appropriate network elements (gateways, NAT)
- a shared Application Load Balancer (ALB) - listens on ports 80 & 443
- a shared EC2 Container Server (ECS) Cluster.
- an RDS Aurora Database
- 4 shared S3 buckets to store CloudFormation templates and scripts
- a "foundation" bucket to store templates associated w/ the foundational stack
- a "build" bucket to store build artifacts for the CodePipeline below (this is shared across all pipelines)
- an "app" bucket to store templates associated w/ the app stack below
- a "build-support" bucket to store shared scripts that the CodeBuild and CodePipeline might use (not currently used... holdover from original bookit-riglet for now)
- A "deployment-pipeline" stack: 1 stack per branch per repo
- an ECS Repository (ECR)
- a CodeBuild build - see buildspec.yml in the project
- Installs dependencies (JDK, Node, etc)
- Executes build (download libraries, build, test, lint, package docker image)
- Pushes the image to the ECR
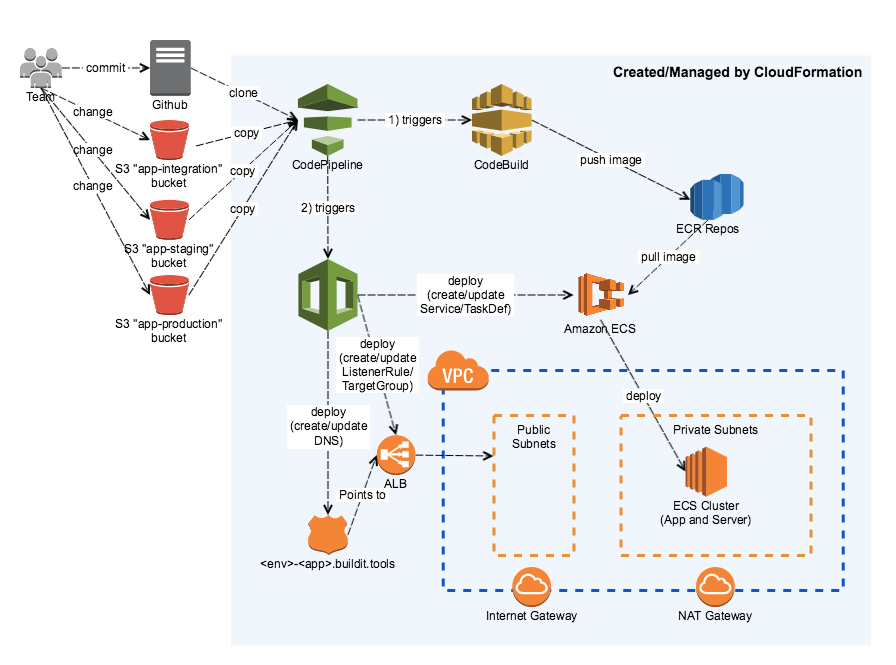
- a CodePipeline pipeline that executes the following:
- Polls for changes to the branch & "app" S3 buckets
- Executes the CodeBuild
- Creates/Updates the "app" stack below for the integration environment
- This also deploys the built image to the ECS cluster
- Creates/Updates the "app" stack below for the staging environment
- Creates/Updates an "app" stack change set for the production environment
- Waits for review/approval
- Executes the "app" stack change set which creates/updates/deploys for the production environment
- IAM roles to make it all work
- An "app" stack: 1 stack per branch per repo per environment - requires "foundation" stack to already exist and ECR repository with built images
- a ALB target group
- 2 ALB listener rules (http & https) that route to the target group based on the HOST header
- a Route53 DNS entry pointing to the ALB
- (optionally) a Route53 DNS entry without the environment name (for production)
- an ECS Service which ties the Target Group to the Task Definition
- an ECS Task Definition which runs the specific tag Docker image
- IAM roles to make it all work
The all infrastructure are set up and maintained using AWS CloudFormation. CodeBuild is configured simply by updating the buildspec.yml file in each bookit project.
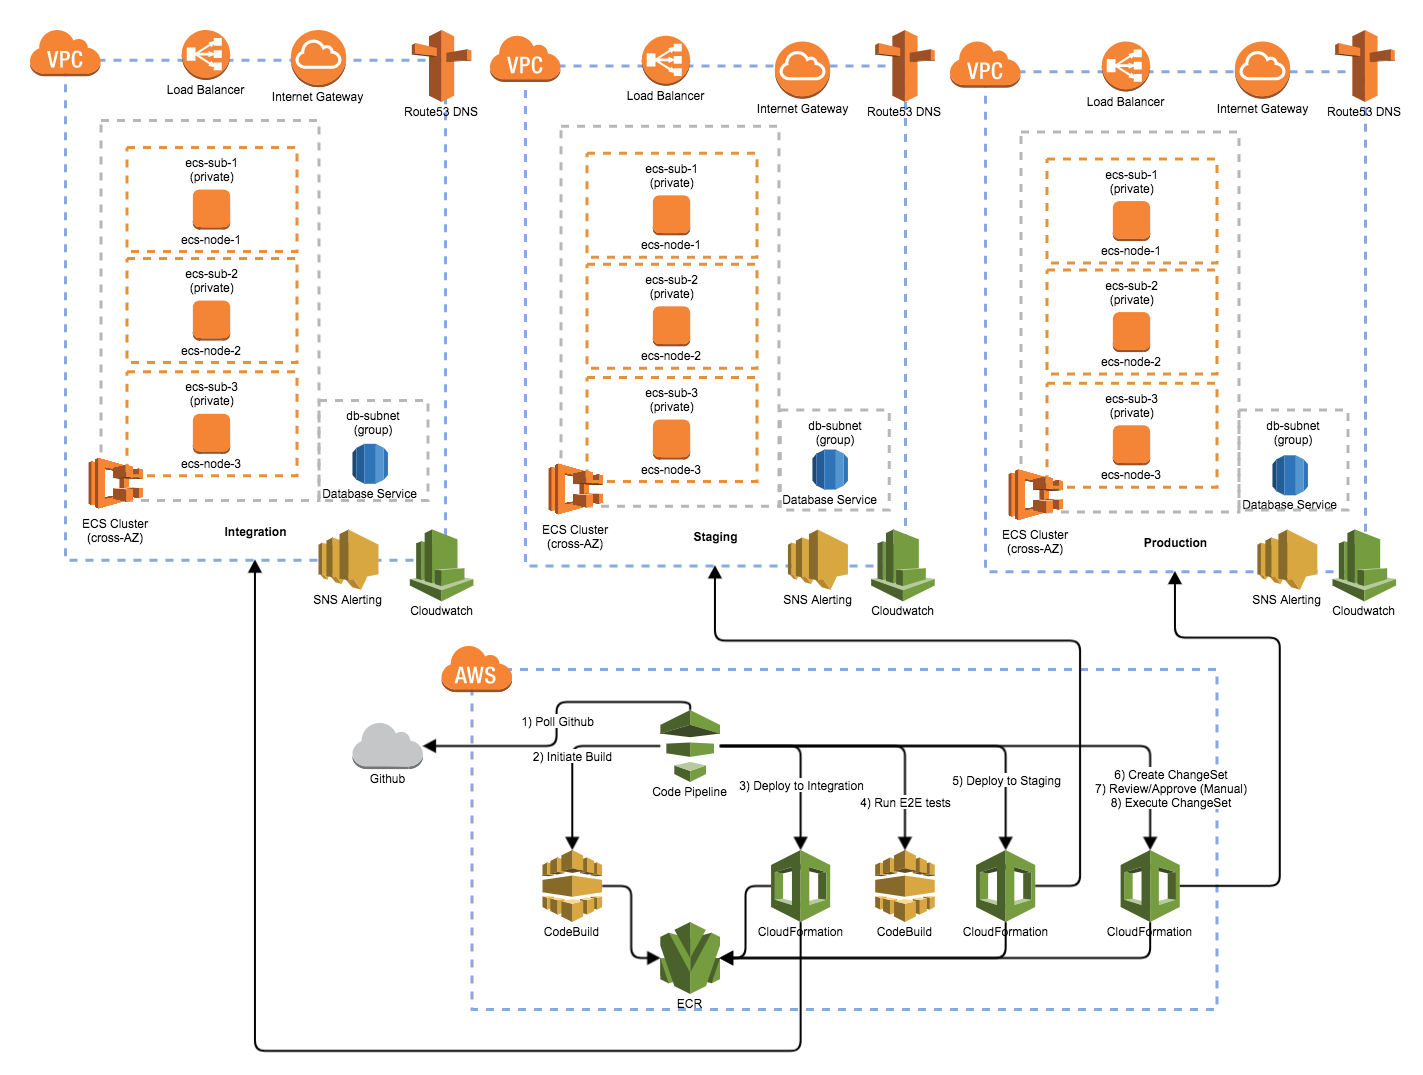
The whole shebang:
Single Environment (more detail):
CodePipeline (more detail):
We are documenting our decisions here
Please read through and understand these instructions before starting. There is a lot of automation, but there are also a lot of details. Approaching things incorrectly can result in a non-running riglet that can be tricky to debug if you're not well-versed in the details.
Those executing these instructions must have basic-to-intermediate knowledge of the following:
- *nix command-line and utilities such as 'curl'
- *nix package installation
- AWS console navigation (there's a lot of it)
- AWS CLI (there's some of it)
- AWS services (CloudFormation, EC2, ECS, S3).
- It is especially important to have some understanding of the ECS service.
It might be a good idea to run through an ECS tutorial before setting up this riglet.
To complete these instructions successfully you'll need:
- AWS CLI (v1.11.57 minimum), and credentials working:
brew install awscli && aws configure. - The
jqutility, which is used often to interpret JSON responses from the AWS CLI:brew install jq. - Ensure that you have your own private key pair setup on AWS - the name of the key will be used in the .make file. See here for instructions.
This rig flavor uses make (yes, you read that right) to automate the creation of riglets. Thus,
it is super-important to get your .make file set up properly. You can either do this via an
automated setup, or by doing some file manipulation.
- Setup minimal
.makefor local settings interactively throughmake .make. - Confirm everything is valid with
make check-env! - Continue below to fire up your riglet.
See .make file Expert mode for additional details.
There are a couple of scripts that automate the detailed steps covered further down. They hide the details, which is both a good and bad thing.
-
./create-standard-riglet.shto create a full riglet with standard environments (integration/staging/production).You will be asked some questions, the answers of which populate parameters in AWS' SSM Param Store. Please take special note of the following:
- You will need a personal Github repo token. Please see http://tinyurl.com/yb5lxtr6
- There are special cases to take into account, so pay close attention to the prompts.
-
make protect-rigletto protect a running riglet (the Cfn stacks, anyway) from unintended deletion (un-protect-rigletto reverse.) -
./delete-standard-riglet.shto delete it all.
See Individual Makefile Targets if you want to build up a riglet by hand.
See Manually Tearing Down a Riglet if you want to tear down by hand.
- Watch things happen in the CloudFormation console and elsewhere in AWS, or ...
- Check the outputs of the activities above with
make outputs-foundation ENV=<environment> - Check the status of the activities above with
make status-foundation ENV=<environment>
And ...
- Check AWS CloudWatch Logs for application logs. In the Log Group Filter box search
for for
<owner>-<application>(at a minimum). You can then drill down on the appropriate log group and individual log streams. - Check that applications have successfully deployed - AWS -> CloudFormation -> Select your application or
API stack, and view the URLs available under "Outputs", e.g. for the API application
https://XXXX-integration-bookit-api.buildit.tools/v1/pingwhere XXXX is the Owner name as specified in the .make file.
For simplicity's sake, the templates don't currently allow a lot of flexibility in network CIDR ranges. The assumption at this point is that these VPCs are self-contained and "sealed off" and thus don't need to communicate with each other, thus no peering is needed and CIDR overlaps are fine.
Obviously, the templates can be updated if necessary.
| Environment | CidrBlock | Public Subnets (Multi AZ) | Private Subnets (Multi AZ) |
|---|---|---|---|
| integration | 10.1.0.0/16 | 10.1.1.0/24,10.1.2.0/24 | 10.1.11.0/24,10.1.12.0/24 |
| staging | 10.2.0.0/16 | 10.2.1.0/24,10.2.2.0/24 | 10.2.11.0/24,10.2.12.0/24 |
| production | 10.3.0.0/16 | 10.3.1.0/24,10.3.2.0/24 | 10.3.11.0/24,10.3.12.0/24 |
We're currently using AWS RDS Aurora MySQL 5.6.x
| Environment | DB URI (internal to VPC) | DB Subnets (Private, MultiAZ) |
|---|---|---|
| integration | mysql://aurora.bookit.internal/bookit | 10.1.100.0/24,10.1.110.0/24 |
| staging | mysql://aurora.bookit.internal/bookit | 10.2.100.0/24,10.2.110.0/24 |
| production | mysql://aurora.bookit.internal/bookit | 10.3.100.0/24,10.3.110.0/24 |
| Application | ContainerPort | ContainerMemory | ListenerRulePriority | Subdomain |
|---|---|---|---|---|
| bookit-api | 8080 | 512 | 300 | usually default to repo name (see create-standard-riglet.sh) |
| bookit-client-react | 4200 | 128 | 200 (lower makes it the ALB fallback) | usually override to "bookit" (see create-standard-riglet.sh) |
There are a few scaling "knobs" that can be twisted in running stacks, using CloudFormation console. Conservative defaults are established in the templates, but the values can (and should) be updated in specific running riglets later.
For example, production ECS should probably be scaled up, at least horizontally, if only for high availability, so increasing the number of cluster instances to at least 2 (and arguably 4) is probably a good idea, as well as running a number of ECS Tasks for each bookit-api and bookit-client-react. ECS automatically distributes the Tasks to the ECS cluster instances.
The same goes for the RDS Aurora instance. We automatically create a replica for production (horizontal scaling). To scale vertically, give it a larger box. Note that a resize of the instance type should not result in any lost data.
The above changes can be made in the CloudFormation console. To make changes find the appropriate stack, select it, choose "update", and specify "use current template". On the resulting parameters page make appropriate changes and submit.
It's a good idea to always pause on the final submission page to see the predicted actions for your changes before proceeding, or consider using a Change Set.
| Parameter | Scaling Style | Stack | Parameter |
|---|---|---|---|
| # of ECS cluster instances | Horizontal | compute-ecs | ClusterSize/ClusterMaxSize |
| Size of ECS Hosts | Vertical | compute-ecs | InstanceType |
| Number of Tasks | Horizontal | app (once created by build) | TaskDesiredCount |
And here are the available database scaling parameters.
| Parameter | Scaling Style | Stack | Parameter |
|---|---|---|---|
| Size of RDS Instances | Vertical | db-aurora | InstanceType |
| # of RDS Instances | Vertical | db-aurora | currently via Replication property in Mappings inside db-aurora/main.yaml |
There are a number of strategies to troubleshoot issues. In addition to monitoring and searching the AWS Console and Cloudwatch Logs, you can SSH into the VPC via a Bastion:
make create-bastion ENV=<integration|staging|production>
This will create a bastion that you can SSH into as well as open an inbound Security Group rule to allow your IP address in. You can output the SSH command via:
make outputs-bastion ENV=<integration|staging|production>
Once inside the VPC, you can connect to any of the services you need.
Don't forget to tear down the Bastion when you are finished:
make delete-bastion ENV=<integration|staging|production>
Except in very unlikely and unusual circumstances all infrastructure/build changes should be made via CloudFormation updates either by submitting template file changes via the appropriate make command, or by changing parameters in the existing CloudFormation stacks using the console. Failure to do so will cause the running environment(s) to diverge from the as-declared CloudFormation resources and may (will) make it impossible to do updates in the future via CloudFormation.
An alternative to immediate execution of stack updates in the CloudFormation console is to use the "change set" feature. This creates a pending update to the CloudFormation stack that can be executed immediately, or go through an approval process. This is a safe way to preview the "blast radius" of planned changes, too before committing.
The ECS cluster runs Amazon-supplied AMIs. The AMIs are captured in a map in the compute-ecs/main.yaml
template. Occasionally, Amazon releases newer AMIs and marks existing instances as out-of-date in the
ECS console. To update to the latest set of AMIs, run the ./cloudformation/scripts/ecs-optimized-ami.sh
script and copy the results into the compute-ecs/main.yaml template's AWSRegionToAMI mapping.
We are using CloudWatch for centralized logging. You can find the logs for each environment and application at here
Alarms are generated when ERROR level logs occur. They currently get sent to the #book-it-notifications channel
The .make file can also be created by copying .make.example to .make and making changes
Example .make file with suggested values and comments (including optional values).
DOMAIN = <Domain to use for Foundation> ("buildit.tools" unless you've created a custom zone)
KEY_NAME = <EC2 SSH key name> (your side of an AWS-generated key pair for the region you'll run in)
OWNER = <The owner of the stack>  (First initial + last name.)
PROFILE = <AWS Profile Name> ("default" if you don't have multiple profiles).
PROJECT = <Project Name> ("bookit" makes the most sense for this project)
REGION = <AWS Region> (Whatever region you intend to run within.  Some regions don't support all resource types, so the common ones are best)
DOMAIN_CERT = <AWS Certificate Manager GUID> ("0663e927-e990-4157-aef9-7dea87faa6ec" is already created for `us-east-` and is your best starting point)
EMAIL_ADDRESS = <optional> (Email address for potential notifications.  Recommended only for production riglets.)
SLACK_WEBHOOK = <optional> (Webhook address to post build notifications Recommended only for production riglets.)If you're not feeling particularly lucky, or you want to understand how things are assembled, or create a custom environment, or what-have-you, follow this guide.
The full build pipeline requires at least integration, staging, and production environments, so the typical installation is:
- Run
make create-deps. This creates additional parameters in AWS' SSM Param Store. Please take special note of the following:- You will need a personal Github repo token. Please see http://tinyurl.com/yb5lxtr6
- There are special cases to take into account, so pay close attention to the prompts.
- Run
make create-environment ENV=integration(runscreate-foundation,create-compute,create-db) - Run
make create-environment ENV=staging - Run
make create-environment ENV=production
In this case there's no real "build environment", unless you want to consider AWS services an environment. We are using CodePipeline and CodeBuild, which are build managed services run by Amazon (think Jenkins in the cloud, sort-of). So what we're doing in this step is creating the build pipeline(s) for our code repo(s).
- Run
make create-build REPO=<repo_name> CONTAINER_PORT=<port> CONTAINER_MEMORY=<MiB> LISTENER_RULE_PRIORITY=<priority>, same options for status:make status-buildand outputsmake outputs-build- REPO is the repo that hangs off buildit organization (e.g "bookit-api")
- CONTAINER_PORT is the port that the application exposes (e.g. 8080)
- CONTAINER_MEMORY is the amount of memory (in MiB) to reserve for this application (e.g. 512).
- LISTENER_RULE_PRIORITY is the priority of the the rule that gets created in the ALB. While these won't ever conflict, ALB requires a unique number across all apps that share the ALB. See Application specifics
- (optional) REPO_BRANCH is the branch name for the repo - MUST NOT CONTAIN SLASHES!
- (optional) SUBDOMAIN is placed in front of the DOMAIN configured in the .make file when generating ALB listener rules. Defaults to REPO.
- (optional) SLACK_WEBHOOK is a slack URL to which build notifications are sent.
If not included, no notifications are sent. Be aware of this when issuing
make create-updatecommands on existing stacks!
It gets a little weird here. You never start an application yourself in this riglet. The build environments actually dynamically create "app" stacks in CloudFormation as part of a successful build. These app stacks represent deployed and running code (they basically map to ECS Services and TaskDefinitions).
The easiest way to tear down a riglet is by running ./delete-standard-riglet.sh.
It will take a long time to execute, mostly because it deletes the riglet's S3 buckets.
To manually delete a running riglet, in order:
- Run
make delete-app ENV=<environment> REPO=<repo_name>to delete any running App stacks.- if for some reason you deleted the pipeline first, you'll find you can't delete the app stacks because
the role under which they were created was deleted with the pipeline. In this case you'll have to create
a temporary "god role" and manually delete the app via the
aws cloudformation delete-stackcommand, supplying the--role-arnoverride.
- if for some reason you deleted the pipeline first, you'll find you can't delete the app stacks because
the role under which they were created was deleted with the pipeline. In this case you'll have to create
a temporary "god role" and manually delete the app via the
- Run
make delete-build REPO=<repo_name> REPO_BRANCH=<branch>to delete the Pipline stack. - Run
make delete-environment ENV=<environment>to delete the Environment stack (runsdelete-db,delete-compute,delete-foundation) - Run
make delete-depsto delete the required SSM parameters.


