-
Notifications
You must be signed in to change notification settings - Fork 2
3. Examples
niwciu edited this page Feb 11, 2025
·
8 revisions
- Git installed
- CMake installed
- Make or Ninja installed
- ARM GNU Toolchain (gcc-arm-none-eabi) installed
- STM32_Programmer_CLI installed
- ST-link (placed on Nucleo Board) installed
- Docker installed
- ST-link (placed on Nucleo Board) installed
- STM32_Programmer_CLI installed or devcontainer runned with given access to St-link
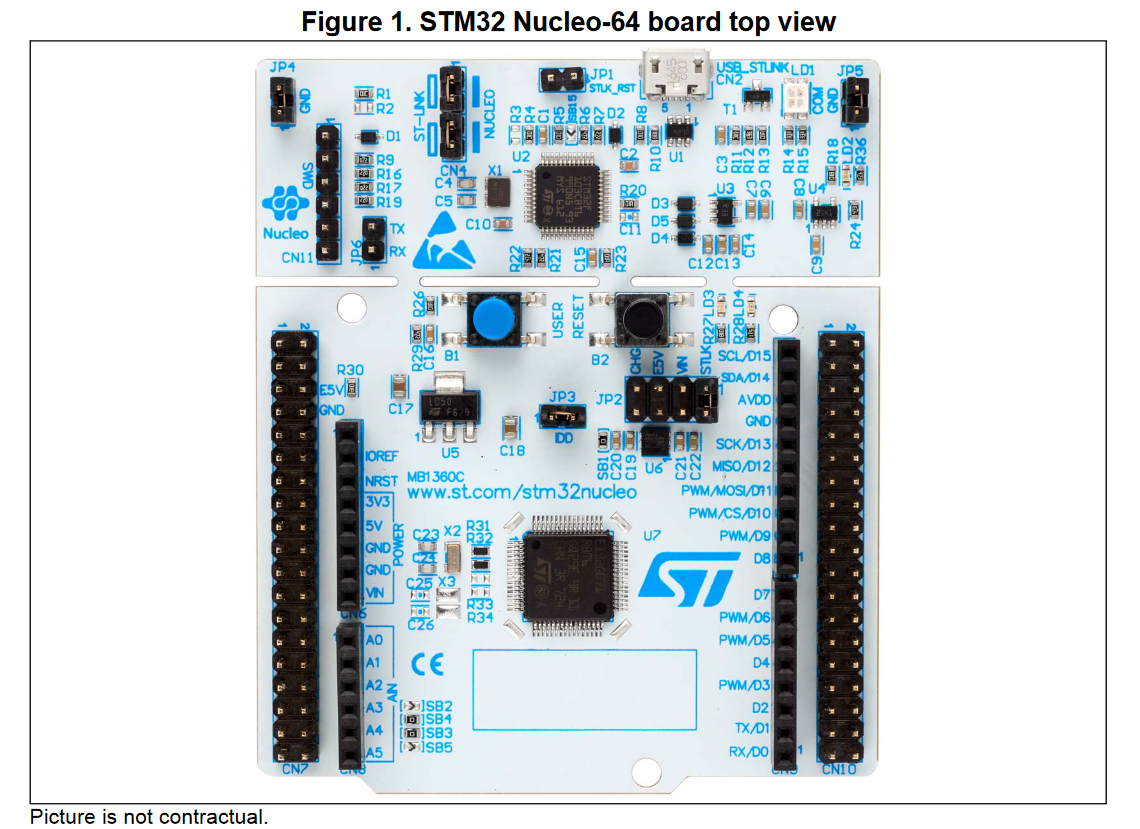
- STM32G071 Nucleo-64
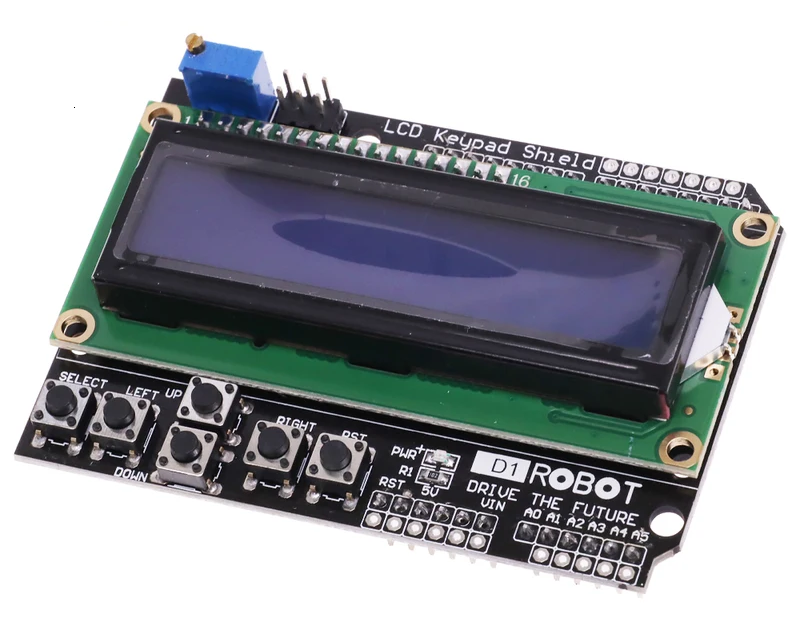
- LCD Keypad Shield for Arduino
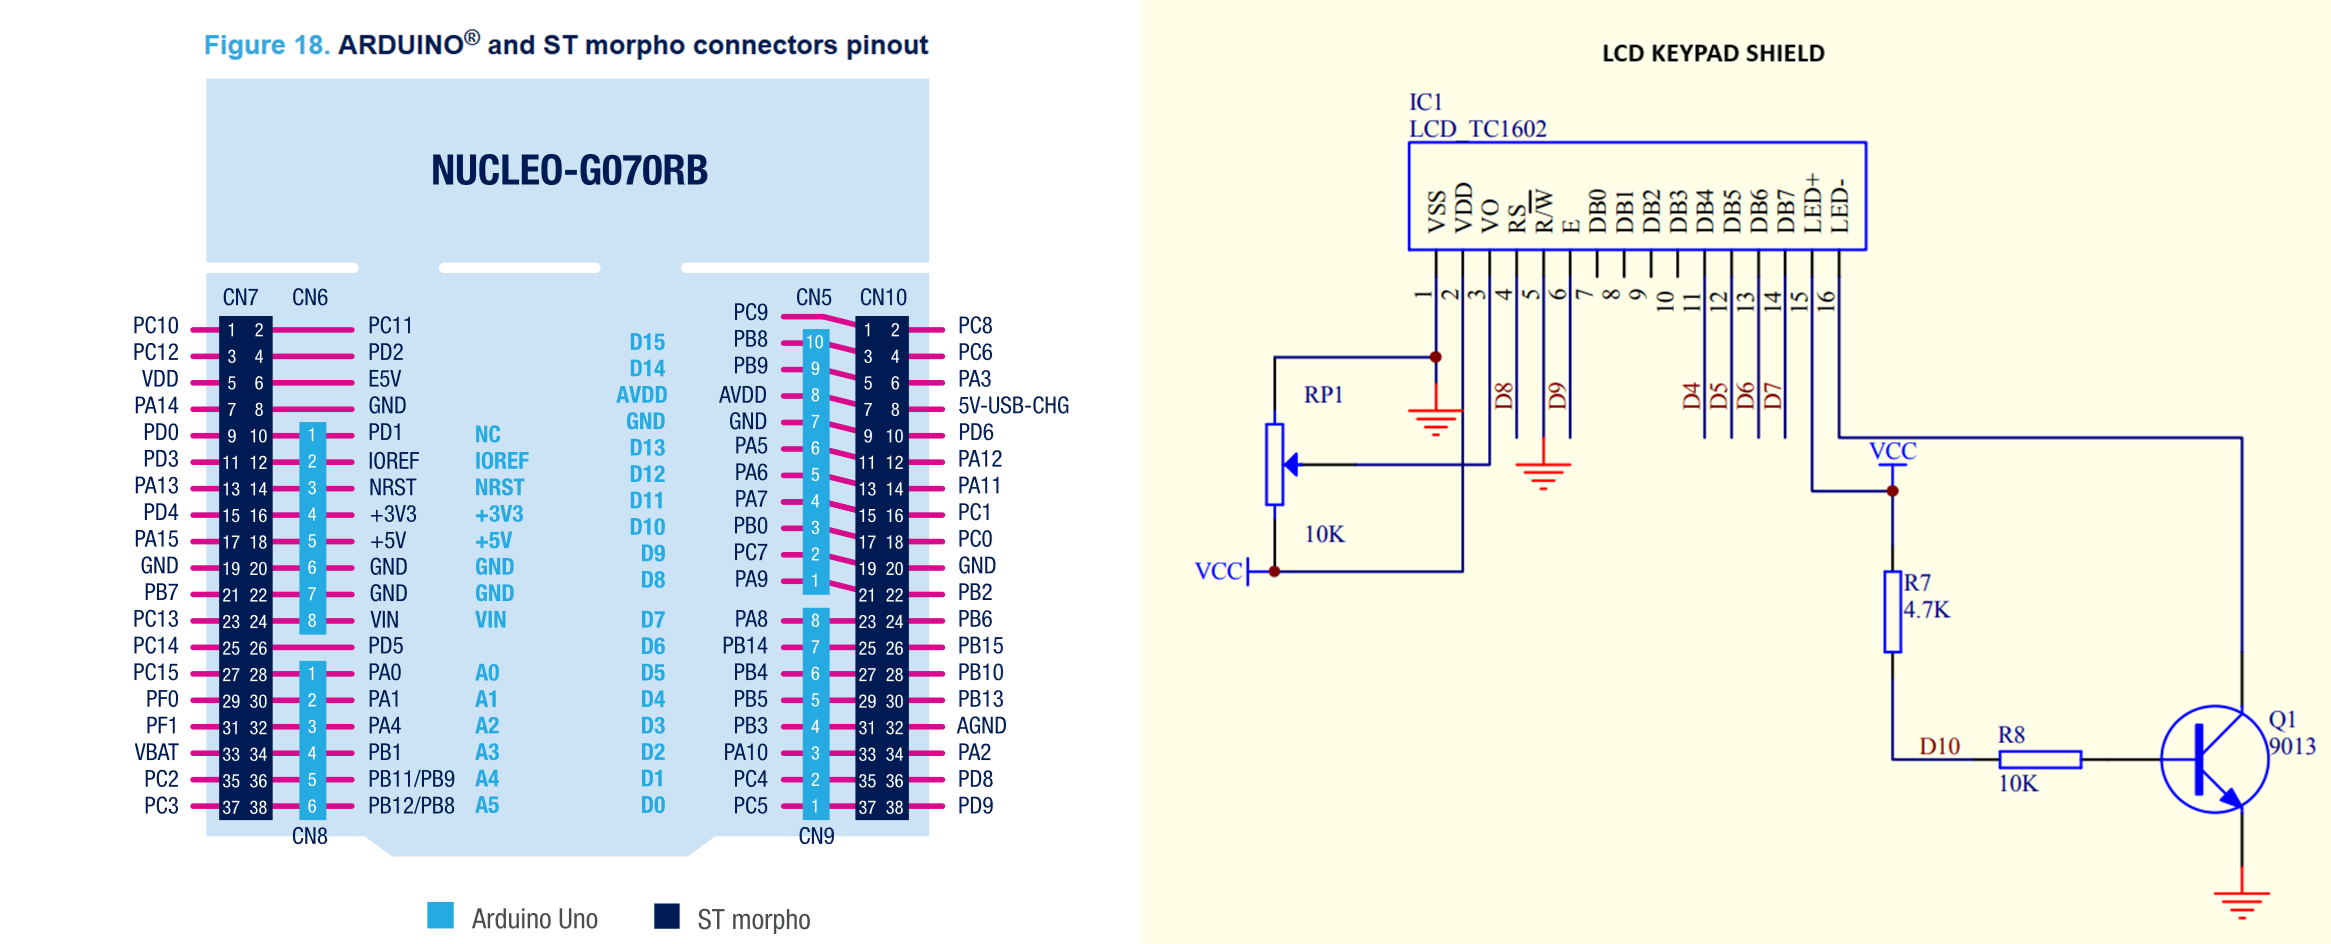
- Pin connection between LCD Keypad Shield and Nucleo board
  /************************************  LCD HARDWARE SETTINGS *******************************
   *   LCD_TYPE -> Set one of the predefined types:
   *               2004 -> 4 lines 20 characters per line
   *               1604 -> 4 lines 16 characters per line
   *               1602 -> 2 lines 16 characters per line
   *   USE_RW_PIN -> Defines HW connection between LCD and uC
   *               ON - when the RW pin is connected
   *               OFF - when the RW pin is not connected
   *  LCD_BCKL_PIN_EN_STATE -> Defines Active state of the LCD backlight enable pin
   *               HIGH - when pin active state is high
   *               LOW - when pin active state is low
   *  LCD_BUFFERING -> Define whether buffering functionalities of the LCD should be added to compilation
   *               ON - add buffering functionality to the compilation
   *               OFF - remove buffering functionality form the compilation
   ********************************************************************************************/
  #define LCD_TYPE        1602
  #define USE_RW_PIN      OFF

  #define LCD_BCKL_PIN_EN_STATE HIGH

  #define LCD_BUFFERING  ON
/******************************** LCD LIBRARY COMPILATION SETTINGS ************************
* Setting USE_(procedure name) to:
* ON - add specific procedure to compilation
* OFF - exclude specific procedure from compilation
********************************************************************************************/
#define USE_DEF_CHAR_FUNCTION ON
#define USE_LCD_INT ON
#define USE_LCD_HEX ON
#define USE_LCD_BIN ON
#define USE_LCD_CURSOR_HOME ON
#define USE_LCD_CURSOR_ON ON
#define USE_LCD_CURSOR_OFF ON
#define USE_LCD_BLINKING_CURSOR_ON ON
#if LCD_BUFFERING == ON
#define USE_LCD_BUF_INT ON
#define USE_LCD_BUF_HEX ON
#define USE_LCD_BUF_BIN ON
#endif- Open the terminal and navigate to the location where you want to clone the repository.
- Clone the repository to your preferred location
git clone https://github.com/niwciu/LCD_HD44780.git
- Enter to LCD_HD44780/examples/STM32G071RB_NUCLEO_BARE_METAL
cd ./LCD_HD44780/examples/STM32G071RB_NUCLEO_BARE_METAL - For Make type:
cmake -S ./ -B Debug -G"Unix Makefiles" -DCMAKE_BUILD_TYPE=Debugcd Debugmake all
make flash
- For Ninja type:
cmake -S ./ -B Debug -G"Ninja" -DCMAKE_BUILD_TYPE=Debugcd Debugninja
ninja flash
- In some cases, the Nucleo board may require unplugging and replugging the USB port to run the program.
- Git installed
- CMake installed
- Make or Ninja installed
- ARM GNU Toolchain (gcc-arm-none-eabi) installed
- STM32_Programmer_CLI installed
- ST-link (placed on Nucleo Board) installed
- Docker installed
- ST-link (placed on Nucleo Board) installed
- STM32_Programmer_CLI installed or devcontainer runned with given access to St-link
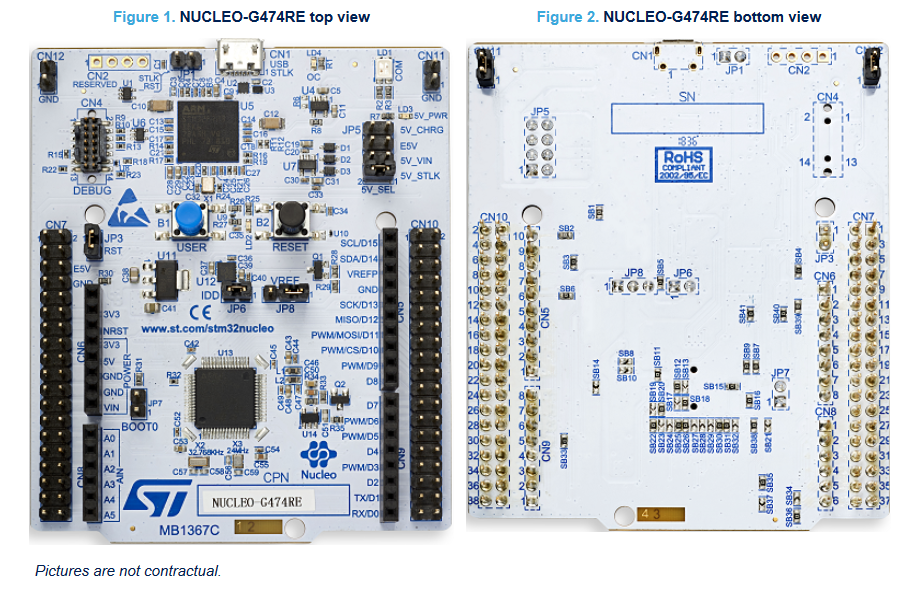
- STM32G474 Nucleo-64
- LCD Keypad Shield for Arduino

- Pin connection between LCD Keypad Shield and Nucleo board
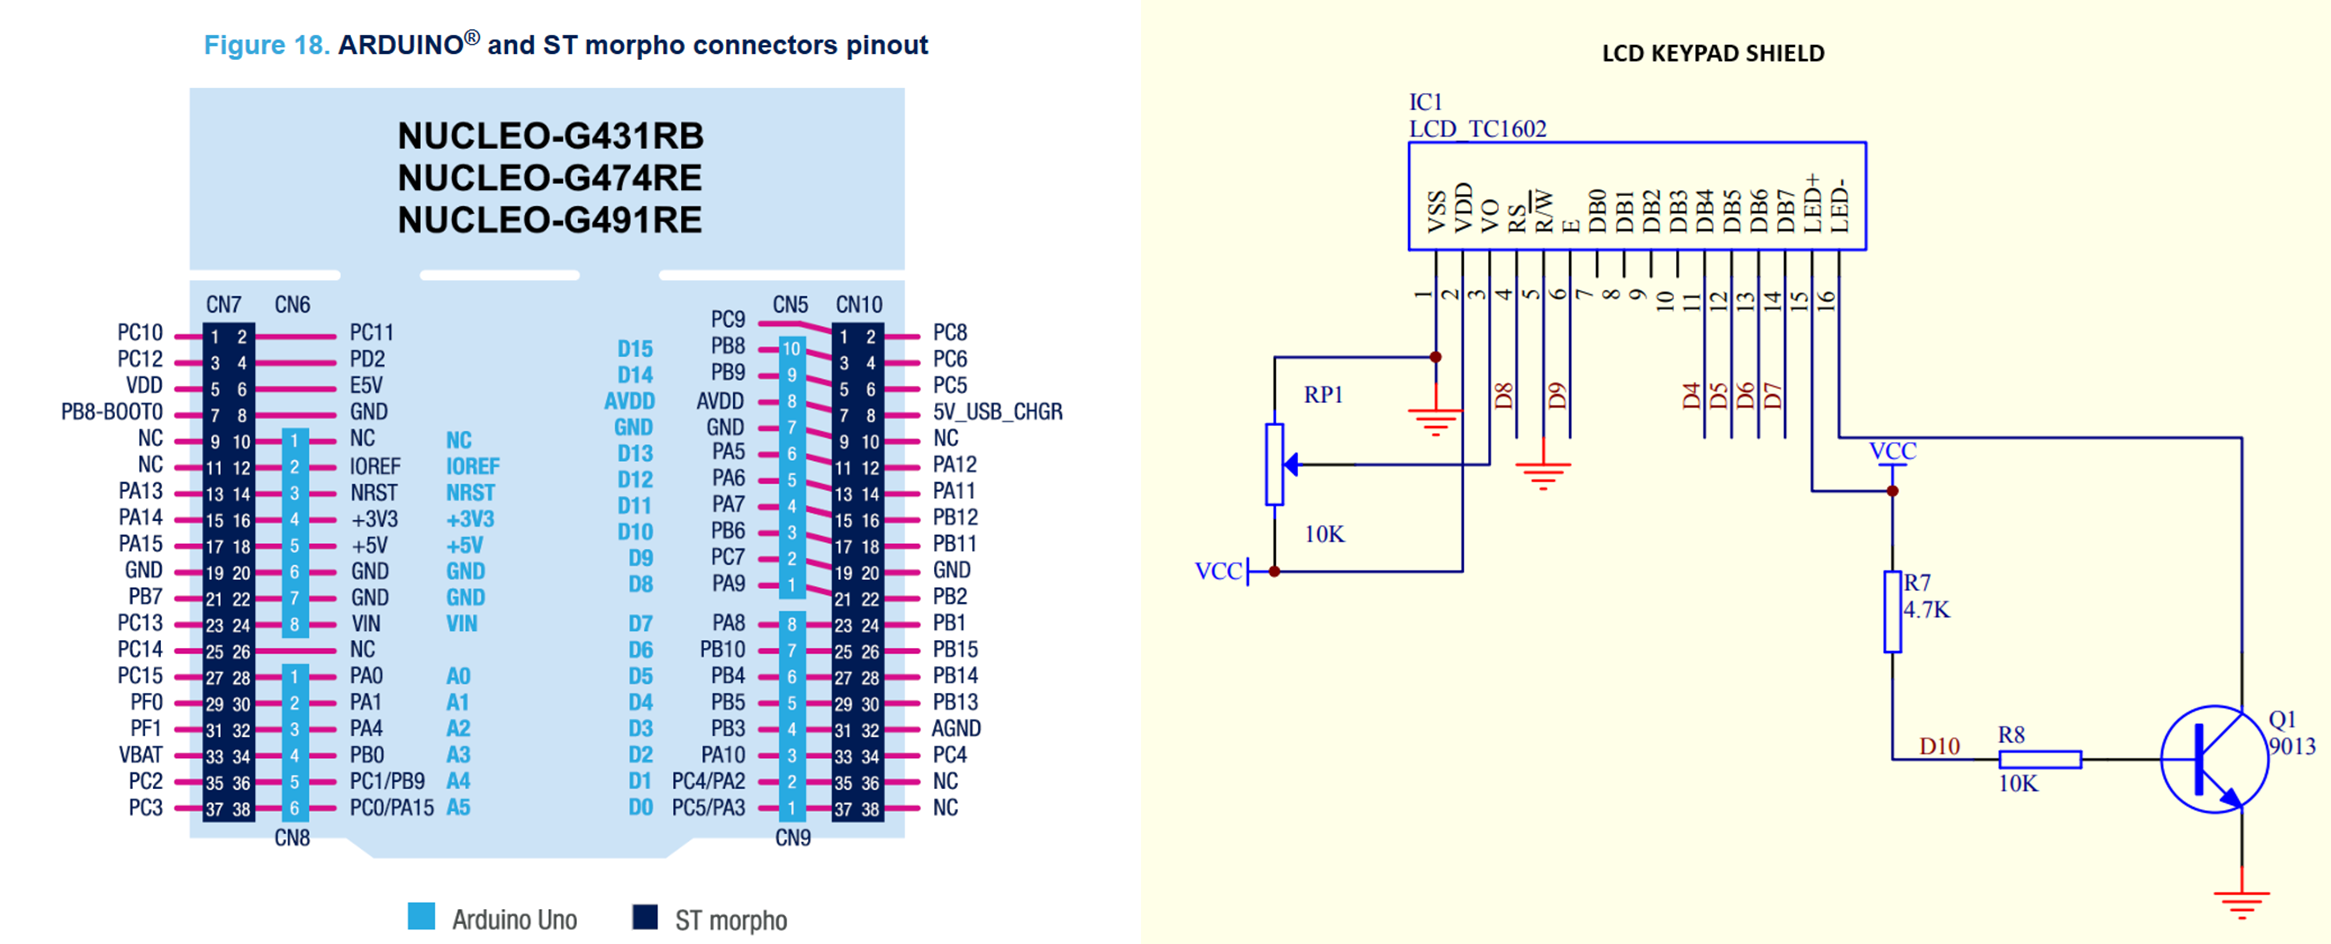
  /************************************  LCD HARDWARE SETTINGS *******************************
   *   LCD_TYPE -> Set one of the predefined types:
   *               2004 -> 4 lines 20 characters per line
   *               1604 -> 4 lines 16 characters per line
   *               1602 -> 2 lines 16 characters per line
   *   USE_RW_PIN -> Defines HW connection between LCD and uC
   *               ON - when the RW pin is connected
   *               OFF - when the RW pin is not connected
   *  LCD_BCKL_PIN_EN_STATE -> Defines Active state of the LCD backlight enable pin
   *               HIGH - when pin active state is high
   *               LOW - when pin active state is low
   *  LCD_BUFFERING -> Define whether buffering functionalities of the LCD should be added to compilation
   *               ON - add buffering functionality to the compilation
   *               OFF - remove buffering functionality form the compilation
   ********************************************************************************************/
  #define LCD_TYPE        1602
  #define USE_RW_PIN      OFF

  #define LCD_BCKL_PIN_EN_STATE HIGH

  #define LCD_BUFFERING  ON
/******************************** LCD LIBRARY COMPILATION SETTINGS ************************
* Setting USE_(procedure name) to:
* ON - add specific procedure to compilation
* OFF - exclude specific procedure from compilation
********************************************************************************************/
#define USE_DEF_CHAR_FUNCTION ON
#define USE_LCD_INT ON
#define USE_LCD_HEX ON
#define USE_LCD_BIN ON
#define USE_LCD_CURSOR_HOME ON
#define USE_LCD_CURSOR_ON ON
#define USE_LCD_CURSOR_OFF ON
#define USE_LCD_BLINKING_CURSOR_ON ON
#if LCD_BUFFERING == ON
#define USE_LCD_BUF_INT ON
#define USE_LCD_BUF_HEX ON
#define USE_LCD_BUF_BIN ON
#endif- Open the terminal and navigate to the location where you want to clone the repository.
- Clone the repository to your preferred location
git clone https://github.com/niwciu/LCD_HD44780.git
- Enter to LCD_HD44780/examples/STM32G474RE_NUCLEO_CUBE_IDE_LL/
cd ./LCD_HD44780/examples/STM32G474RE_NUCLEO_CUBE_IDE_LL - For Make type:
cmake -S ./ -B Debug -G"Unix Makefiles" -DCMAKE_BUILD_TYPE=Debugcd Debugmake all
make flash
- For Ninja type:
cmake -S ./ -B Debug -G"Ninja" -DCMAKE_BUILD_TYPE=Debugcd Debugninja
ninja flash
- Git installed
- CMake installed
- Make or Ninja installed
- AVR 8-bit GNU Toolchain
- AVRdude Installed
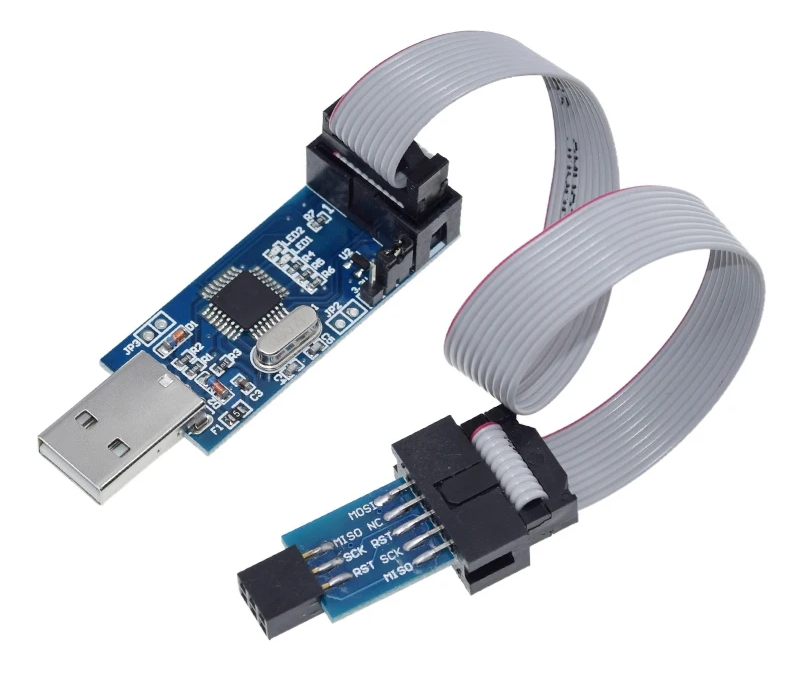
- USBasp programmer installed and updated
- Arduino UNO R3
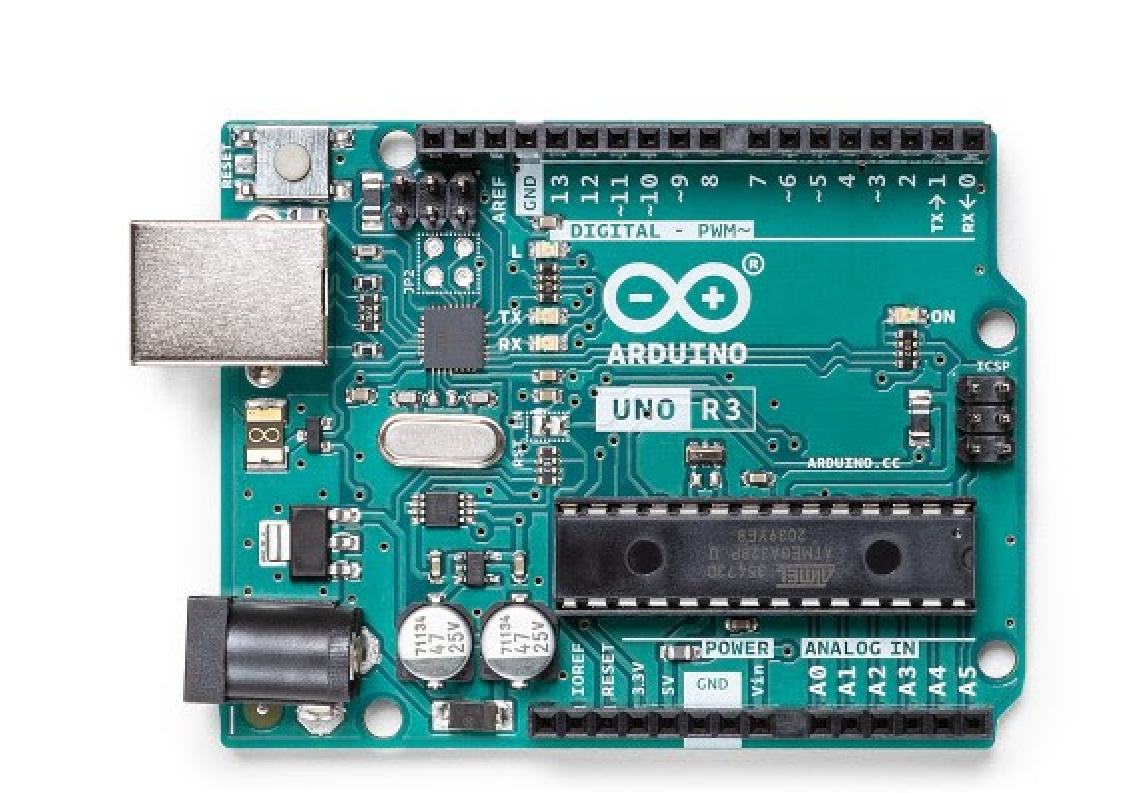
- USBasp programmer
- LCD Keypad Shield for Arduino

- Pin connection between LCD Keypad Shield and Nucleo board
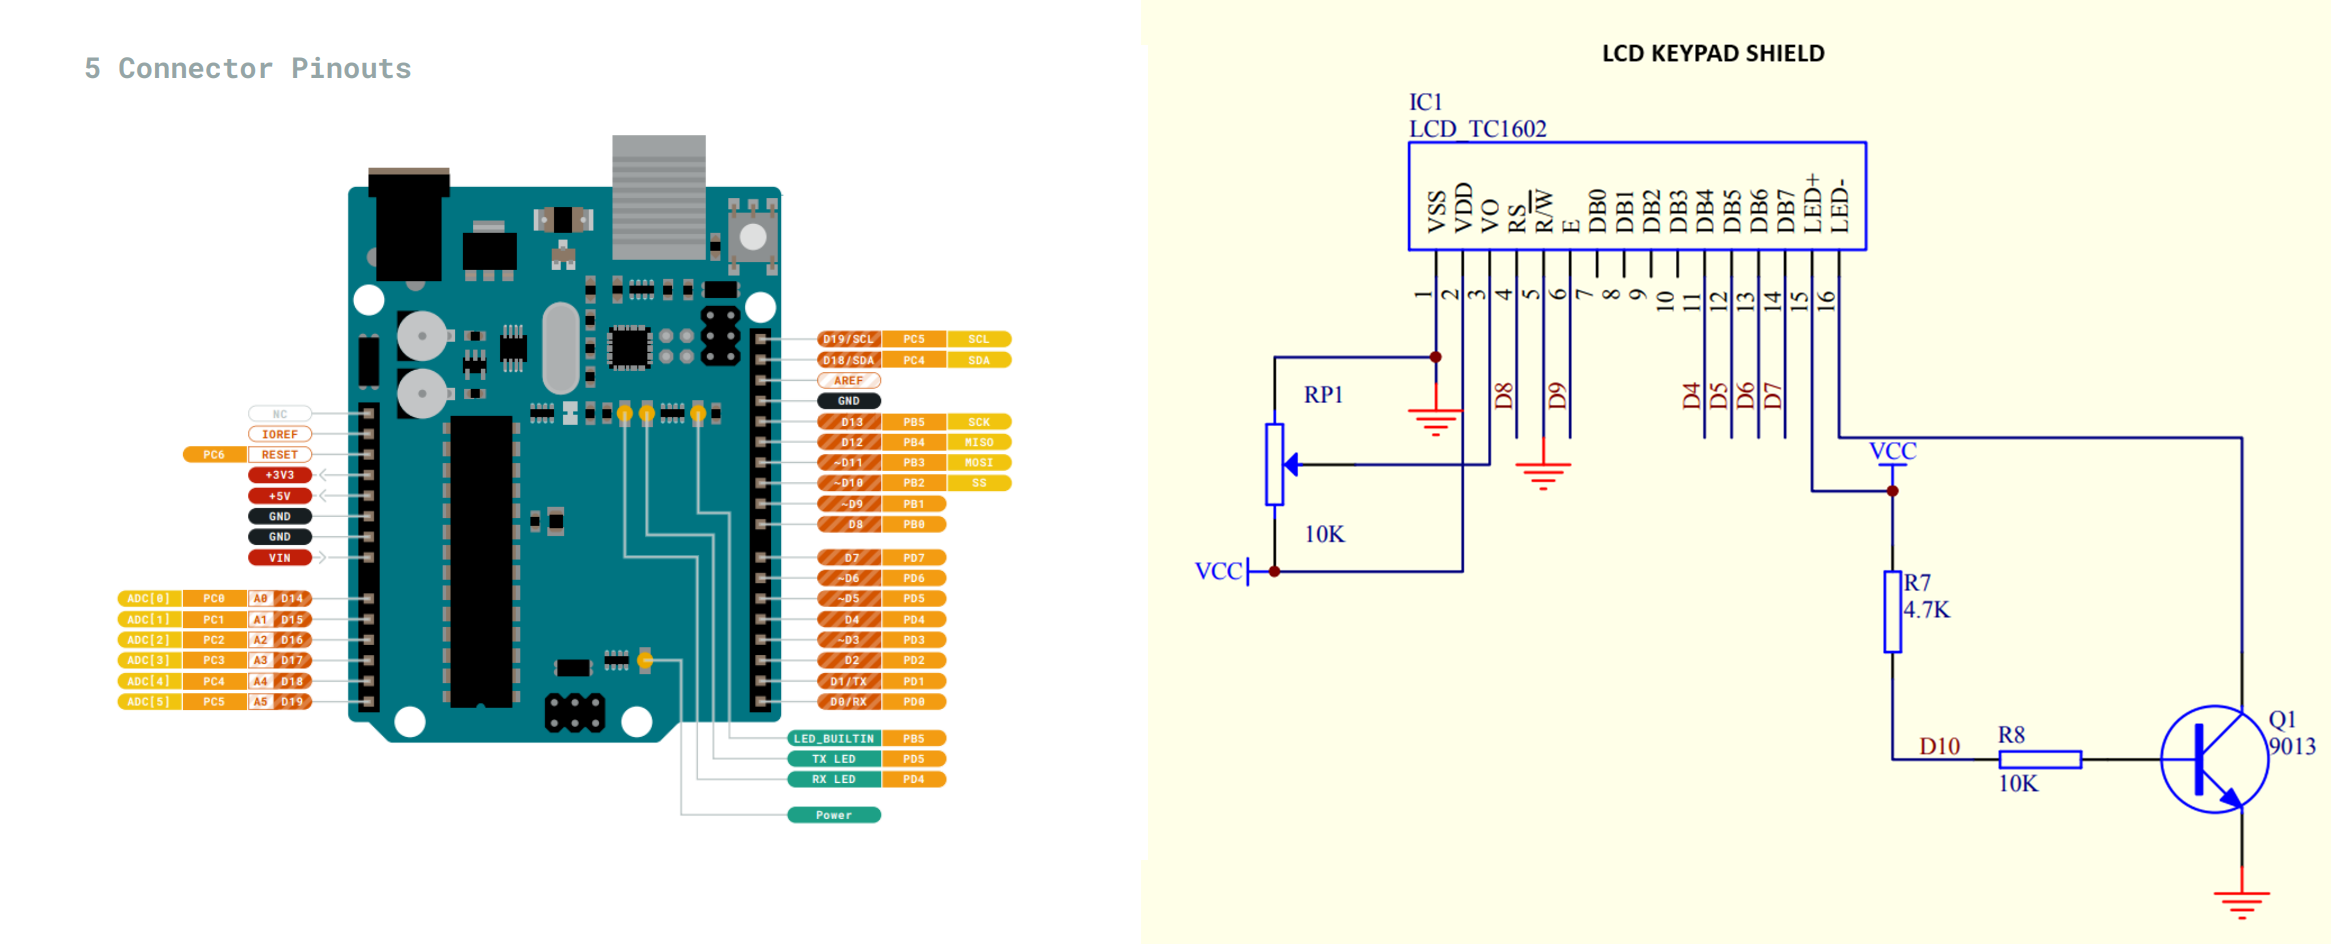
  /************************************  LCD HARDWARE SETTINGS *******************************
   *   LCD_TYPE -> Set one of the predefined types:
   *               2004 -> 4 lines 20 characters per line
   *               1604 -> 4 lines 16 characters per line
   *               1602 -> 2 lines 16 characters per line
   *   USE_RW_PIN -> Defines HW connection between LCD and uC
   *               ON - when the RW pin is connected
   *               OFF - when the RW pin is not connected
   ********************************************************************************************/
  #define LCD_TYPE        1602
  #define USE_RW_PIN      OFF

  #define LCD_BCKL_PIN_EN_STATE HIGH

  #define LCD_BUFFERING  ON
/******************************** LCD LIBRARY COMPILATION SETTINGS ************************
* Setting USE_(procedure name) to:
* ON - add specific procedure to compilation
* OFF - exclude specific procedure from compilation
********************************************************************************************/
#define USE_DEF_CHAR_FUNCTION ON
#define USE_LCD_INT ON
#define USE_LCD_HEX ON
#define USE_LCD_BIN ON
#define USE_LCD_CURSOR_HOME ON
#define USE_LCD_CURSOR_ON ON
#define USE_LCD_CURSOR_OFF ON
#define USE_LCD_BLINKING_CURSOR_ON ON
#if LCD_BUFFERING == ON
#define USE_LCD_BUF_INT ON
#define USE_LCD_BUF_HEX ON
#define USE_LCD_BUF_BIN ON
#endif- Open the terminal and navigate to the location where you want to clone the repository.
- Clone the repository to your preferred location
git clone https://github.com/niwciu/LCD_HD44780.git
- Enter to LCD_HD44780/examples/ATMEGA328P_ARDUINO_UNO_R3 folder
cd ./LCD_HD44780/examples/ATMEGA328P_ARDUINO_UNO_R3 - For Make type:
cmake -S ./ -B Build -G"Unix Makefiles"cd Buildmake all
make write_fuses
make flash
- For Ninja type:
cmake -S ./ -B Build -G"Ninja"cd Buildninja
ninja write_fuses
ninja flash
- Git installed
- Make installed
- ESP Toolchain installed according to esspresif doc
- Downloaded Flash Download Tool V3.8.5
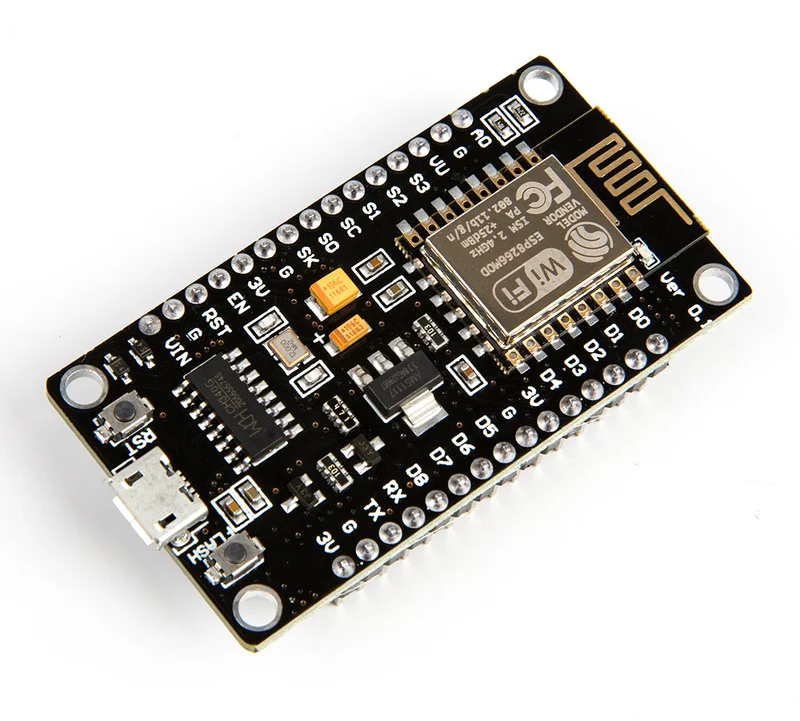
- ESP8266 NodeMCU V3 installed
- ESP8266 NodeMCU V3
- LCD Keypad Shield for Arduino

- Pin connection between LCD Keypad Shield and ESP8266 NoneMCU board
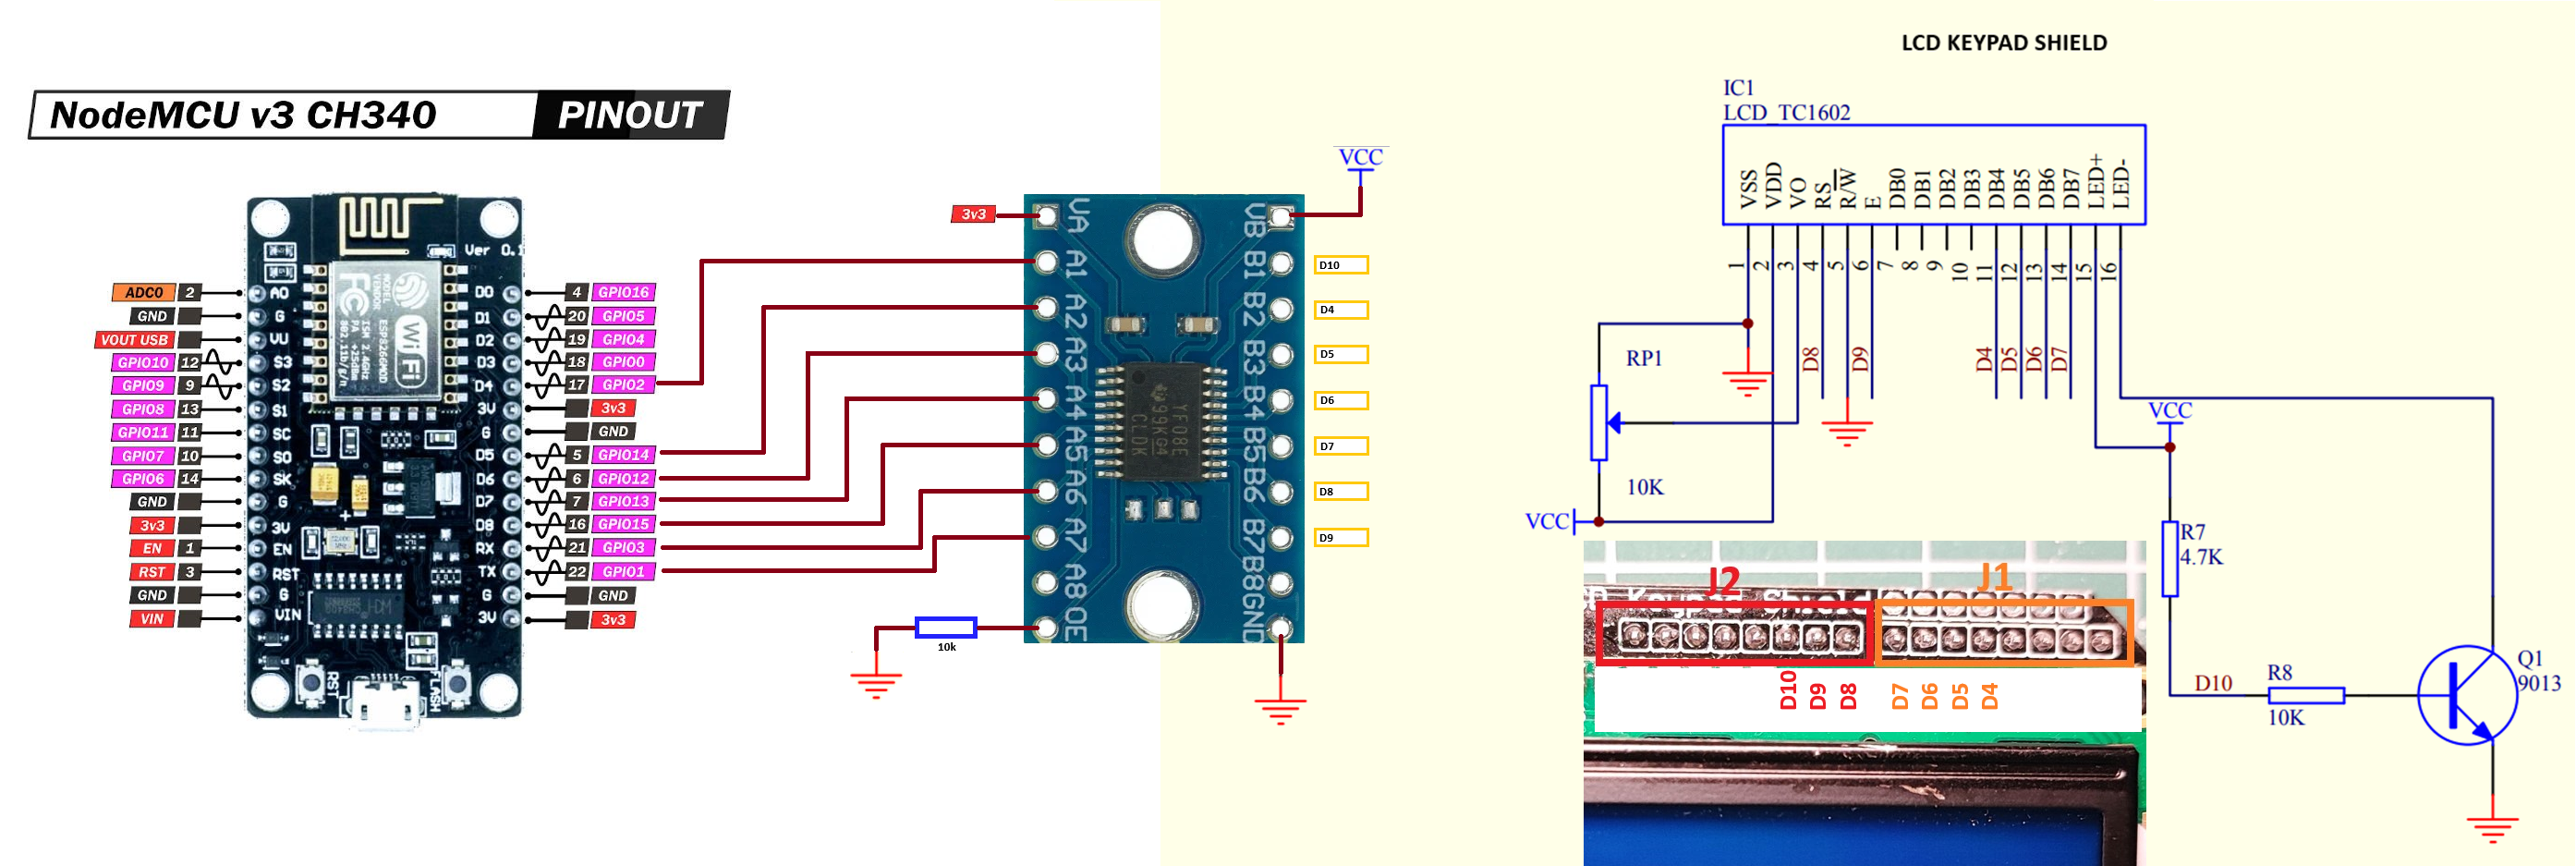
  /************************************  LCD HARDWARE SETTINGS *******************************
   *   LCD_TYPE -> Set one of the predefined types:
   *               2004 -> 4 lines 20 characters per line
   *               1604 -> 4 lines 16 characters per line
   *               1602 -> 2 lines 16 characters per line
   *   USE_RW_PIN -> Defines HW connection between LCD and uC
   *               ON - when the RW pin is connected
   *               OFF - when the RW pin is not connected
   ********************************************************************************************/
  #define LCD_TYPE        1602
  #define USE_RW_PIN      OFF

  #define LCD_BCKL_PIN_EN_STATE HIGH

  #define LCD_BUFFERING  ON
/******************************** LCD LIBRARY COMPILATION SETTINGS ************************
* Setting USE_(procedure name) to:
* ON - add specific procedure to compilation
* OFF - exclude specific procedure from compilation
********************************************************************************************/
#define USE_DEF_CHAR_FUNCTION ON
#define USE_LCD_INT ON
#define USE_LCD_HEX ON
#define USE_LCD_BIN ON
#define USE_LCD_CURSOR_HOME ON
#define USE_LCD_CURSOR_ON ON
#define USE_LCD_CURSOR_OFF ON
#define USE_LCD_BLINKING_CURSOR_ON ON
#if LCD_BUFFERING == ON
#define USE_LCD_BUF_INT ON
#define USE_LCD_BUF_HEX ON
#define USE_LCD_BUF_BIN ON
#endif- Open the terminal and navigate to the location where you want to clone the repository.
- Clone the repository to your preferred location
git clone https://github.com/niwciu/LCD_HD44780.git- Enter to LCD_HD44780/examples/ESP8266_NONOS_SDK/LCD_HD44780_TEST folder
cd ./LCD_HD44780/examples/ESP8266_NONOS_SDK/LCD_HD44780_TEST- Clean the project by running clean.bat script
./clean.bat- Build the project by running build.bat script
./build.bat- Run flash_download_tool_3.8.5
- Select "Developer Mode" and "ESP8266 DownloadTool"
- Set all fields as it is shown on picture bellow
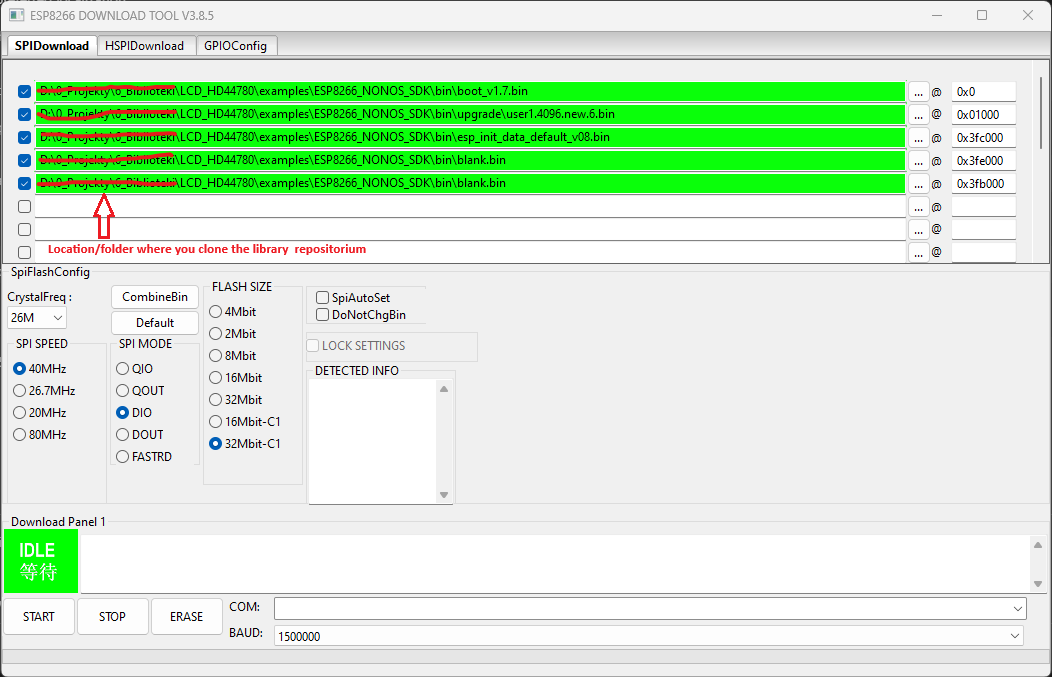
- Select COM port on which your NodeMCU board has been installed
- Click START to flash the IC
- After flash is done pres reset button on your NodeMCU board
