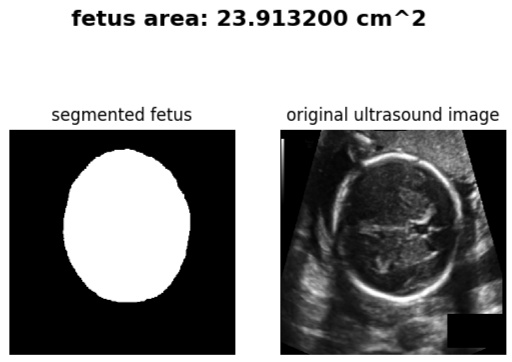
Semantic segmentation of Fetus head & Area determination using a modified U-Net architecture. This model was trained from scratch using 800 training images. Random crop & random vertical flip methods are used for data augmentation.
The Network was trained for 100 epochs using batch size=1 and obtained IoU Score of 96.95 % on the validation dataset which contains 200 images. The link to the trained weights is here.
The data is used from the Grand Challenge.
Programming Language : Python3
The code for training is constructed in such a way that a particular structure of the directory is necessary within the data folder. So, instead of manually downloading data from the link mentioned above run the following command in the terminal:
python3 data_downloader.py
The above code will automotically download, unzip, creates test, training & validation directories, then splits the annotations from the images(Images and targets are together in the source of the data).
The original annotations in the source of the data are elliptical closed figure because the task in the Grand challenge was estimating the fetus head perimeter. In this task we need to segment the fetus head and calculate the area. So an appropriate function is built in the data downloader to fill the annotations automatically without any manual processing. The process of downloading data and filling annotations will take some time. This is only one time thing.
The annotations before and after filing are shown below:

After running the file data_downloader.py you will see a folder called data in the working directory. Please explore the data folder to get an idea about the data.
After this step the data can be used to train the model & predict the outcomes of the model.
>python3 trainer.py -h
usage: trainer.py [-h] [--lr LR] --n_epochs N_EPOCHS [--device {cpu,gpu}]
                  [--load LOAD] [--bs BS] --save SAVE

Command line arguments for training Unet

optional arguments:
  -h, --help           show this help message and exit
  --lr LR              learning rate of the optimizer
                              (default learning rate=0.001)
  --n_epochs N_EPOCHS  number of epochs
                              (required: True)
  --device {cpu,gpu}   device to train the model
                              (default='cpu')
  --load LOAD          path of pre-trained weights
                              (default= None,it will start from scratch)
  --bs BS              batch size of dataloader
                              (default= 1)
  --save SAVE          path to save trained weights
                              (required: True)
You can specify which model to use with --load WEIGHTS.pth
The complete structure of code looks like:
python3 trainer.py --n_epochs=1 --device=gpu --save=trained_weights/unet_10_epochs.pth --lr=0.001 --bs=1
>python3 predict.py -h
usage: predict.py [-h] [--visualize VISUALIZE] [--device {cpu,gpu}] --load
                  LOAD --path PATH [--output_path OUTPUT_PATH]
                  [--pixel_size PIXEL_SIZE]

Command line arguments for predicting Unet model perfomance

optional arguments:
  -h, --help            show this help message and exit
  --visualize VISUALIZE
                        visualize predictions of the network ?
                            (deault= True)
  --device {cpu,gpu}    device to run the model.
                            (default='cpu')
  --load LOAD           path of trained weights.
                            (required= True)
  --path PATH           path of image to predict.
                            (required= True)
  --output_path OUTPUT_PATH
                        path to save the predicted image
  --pixel_size PIXEL_SIZE
                        pixel size of input image
Note: If you want to save the output you can specify the output path.However there is a easier way of saving it. By enabling --visualize=True a matplotlib window pops up. You can save by clicking the save button on the window.
The complete code for prediction looks like this:
python3 predict.py --device=gpu --load=trained_weights/unet_100_epochs.pth --path=data/test_set/152_HC.png --pixel_size=0.25199 --visualize=True
The model was trained on Google Colaboratory. It took approximately 7hrs to train the model for 100 epochs.
