Examples demonstrating how to optimize Caffe/TensorFlow/DarkNet/PyTorch models with TensorRT and do inference on NVIDIA Jetson or x86_64 platforms. Highlights:
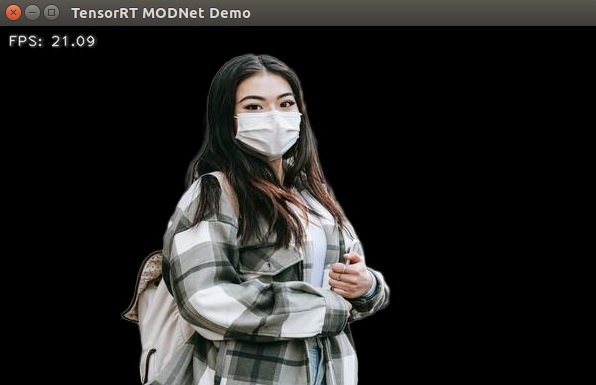
- Run an optimized "MODNet" video matting model at ~21 FPS on Jetson Xavier NX.
- Run an optimized "yolov4-416" object detector at ~4.6 FPS on Jetson Nano.
- Run an optimized "yolov3-416" object detector at ~4.9 FPS on Jetson Nano.
- Run an optimized "ssd_mobilenet_v1_coco" object detector ("trt_ssd_async.py") at 27~28 FPS on Jetson Nano.
- Run an optimized "MTCNN" face detector at 6~11 FPS on Jetson Nano.
- Run an optimized "GoogLeNet" image classifier at "~16 ms per image (inference only)" on Jetson Nano.
- All demos work on Jetson Nano, TX2, AGX Xavier, and Xavier NX.
- All demos also work on x86_64 PC with NVIDIA GPU(s). Please refer to README_x86.md for more information.
- Prerequisite
- Demo #1: GoogLeNet
- Demo #2: MTCNN
- Demo #3: SSD
- Demo #4: YOLOv3
- Demo #5: YOLOv4
- Demo #6: Using INT8 and DLA core
- Demo #7: MODNet
The code in this repository was tested on Jetson Nano, TX2, and Xavier NX DevKits. In order to run the demos below, first make sure you have the proper version of image (JetPack) installed on the target Jetson system. For example, Setting up Jetson Nano: The Basics and Setting up Jetson Xavier NX.
More specifically, the target Jetson system must have TensorRT libraries installed.
- Demo #1 and Demo #2: works for TensorRT 3.x+,
- Demo #3: requires TensoRT 5.x+,
- Demo #4 and Demo #5: requires TensorRT 6.x+.
- Demo #6 part 1: INT8 requires TensorRT 6.x+ and only works on GPUs with CUDA compute 6.1+.
- Demo #6 part 2: DLA core requires TensorRT 7.x+ (is only tested on Jetson Xavier NX).
- Demo #7: requires TensorRT 7.x+.
You could check which version of TensorRT has been installed on your Jetson system by looking at file names of the libraries. For example, TensorRT v5.1.6 (JetPack-4.2.2) was present on one of my Jetson Nano DevKits.
$ ls /usr/lib/aarch64-linux-gnu/libnvinfer.so*
/usr/lib/aarch64-linux-gnu/libnvinfer.so
/usr/lib/aarch64-linux-gnu/libnvinfer.so.5
/usr/lib/aarch64-linux-gnu/libnvinfer.so.5.1.6
Furthermore, all demo programs in this repository require "cv2" (OpenCV) module for python3. You could use the "cv2" module which came in the JetPack. Or, if you'd prefer building your own, refer to Installing OpenCV 3.4.6 on Jetson Nano for how to build from source and install opencv-3.4.6 on your Jetson system.
If you plan to run Demo #3 (SSD), you'd also need to have "tensorflow-1.x" installed. You could probably use the official tensorflow wheels provided by NVIDIA, or refer to Building TensorFlow 1.12.2 on Jetson Nano for how to install tensorflow-1.12.2 on the Jetson system.
Or if you plan to run Demo #4 and Demo #5, you'd need to have "protobuf" installed. I recommend installing "protobuf-3.8.0" using my install_protobuf-3.8.0.sh script. This script would take a couple of hours to finish on a Jetson system. Alternatively, doing pip3 install with a recent version of "protobuf" should also work (but might run a little bit slowlier).
In case you are setting up a Jetson Nano, TX2 or Xavier NX from scratch to run these demos, you could refer to the following blog posts.
- JetPack-4.6
- JetPack-4.5
- Setting up Jetson Xavier NX
- JetPack-4.4 for Jetson Nano
- JetPack-4.3 for Jetson Nano
This demo illustrates how to convert a prototxt file and a caffemodel file into a TensorRT engine file, and to classify images with the optimized TensorRT engine.
Step-by-step:
-
Clone this repository.
$ cd ${HOME}/project
$ git clone https://github.com/jkjung-avt/tensorrt_demos.git
$ cd tensorrt_demos
-
Build the TensorRT engine from the pre-trained googlenet (ILSVRC2012) model. Note that I downloaded the pre-trained model files from BVLC caffe and have put a copy of all necessary files in this repository.
$ cd ${HOME}/project/tensorrt_demos/googlenet
$ make
$ ./create_engine
-
Build the Cython code. Install Cython if not previously installed.
$ sudo pip3 install Cython
$ cd ${HOME}/project/tensorrt_demos
$ make
-
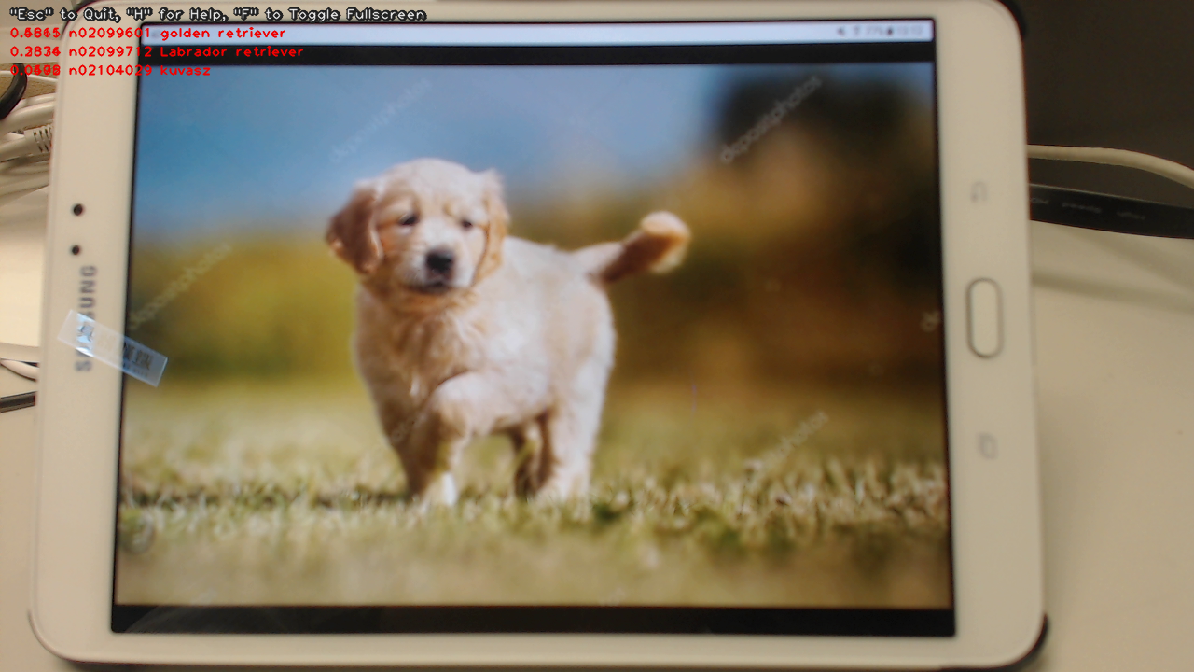
Run the "trt_googlenet.py" demo program. For example, run the demo using a USB webcam (/dev/video0) as the input.
$ cd ${HOME}/project/tensorrt_demos
$ python3 trt_googlenet.py --usb 0 --width 1280 --height 720
Here's a screenshot of the demo (JetPack-4.2.2, i.e. TensorRT 5).
-
The demo program supports 5 different image/video inputs. You could do
python3 trt_googlenet.py --helpto read the help messages. Or more specifically, the following inputs could be specified:--image test_image.jpg: an image file, e.g. jpg or png.--video test_video.mp4: a video file, e.g. mp4 or ts. An optional--video_loopingflag could be enabled if needed.--usb 0: USB webcam (/dev/video0).--rtsp rtsp://admin:[email protected]/live.sdp: RTSP source, e.g. an IP cam. An optional--rtsp_latencyargument could be used to adjust the latency setting in this case.--onboard 0: Jetson onboard camera.
In additional, you could use
--widthand--heightto specify the desired input image size, and use--do_resizeto force resizing of image/video file source.The
--usb,--rtspand--onboardvideo sources usually produce image frames at 30 FPS. If the TensorRT engine inference code runs faster than that (which happens easily on a x86_64 PC with a good GPU), one particular image could be inferenced multiple times before the next image frame becomes available. This causes problem in the object detector demos, since the original image could have been altered (bounding boxes drawn) and the altered image is taken for inference again. To cope with this problem, use the optional--copy_frameflag to force copying/cloning image frames internally. -
Check out my blog post for implementation details:
This demo builds upon the previous one. It converts 3 sets of prototxt and caffemodel files into 3 TensorRT engines, namely the PNet, RNet and ONet. Then it combines the 3 engine files to implement MTCNN, a very good face detector.
Assuming this repository has been cloned at "${HOME}/project/tensorrt_demos", follow these steps:
-
Build the TensorRT engines from the pre-trained MTCNN model. (Refer to mtcnn/README.md for more information about the prototxt and caffemodel files.)
$ cd ${HOME}/project/tensorrt_demos/mtcnn
$ make
$ ./create_engines
-
Build the Cython code if it has not been done yet. Refer to step 3 in Demo #1.
-
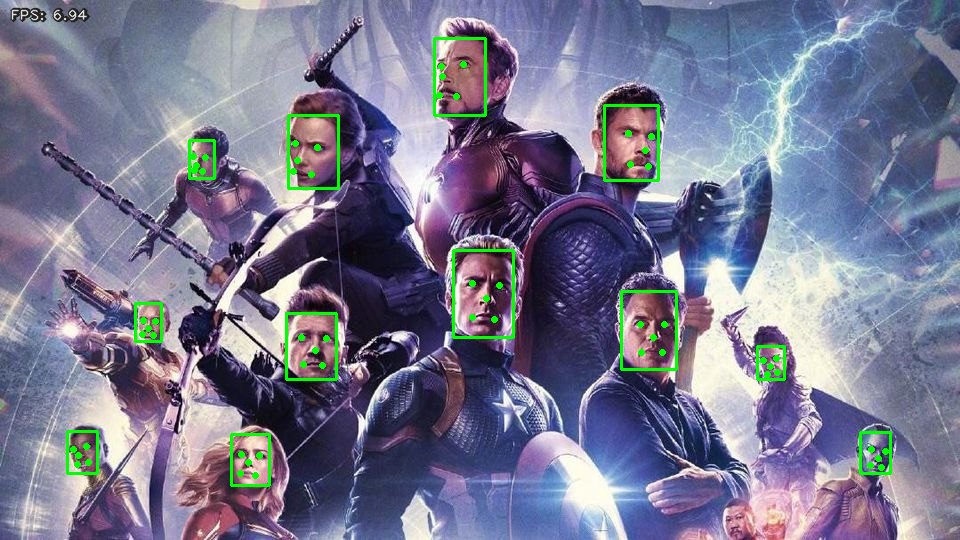
Run the "trt_mtcnn.py" demo program. For example, I grabbed from the internet a poster of The Avengers for testing.
$ cd ${HOME}/project/tensorrt_demos
$ python3 trt_mtcnn.py --image ${HOME}/Pictures/avengers.jpg
Here's the result (JetPack-4.2.2, i.e. TensorRT 5).
-
The "trt_mtcnn.py" demo program could also take various image inputs. Refer to step 5 in Demo #1 for details.
-
Check out my related blog posts:
This demo shows how to convert pre-trained tensorflow Single-Shot Multibox Detector (SSD) models through UFF to TensorRT engines, and to do real-time object detection with the TensorRT engines.
NOTE: This particular demo requires TensorRT "Python API", which is only available in TensorRT 5.x+ on the Jetson systems. In other words, this demo only works on Jetson systems properly set up with JetPack-4.2+, but not JetPack-3.x or earlier versions.
Assuming this repository has been cloned at "${HOME}/project/tensorrt_demos", follow these steps:
-
Install requirements (pycuda, etc.) and build TensorRT engines from the pre-trained SSD models.
$ cd ${HOME}/project/tensorrt_demos/ssd
$ ./install.sh
$ ./build_engines.sh
NOTE: On my Jetson Nano DevKit with TensorRT 5.1.6, the version number of UFF converter was "0.6.3". When I ran "build_engine.py", the UFF library actually printed out:
UFF has been tested with tensorflow 1.12.0. Other versions are not guaranteed to work.So I would strongly suggest you to use tensorflow 1.12.x (or whatever matching version for the UFF library installed on your system) when converting pb to uff. -
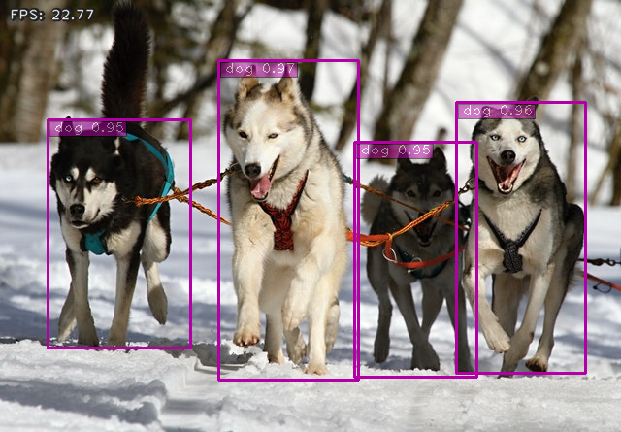
Run the "trt_ssd.py" demo program. The demo supports 4 models: "ssd_mobilenet_v1_coco", "ssd_mobilenet_v1_egohands", "ssd_mobilenet_v2_coco", or "ssd_mobilenet_v2_egohands". For example, I tested the "ssd_mobilenet_v1_coco" model with the "huskies" picture.
$ cd ${HOME}/project/tensorrt_demos
$ python3 trt_ssd.py --image ${HOME}/project/tf_trt_models/examples/detection/data/huskies.jpg \
                     --model ssd_mobilenet_v1_coco
Here's the result (JetPack-4.2.2, i.e. TensorRT 5). Frame rate was good (over 20 FPS).
NOTE: When running this demo with TensorRT 6 (JetPack-4.3) on the Jetson Nano, I encountered the following error message which could probably be ignored for now. Quote from NVIDIA's NVES_R:
This is a known issue and will be fixed in a future version.[TensorRT] ERROR: Could not register plugin creator: FlattenConcat_TRT in namespaceI also tested the "ssd_mobilenet_v1_egohands" (hand detector) model with a video clip from YouTube, and got the following result. Again, frame rate was pretty good. But the detection didn't seem very accurate though :-(
$ python3 trt_ssd.py --video ${HOME}/Videos/Nonverbal_Communication.mp4 \
                     --model ssd_mobilenet_v1_egohands
(Click on the image below to see the whole video clip...)
-
The "trt_ssd.py" demo program could also take various image inputs. Refer to step 5 in Demo #1 again.
-
Referring to this comment, "#TODO enable video pipeline", in the original TRT_object_detection code, I did implement an "async" version of ssd detection code to do just that. When I tested "ssd_mobilenet_v1_coco" on the same huskies image with the async demo program on the Jetson Nano DevKit, frame rate improved 3~4 FPS.
$ cd ${HOME}/project/tensorrt_demos
$ python3 trt_ssd_async.py --image ${HOME}/project/tf_trt_models/examples/detection/data/huskies.jpg \
                           --model ssd_mobilenet_v1_coco
-
To verify accuracy (mAP) of the optimized TensorRT engines and make sure they do not degrade too much (due to reduced floating-point precision of "FP16") from the original TensorFlow frozen inference graphs, you could prepare validation data and run "eval_ssd.py". Refer to README_mAP.md for details.
I compared mAP of the TensorRT engine and the original tensorflow model for both "ssd_mobilenet_v1_coco" and "ssd_mobilenet_v2_coco" using COCO "val2017" data. The results were good. In both cases, mAP of the optimized TensorRT engine matched the original tensorflow model. The FPS (frames per second) numbers in the table were measured using "trt_ssd_async.py" on my Jetson Nano DevKit with JetPack-4.3.
TensorRT engine mAP @
IoU=0.5:0.95mAP @
IoU=0.5FPS on Nano mobilenet_v1 TF 0.232 0.351 -- mobilenet_v1 TRT (FP16) 0.232 0.351 27.7 mobilenet_v2 TF 0.248 0.375 -- mobilenet_v2 TRT (FP16) 0.248 0.375 22.7 -
Check out my blog posts for implementation details:
- TensorRT UFF SSD
- Speeding Up TensorRT UFF SSD
- Verifying mAP of TensorRT Optimized SSD and YOLOv3 Models
- Or if you'd like to learn how to train your own custom object detectors which could be easily converted to TensorRT engines and inferenced with "trt_ssd.py" and "trt_ssd_async.py": Training a Hand Detector with TensorFlow Object Detection API
(Merged with Demo #5: YOLOv4...)
Along the same line as Demo #3, these 2 demos showcase how to convert pre-trained yolov3 and yolov4 models through ONNX to TensorRT engines. The code for these 2 demos has gone through some significant changes. More specifically, I have recently updated the implementation with a "yolo_layer" plugin to speed up inference time of the yolov3/yolov4 models.
My current "yolo_layer" plugin implementation is based on TensorRT's IPluginV2IOExt. It only works for TensorRT 6+. I'm thinking about updating the code to support TensorRT 5 if I have time late on.
I developed my "yolo_layer" plugin by referencing similar plugin code by wang-xinyu and dongfangduoshou123. So big thanks to both of them.
Assuming this repository has been cloned at "${HOME}/project/tensorrt_demos", follow these steps:
-
Install "pycuda".
$ cd ${HOME}/project/tensorrt_demos/yolo
$ ./install_pycuda.sh
-
Install version "1.9.0" of python3 "onnx" module. Note that the "onnx" module would depend on "protobuf" as stated in the Prerequisite section.
$ sudo pip3 install onnx==1.9.0
-
Go to the "plugins/" subdirectory and build the "yolo_layer" plugin. When done, a "libyolo_layer.so" would be generated.
$ cd ${HOME}/project/tensorrt_demos/plugins
$ make
-
Download the pre-trained yolov3/yolov4 COCO models and convert the targeted model to ONNX and then to TensorRT engine. I use "yolov4-416" as example below. (Supported models: "yolov3-tiny-288", "yolov3-tiny-416", "yolov3-288", "yolov3-416", "yolov3-608", "yolov3-spp-288", "yolov3-spp-416", "yolov3-spp-608", "yolov4-tiny-288", "yolov4-tiny-416", "yolov4-288", "yolov4-416", "yolov4-608", "yolov4-csp-256", "yolov4-csp-512", "yolov4x-mish-320", "yolov4x-mish-640", and custom models such as "yolov4-416x256".)
$ cd ${HOME}/project/tensorrt_demos/yolo
$ ./download_yolo.sh
$ python3 yolo_to_onnx.py -m yolov4-416
$ python3 onnx_to_tensorrt.py -m yolov4-416
The last step ("onnx_to_tensorrt.py") takes a little bit more than half an hour to complete on my Jetson Nano DevKit. When that is done, the optimized TensorRT engine would be saved as "yolov4-416.trt".
In case "onnx_to_tensorrt.py" fails (process "Killed" by Linux kernel), it could likely be that the Jetson platform runs out of memory during conversion of the TensorRT engine. This problem might be solved by adding a larger swap file to the system. Reference: Process killed in onnx_to_tensorrt.py Demo#5.
-
Test the TensorRT "yolov4-416" engine with the "dog.jpg" image.
$ cd ${HOME}/project/tensorrt_demos
$ wget https://raw.githubusercontent.com/pjreddie/darknet/master/data/dog.jpg -O ${HOME}/Pictures/dog.jpg
$ python3 trt_yolo.py --image ${HOME}/Pictures/dog.jpg \
                      -m yolov4-416
This is a screenshot of the demo against JetPack-4.4, i.e. TensorRT 7.
-
The "trt_yolo.py" demo program could also take various image inputs. Refer to step 5 in Demo #1 again.
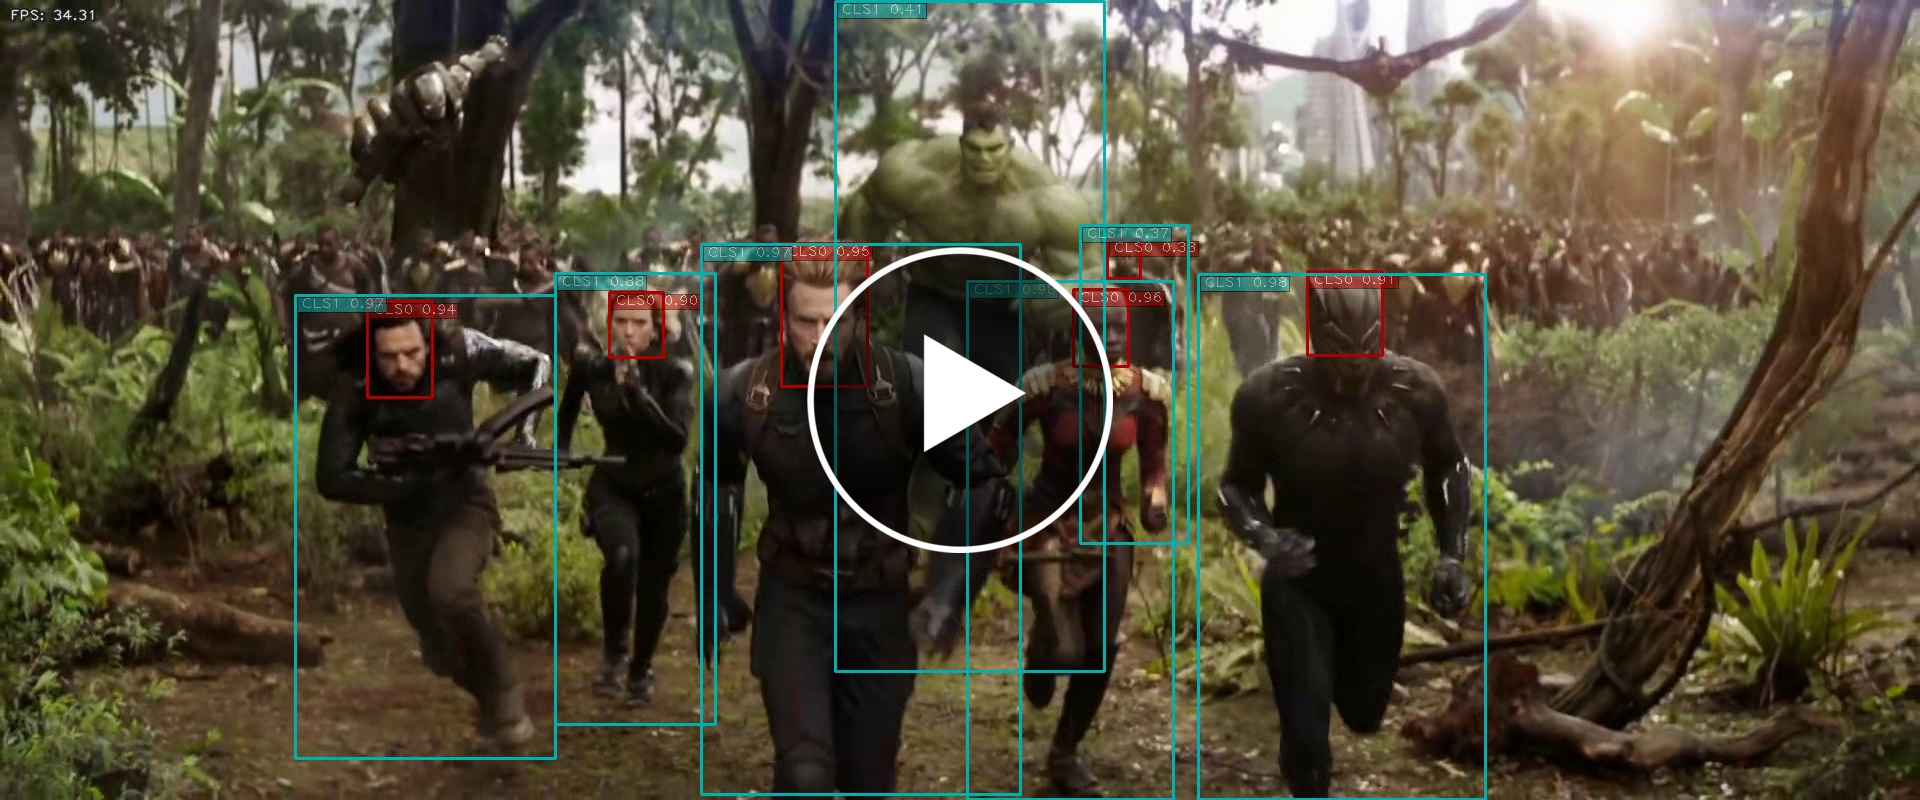
For example, I tested my own custom trained "yolov4-crowdhuman-416x416" TensorRT engine with the "Avengers: Infinity War" movie trailer:
-
(Optional) Test other models than "yolov4-416".
-
(Optional) If you would like to stream TensorRT YOLO detection output over the network and view the results on a remote host, check out my trt_yolo_mjpeg.py example.
-
Similar to step 5 of Demo #3, I created an "eval_yolo.py" for evaluating mAP of the TensorRT yolov3/yolov4 engines. Refer to README_mAP.md for details.
$ python3 eval_yolo.py -m yolov3-tiny-288
$ python3 eval_yolo.py -m yolov4-tiny-416
......
$ python3 eval_yolo.py -m yolov4-608
$ python3 eval_yolo.py -l -m yolov4-csp-256
......
$ python3 eval_yolo.py -l -m yolov4x-mish-640
I evaluated all these TensorRT yolov3/yolov4 engines with COCO "val2017" data and got the following results. I also checked the FPS (frames per second) numbers on my Jetson Nano DevKit with JetPack-4.4 (TensorRT 7).
TensorRT engine mAP @
IoU=0.5:0.95mAP @
IoU=0.5FPS on Nano yolov3-tiny-288 (FP16) 0.077 0.158 35.8 yolov3-tiny-416 (FP16) 0.096 0.202 25.5 yolov3-288 (FP16) 0.331 0.601 8.16 yolov3-416 (FP16) 0.373 0.664 4.93 yolov3-608 (FP16) 0.376 0.665 2.53 yolov3-spp-288 (FP16) 0.339 0.594 8.16 yolov3-spp-416 (FP16) 0.391 0.664 4.82 yolov3-spp-608 (FP16) 0.410 0.685 2.49 yolov4-tiny-288 (FP16) 0.179 0.344 36.6 yolov4-tiny-416 (FP16) 0.196 0.387 25.5 yolov4-288 (FP16) 0.376 0.591 7.93 yolov4-416 (FP16) 0.459 0.700 4.62 yolov4-608 (FP16) 0.488 0.736 2.35 yolov4-csp-256 (FP16) 0.336 0.502 12.8 yolov4-csp-512 (FP16) 0.436 0.630 4.26 yolov4x-mish-320 (FP16) 0.400 0.581 4.79 yolov4x-mish-640 (FP16) 0.470 0.668 1.46 -
Check out my blog posts for implementation details:
- TensorRT ONNX YOLOv3
- TensorRT YOLOv4
- Verifying mAP of TensorRT Optimized SSD and YOLOv3 Models
- For training your own custom yolov4 model: Custom YOLOv4 Model on Google Colab
- For adapting the code to your own custom trained yolov3/yolov4 models: TensorRT YOLO For Custom Trained Models (Updated)
NVIDIA introduced INT8 TensorRT inferencing since CUDA compute 6.1+. For the embedded Jetson product line, INT8 is available on Jetson AGX Xavier and Xavier NX. In addition, NVIDIA further introduced Deep Learning Accelerator (NVDLA) on Jetson Xavier NX. I tested both features on my Jetson Xavier NX DevKit, and shared the source code in this repo.
Please make sure you have gone through the steps of Demo #5 and are able to run TensorRT yolov3/yolov4 engines successfully, before following along:
-
In order to use INT8 TensorRT, you'll first have to prepare some images for "calibration". These images for calibration should cover all distributions of possible image inputs at inference time. According to official documentation, 500 of such images are suggested by NVIDIA. As an example, I used 1,000 images from the COCO "val2017" dataset for that purpose. Note that I've previously downloaded the "val2017" images for mAP evaluation.
$ cd ${HOME}/project/tensorrt_demos/yolo
$ mkdir calib_images
### randomly pick and copy over 1,000 images from "val207"
$ for jpg in $(ls -1 ${HOME}/data/coco/images/val2017/*.jpg | sort -R | head -1000); do \
    cp ${HOME}/data/coco/images/val2017/${jpg} calib_images/; \
  done
When this is done, the 1,000 images for calibration should be present in the "${HOME}/project/tensorrt_demos/yolo/calib_images/" directory.
-
Build the INT8 TensorRT engine. I use the "yolov3-608" model in the example commands below. (I've also created a "build_int8_engines.sh" script to facilitate building multiple INT8 engines at once.) Note that building the INT8 TensorRT engine on Jetson Xavier NX takes quite long. By enabling verbose logging ("-v"), you would be able to monitor the progress more closely.
$ ln -s yolov3-608.cfg yolov3-int8-608.cfg $ ln -s yolov3-608.onnx yolov3-int8-608.onnx $ python3 onnx_to_tensorrt.py -v --int8 -m yolov3-int8-608 -
(Optional) Build the TensorRT engines for the DLA cores. I use the "yolov3-608" model as example again. (I've also created a "build_dla_engines.sh" script for building multiple DLA engines at once.)
$ ln -s yolov3-608.cfg yolov3-dla0-608.cfg $ ln -s yolov3-608.onnx yolov3-dla0-608.onnx $ python3 onnx_to_tensorrt.py -v --int8 --dla_core 0 -m yolov3-dla0-608 $ ln -s yolov3-608.cfg yolov3-dla1-608.cfg $ ln -s yolov3-608.onnx yolov3-dla1-608.onnx $ python3 onnx_to_tensorrt.py -v --int8 --dla_core 1 -m yolov3-int8-608 -
Test the INT8 TensorRT engine with the "dog.jpg" image.
$ cd ${HOME}/project/tensorrt_demos
$ python3 trt_yolo.py --image ${HOME}/Pictures/dog.jpg \
                      -m yolov3-int8-608
(Optional) Also test the DLA0 and DLA1 TensorRT engines.
$ python3 trt_yolo.py --image ${HOME}/Pictures/dog.jpg \
                      -m yolov3-dla0-608
$ python3 trt_yolo.py --image ${HOME}/Pictures/dog.jpg \
                      -m yolov3-dla1-608
-
Evaluate mAP of the INT8 and DLA TensorRT engines.
$ python3 eval_yolo.py -m yolov3-int8-608
$ python3 eval_yolo.py -m yolov3-dla0-608
$ python3 eval_yolo.py -m yolov3-dla1-608
-
I tested the 5 original yolov3/yolov4 models on my Jetson Xavier NX DevKit with JetPack-4.4 (TensorRT 7.1.3.4). Here are the results.
The following FPS numbers were measured under "15W 6CORE" mode, with CPU/GPU clocks set to maximum value (
sudo jetson_clocks).TensorRT engine FP16 INT8 DLA0 DLA1 yolov3-tiny-416 58 65 42 42 yolov3-608 15.2 23.1 14.9 14.9 yolov3-spp-608 15.0 22.7 14.7 14.7 yolov4-tiny-416 57 60 X X yolov4-608 13.8 20.5 8.97 8.97 yolov4-csp-512 19.8 27.8 -- -- yolov4x-mish-640 9.01 14.1 -- -- And the following are "mAP@IoU=0.5:0.95" / "mAP@IoU=0.5" of those TensorRT engines.
TensorRT engine FP16 INT8 DLA0 DLA1 yolov3-tiny-416 0.096 / 0.202 0.094 / 0.198 0.096 / 0.199 0.096 / 0.199 yolov3-608 0.376 / 0.665 0.378 / 0.670 0.378 / 0.670 0.378 / 0.670 yolov3-spp-608 0.410 / 0.685 0.407 / 0.681 0.404 / 0.676 0.404 / 0.676 yolov4-tiny-416 0.196 / 0.387 0.190 / 0.376 X X yolov4-608 0.488 / 0.736 0.317 / 0.507 0.474 / 0.727 0.473 / 0.726 yolov4-csp-512 0.436 / 0.630 0.391 / 0.577 -- -- yolov4x-mish-640 0.470 / 0.668 0.434 / 0.631 -- -- -
Issues:
- For some reason, I'm not able to build DLA TensorRT engines for the "yolov4-tiny-416" model. I have reported the issue to NVIDIA.
- There is no method in TensorRT 7.1 Python API to specifically set DLA core at inference time. I also reported this issue to NVIDIA. When testing, I simply deserialize the TensorRT engines onto Jetson Xavier NX. I'm not 100% sure whether the engine is really executed on DLA core 0 or DLA core 1.
- mAP of the INT8 TensorRT engine of the "yolov4-608" model is not good. Originally, I thought it was an issue of TensorRT library's handling of "Concat" nodes. But after some more investigation, I saw that was not the case. Currently, I'm still not sure what the problem is...
This demo illustrates the use of TensorRT to optimize an image segmentation model. More specifically, I build and test a TensorRT engine from the pre-trained MODNet to do real-time image/video "matting". The PyTorch MODNet model comes from ZHKKKe/MODNet. Note that, as stated by the original auther, this pre-trained model is under Creative Commons Attribution NonCommercial ShareAlike 4.0 license. Thanks to ZHKKKe for sharing the model and inference code.
This MODNet model contains InstanceNorm2d layers, which are only supported in recent versions of TensorRT. So far I have only tested the code with TensorRT 7.1 and 7.2. I don't guarantee the code would work for older versions of TensorRT.
To make the demo simpler to follow, I have already converted the PyTorch MODNet model to ONNX ("modnet/modnet.onnx"). If you'd like to do the PyTorch-to-ONNX conversion by yourself, you could refer to modnet/README.md.
Here is the step-by-step guide for the demo:
-
Install "pycuda" in case you haven't done so before.
$ cd ${HOME}/project/tensorrt_demos/modnet
$ ./install_pycuda.sh
-
Build TensorRT engine from "modnet/modnet.onnx".
This step would be easy if you are using TensorRT 7.2 or later. Just use the "modnet/onnx_to_tensorrt.py" script: (You could optionally use "-v" command-line option to see verbose logs.)
$ python3 onnx_to_tensorrt.py modnet.onnx modnet.engine
When "onnx_to_tensorrt.py" finishes, the "modnet.engine" file should be generated. And you could go to step #3.
In case you are using TensorRT 7.1 (JetPack-4.5 or JetPack-4.4), "modnet/onnx_to_tensorrt.py" wouldn't work due to this error (which has been fixed in TensorRT 7.2): UNSUPPORTED_NODE: Assertion failed: !isDynamic(tensorPtr->getDimensions()) && "InstanceNormalization does not support dynamic inputs!". I worked around the problem by building onnx-tensorrt by myself. Here's how you could do it too.
$ cd ${HOME}/project/tensorrt_demos/modnet ### check out the "onnx-tensorrt" submodule $ git submodule update --init --recursive ### patch CMakeLists.txt $ sed -i '21s/cmake_minimum_required(VERSION 3.13)/#cmake_minimum_required(VERSION 3.13)/' \ onnx-tensorrt/CMakeLists.txt ### build onnx-tensorrt $ mkdir -p onnx-tensorrt/build $ cd onnx-tensorrt/build $ cmake -DCMAKE_CXX_FLAGS=-I/usr/local/cuda/targets/aarch64-linux/include \ -DONNX_NAMESPACE=onnx2trt_onnx .. $ make -j4 ### finally, we could build the TensorRT (FP16) engine $ cd ${HOME}/project/tensorrt_demos/modnet $ LD_LIBRARY_PATH=$(pwd)/onnx-tensorrt/build \ onnx-tensorrt/build/onnx2trt modnet.onnx -o modnet.engine \ -d 16 -v -
Test the TensorRT MODNet engine with "modnet/image.jpg".
$ cd ${HOME}/project/tensorrt_demos
$ python3 trt_modnet.py --image modnet/image.jpg
You could see the matted image as below. Note that I get ~21 FPS when running the code on Jetson Xavier NX with JetPack-4.5.
-
The "trt_modnet.py" demo program could also take various image inputs. Refer to step 5 in Demo #1 again. (For example, the "--usb" command-line option would be useful.)
-
Instead of a boring black background, you could use the "--background" option to specify an alternative background. The background could be either a still image or a video file. Furthermore, you could also use the "--create_video" option to save the matted outputs as a video file.
For example, I took a Chou, Tzu-Yu video and a beach video, and created a blended video like this:
$ cd ${HOME}/project/tensorrt_demos
$ python3 trt_modnet.py --video Tzu-Yu.mp4 \
                        --background beach.mp4 \
                        --demo_mode \
                        --create_video output
The result would be saved as "output.ts" on Jetson Xavier NX (or "output.mp4" on x86_64 PC).
- I referenced source code of NVIDIA/TensorRT samples to develop most of the demos in this repository. Those NVIDIA samples are under Apache License 2.0.
- GoogLeNet: "This model is released for unrestricted use."
- MTCNN: license not specified. Note the original MTCNN is under MIT License.
- TensorFlow Object Detection Models: Apache License 2.0.
- YOLOv3/YOLOv4 models (DarkNet): YOLO LICENSE.
- MODNet: Creative Commons Attribution NonCommercial ShareAlike 4.0 license.
- For the rest of the code (developed by jkjung-avt and other contributors): MIT License.
