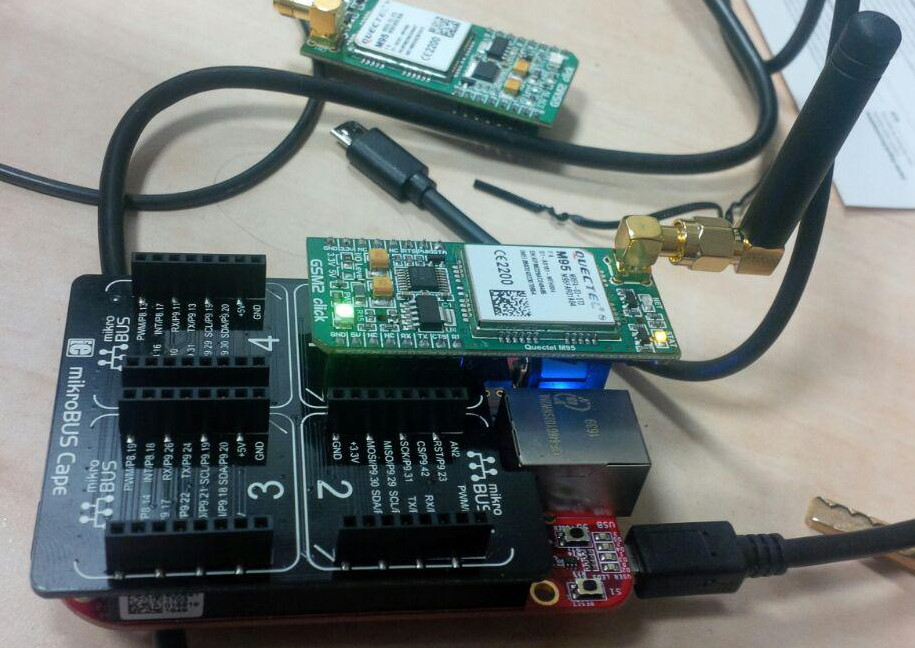
-
Notifications
You must be signed in to change notification settings - Fork 0
BeagleBone MikroBusCape GSM2 Click Debian HowTo
 based on, many thanks to:
- http://learn.mikroe.com/mikrobus-cape-beaglebone-shield/
- https://www.hackster.io/anemoi/lean-green-rc-sailing-machine-2cdde5 (great page)
Tested on Debian 8 jessie
Open file /boot/uEnv.txt find line
cmdline=coherent_pool=1M quiet net.ifnames=0 cape_universal=enable
and change it to
cmdline=coherent_pool=1M quiet net.ifnames=0
and reboot
There are more options to do that:
- use BB-UART2
- use BB-MIKROBUS-01 this overlay is not included in Debian image and must be compiled
To make instalation permanent add CAPE=BB-UART2 to /etc/default/capemgr and reboot
Download BB-MIKROBUS-01-00A1.dts and compile it.
dtc -O dtb -o BB-MIKROBUS-01-00A1.dtbo -b 0 -@ BB-MIKROBUS-01-00A1.dts
mv BB-MIKROBUS-01-00A1.dtbo /lib/firmware/
Test Device Tree Overlay file
echo BB-MIKROBUS-01:00A1 > /sys/devices/platform/bone_capemgr/slotsYou should see
root@beaglebone:/home/fanda# cat /sys/devices/platform/bone_capemgr/slots
 0: PF----  -1
 1: PF----  -1
 2: PF----  -1
 3: PF----  -1
 4: P-O-L-   0 Override Board Name,00A1,Override Manuf,BB-MIKROBUS-01
To make instalation permanent add CAPE=BB-MIKROBUS-01:00A1 to /etc/default/capemgr and reboot
GSM2/3 Click in MikroBus slot #1 should be accessible via UART /dev/ttyO2
minicom -b 9600 -D /dev/ttyO2test connection and set baud rate to 115200
Note: it can happen that first time, you run minicom, you will not see any echo. Type
AT+Enter, you shall seeOKand all the succeeded command should be visible from this time.
Welcome to minicom 2.7

OPTIONS: I18n
Compiled on Jan  1 2014, 11:34:34.
Port /dev/ttyO2, 18:13:53

Press CTRL-A Z for help on special keys

AT
OK
AT+IPR?
0

OK
AT+IPR=?
+IPR: (4800,9600,19200,38400,57600,115200),(0,75,150,300,600,1200,2400,4800,9600,14400,19200,28800,38400,57600,115200)

OK
AT+IPR=115200
OK
exit minicom Ctrl-A Z X
minicom -b 115200 -D /dev/ttyO2change /etc/chatscripts/pap to
# You can use this script unmodified to connect to sites which allow
# authentication via PAP, CHAP and similar protocols.
# This script can be shared among different pppd peer configurations.
# To use it, add something like this to your /etc/ppp/peers/ file:
#
# connect "/usr/sbin/chat -v -f /etc/chatscripts/pap -T PHONE-NUMBER"
# user YOUR-USERNAME-IN-PAP-SECRETS
# noauth

# Uncomment the following line to see the connect speed.
# It will be logged to stderr or to the file specified with the -r chat option.
#REPORT         CONNECT

TIMEOUT      60
ABORT        BUSY
ABORT        VOICE
ABORT        "ERROR"
ABORT        "NO CARRIER"
ABORT        "NO DIALTONE"
ABORT        "NO DIAL TONE"
""           ATZ
OK           AT+CGDCONT=1,"IP","internet","0.0.0.0",0,0
OK           ATDT\T
CONNECT      ""
change /etc/ppp/peers/provider to
# This is the default configuration used by pon(1) and poff(1).
# See the manual page pppd(8) for information on all the options.

# MUST CHANGE: replace myusername@realm with the PPP login name given to
# your by your provider.
# There should be a matching entry with the password in /etc/ppp/pap-secrets
# and/or /etc/ppp/chap-secrets.
user ""
password ""

# MUST CHANGE: replace *99***1# with the phone number of your provider.
# The /etc/chatscripts/pap chat script may be modified to change the
# modem initialization string.
connect "/usr/sbin/chat -v -f /etc/chatscripts/pap -T *99***1#"

# Serial device to which the modem is connected.
/dev/ttyO2

# Speed of the serial line.  If you skipped "GPRS Step 2" then leave this at 9600.
115200

# Assumes that your IP address is allocated dynamically by the ISP.
noipdefault

# Try to get the name server addresses from the ISP.
usepeerdns

# Use this connection as the default route.
defaultroute

# Makes pppd "dial again" when the connection is lost.
persist

# Do not ask the remote to authenticate.  This works for my provider.
noauth

# 'noccp' disables CCP (Compression Control Protocol) negotiation.
# I had to use to successfully connect to my provider, you may wish to
# disable.
noccp

# 'novj' disables Van Jacobson style TCP/IP header compression in both
# the transmit and the receive direction. I had to use to successfully
# connect to my provider, you may wish to disable.
novj

# I have included debug to debug issues.  The debug messages are written
# to /var/log/message.
debug
Test connection
to connect to internet
sudo ponto disconnect
sudo poffcreate file /etc/systemd/system/[email protected]
[Unit]
Description=PPTP link to %I
After=network.target
[Service]
Type=forking
# PIDFile=/run/ppp-%i.pid
ExecStart=/usr/bin/pon %I
ExecStop=/usr/bin/poff %I
ExecReload=/usr/bin/poff -r %I
[Install]
WantedBy=multi-user.target
enable service, note that service name provider must be the same as filename /etc/ppp/peers/provider
sudo systemctl enable ppp@provider
sudo systemctl start ppp@provider
to inspect connect log
sudo journalctl -fCopy your OpenVPN config file to /etc/openvpn/silicon-heaven.conf
sudo systemctl enable openvpn@silicon-heaven
sudo systemctl start openvpn@silicon-heavenCreate executable file /etc/systemd/system/checkInternetConnectivity.sh
touch /etc/systemd/system/checkInternetConnectivity.sh
chmod +x /etc/systemd/system/checkInternetConnectivity.sh
paste following lines into created file
#!/bin/bash

GOOGLE_HOST=google.com
GOOGLE_DNS_HOST=8.8.8.8
SILICON_HEAVEN_HOST=35.167.83.38

PPP_SERVICE=ppp@provider
OPENVPN_SERVICE=openvpn@silicon-heaven

check_ping()
{
    local HOST=$1
    echo "trying to ping $HOST $2 ..."
    ping -c 1 $HOST
    if [[ $? -gt 0 ]] ; then
        echo "ERROR unreachable"
        return 1
    fi
    echo "OK"
    return 0
}

check_ping $GOOGLE_DNS_HOST "Google DNS"
if [[ $? -eq 0 ]] ; then
    check_ping $GOOGLE_HOST
    if [[ $? -eq 0 ]] ; then
        check_ping $SILICON_HEAVEN_HOST "silicon-heaven OpenVPN"
        if [[ $? -eq 0 ]] ; then
            exit 0
        fi
    fi
fi

echo "stopping service $OPENVPN_SERVICE"
systemctl stop $OPENVPN_SERVICE
sleep 5
echo "stopping service $PPP_SERVICE"
systemctl stop $PPP_SERVICE
sleep 10

echo "starting service $PPP_SERVICE"
systemctl start $PPP_SERVICE
sleep 10
echo "starting service $OPENVPN_SERVICE"
systemctl start $OPENVPN_SERVICEcreate file /etc/systemd/system/checkInternetConnectivity.service
[Unit]
Description=Check internet connectivity service

[Service]
Type=simple
ExecStart=/etc/systemd/system/checkInternetConnectivity.sh
create file /etc/systemd/system/checkInternetConnectivity.timer
[Unit]
Description=Check internet connectivity every 10 minutes

[Timer]
OnBootSec=90
OnCalendar=*:0/10

[Install]
WantedBy=multi-user.target
enable and run timer service
sudo systemctl enable checkInternetConnectivity.timer
sudo systemctl start checkInternetConnectivity.timer