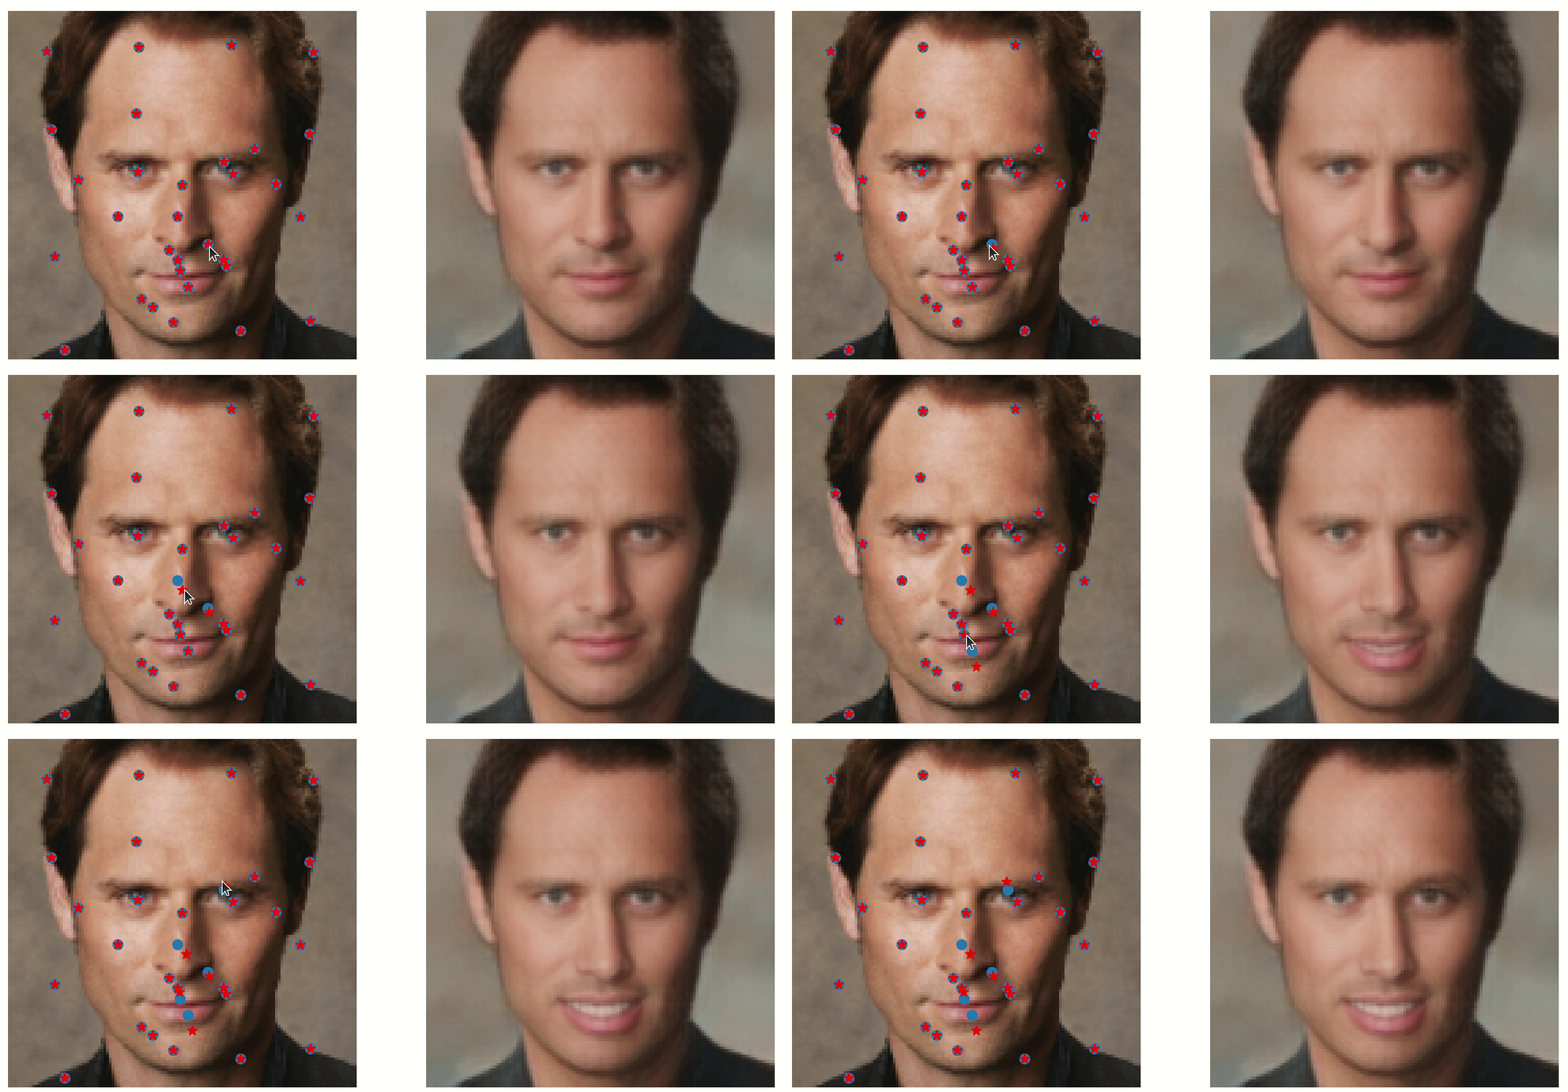
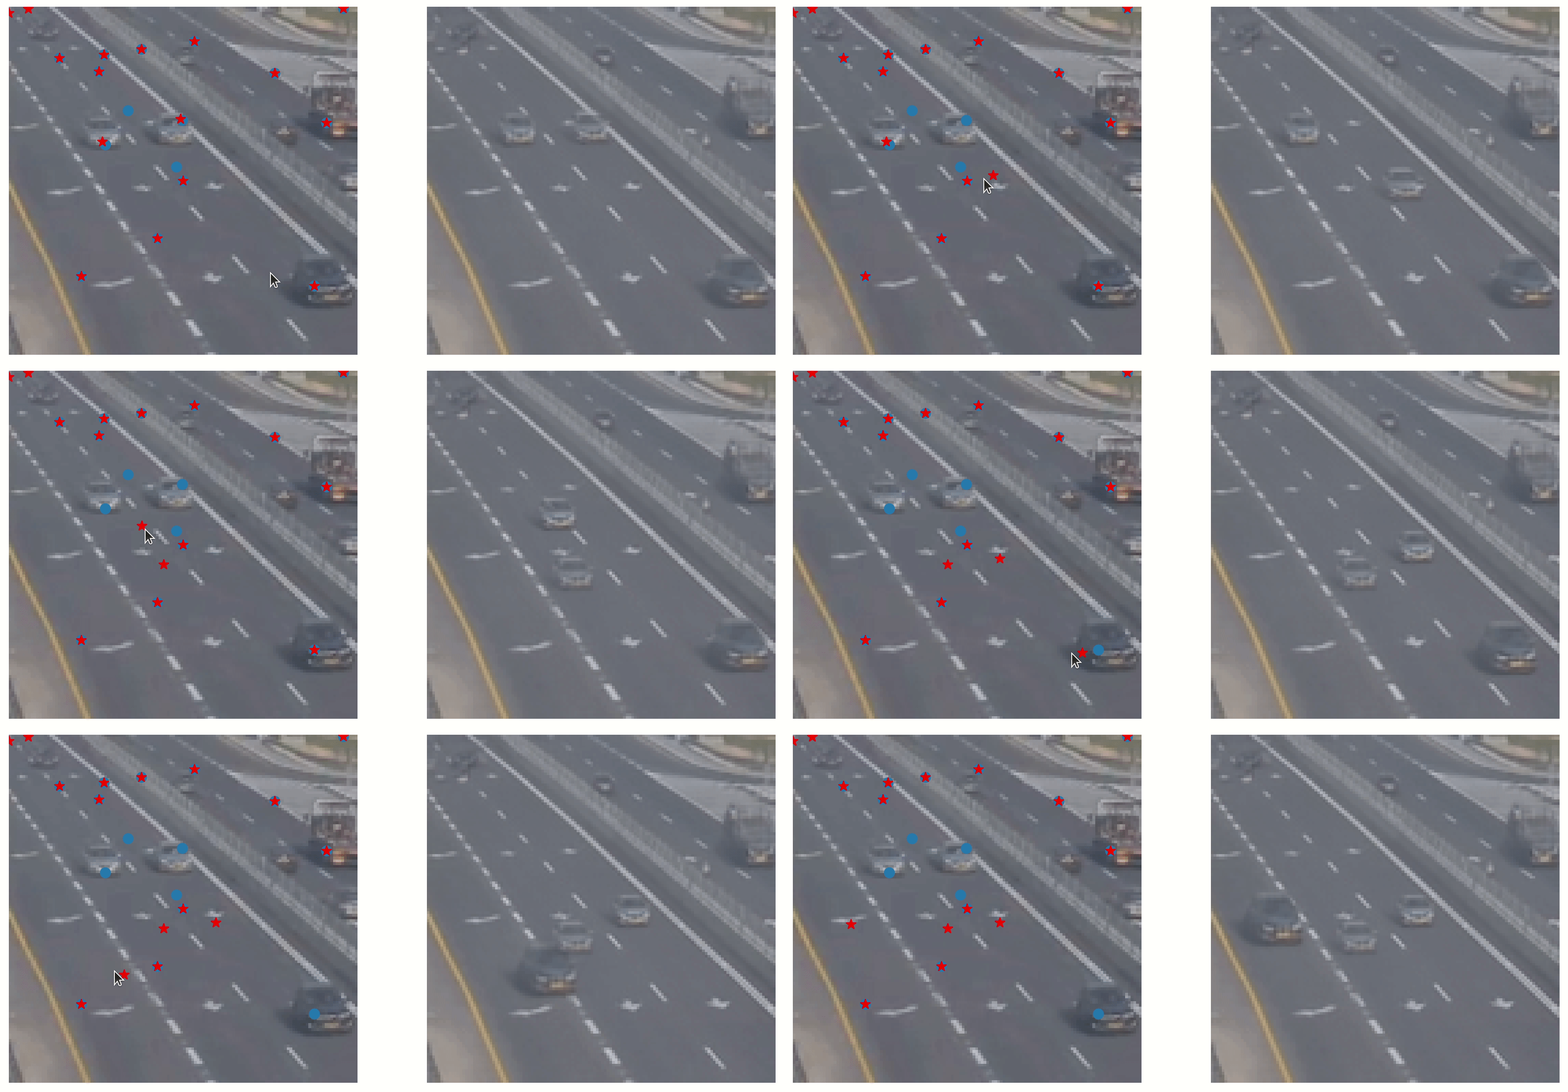
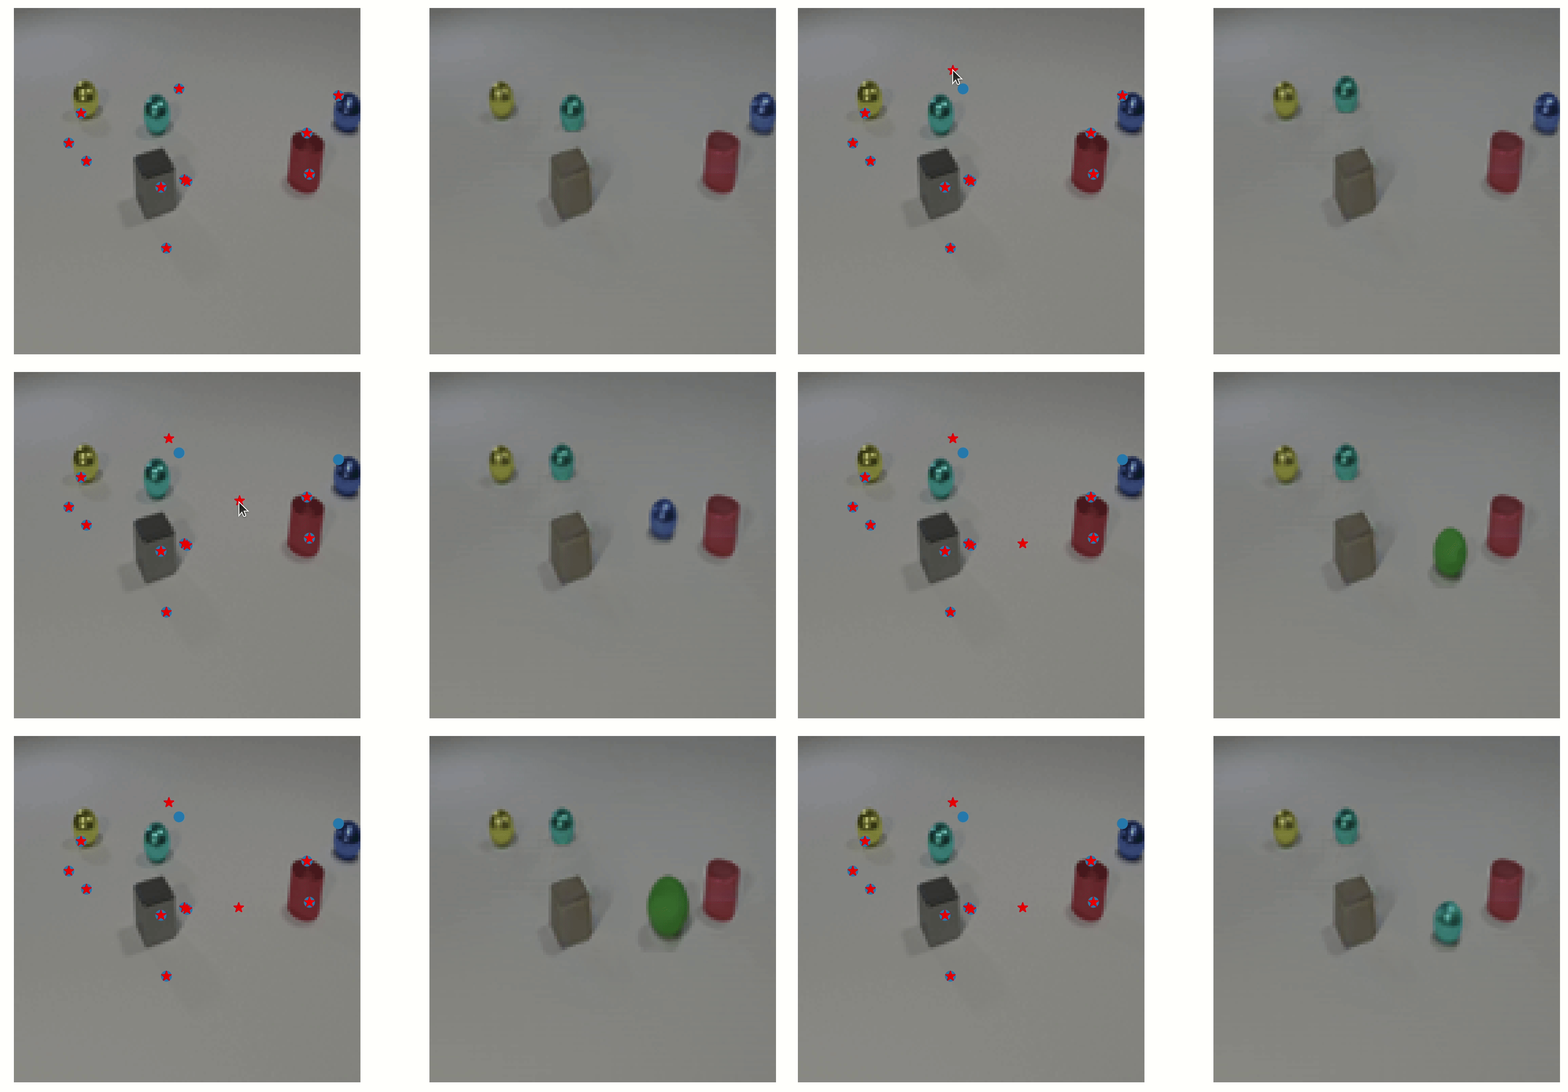
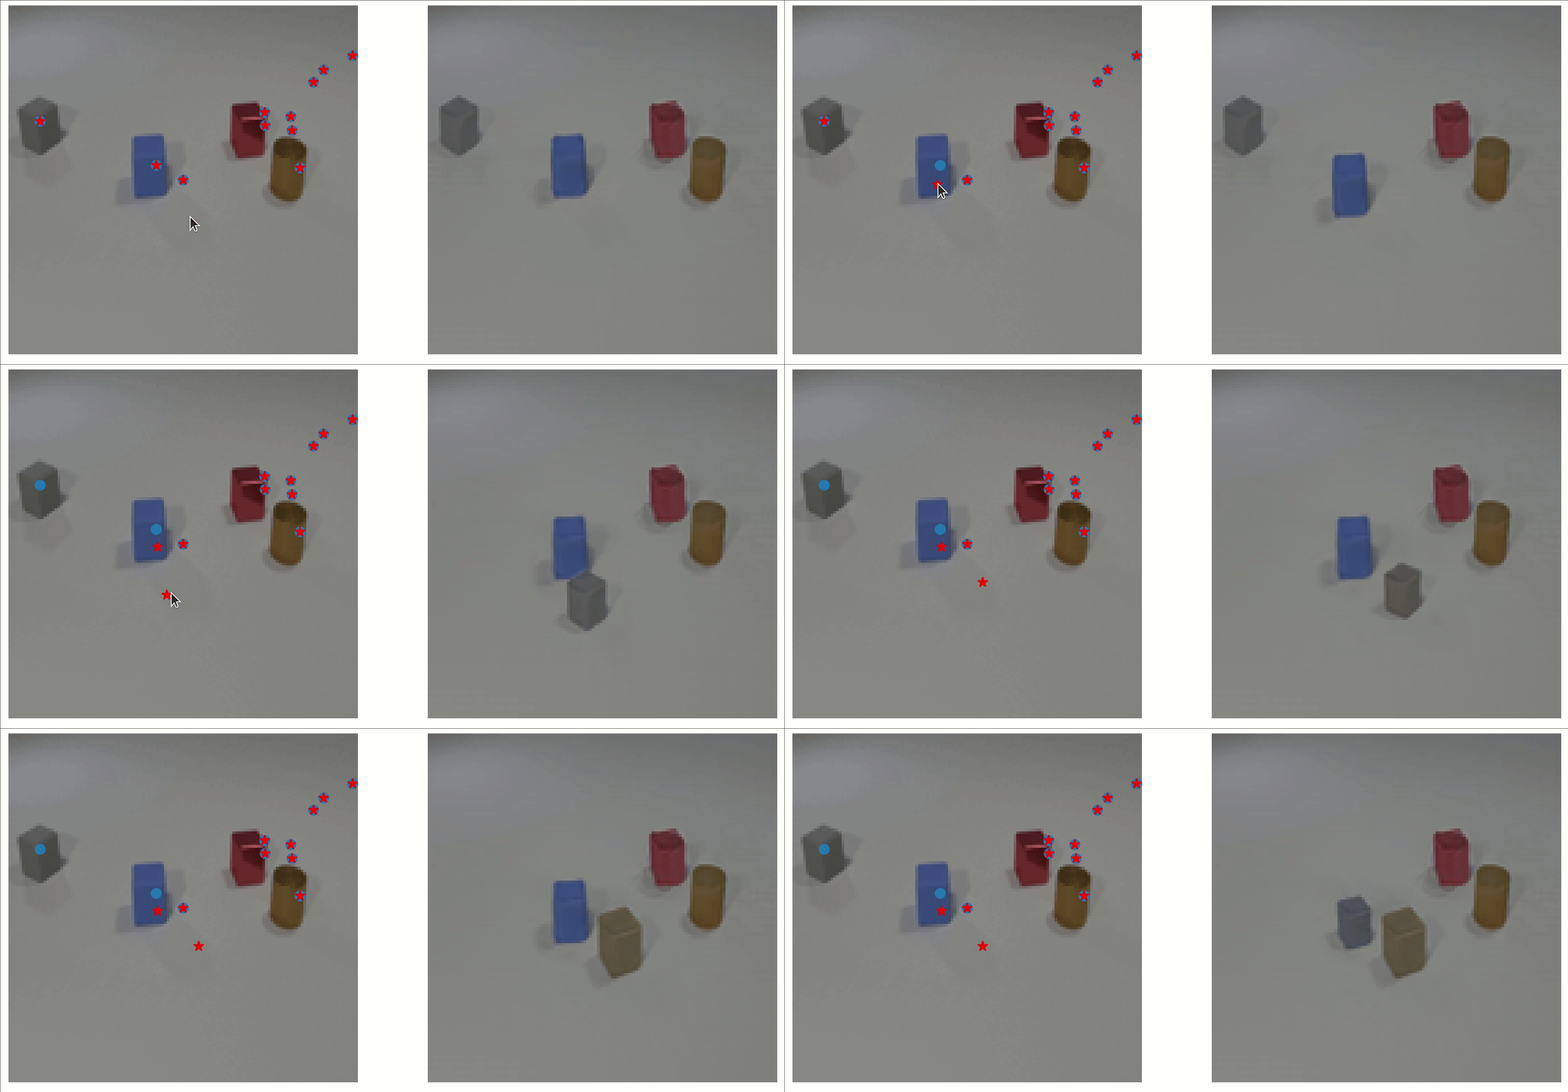
[ICML 2022] Official PyTorch implementation of the paper "Unsupervised Image Representation Learning with Deep Latent Particles"
DLPv2 and DDLP (DLP for video generation) have been released: DDLP: Unsupervised Object-Centric Video Prediction with Deep Dynamic Latent Particles
Unsupervised Image Representation Learning with Deep Latent Particles
Tal Daniel, Aviv TamarAbstract: We propose a new representation of visual data that disentangles object position from appearance. Our method, termed Deep Latent Particles (DLP), decomposes the visual input into low-dimensional latent ``particles'', where each particle is described by its spatial location and features of its surrounding region. To drive learning of such representations, we follow a VAE-based approach and introduce a prior for particle positions based on a spatial-softmax architecture, and a modification of the evidence lower bound loss inspired by the Chamfer distance between particles. We demonstrate that our DLP representations are useful for downstream tasks such as unsupervised keypoint (KP) detection, image manipulation, and video prediction for scenes composed of multiple dynamic objects. In addition, we show that our probabilistic interpretation of the problem naturally provides uncertainty estimates for particle locations, which can be used for model selection, among other tasks.
Daniel, Tal, and Aviv Tamar. "Unsupervised Image Representation Learning with Deep Latent Particles." Proceedings of the 39th International Conference on Machine Learning (ICML) 2022.
@InProceedings{pmlr-v162-daniel22a,
  title = 	 {Unsupervised Image Representation Learning with Deep Latent Particles},
  author =       {Daniel, Tal and Tamar, Aviv},
  booktitle = 	 {Proceedings of the 39th International Conference on Machine Learning},
  pages = 	 {4644--4665},
  year = 	 {2022},
  volume = 	 {162},
  series = 	 {Proceedings of Machine Learning Research},
  month = 	 {17--23 Jul},
  publisher =    {PMLR}
Paper on ArXiv: 2205.15821
- For your convenience, we provide an
environemnt.ymlfile which installs the required packages in acondaenvironment namedtorch. Alternatively, you can usepipto installrequirements.txt.- Use the terminal or an Anaconda Prompt and run the following command
conda env create -f environment.yml. - For PyTorch 1.7 + CUDA 10.2:
environment17.yml,requirements17.txt - For PyTorch 1.9 + CUDA 11.1:
environment19.yml,requirements19.txt
- Use the terminal or an Anaconda Prompt and run the following command
| Library | Version |
|---|---|
Python |
3.7 (Anaconda) |
torch |
> = 1.7.1 |
torch_geometric |
> = 1.7.1 |
torchvision |
> = 0.4 |
matplotlib |
> = 2.2.2 |
numpy |
> = 1.17 |
py-opencv |
> = 3.4.2 |
tqdm |
> = 4.36.1 |
scipy |
> = 1.3.1 |
scikit-image |
> = 0.18.1 |
accelerate |
> = 0.3.0 |
- We provide pre-trained checkpoints for the 3 datasets we used in the paper.
- All model checkpoints should be placed inside the
/checkpointsdirectory. - The interactive demo will use these checkpoints.
| Dataset | Filename | Link |
|---|---|---|
| CelebA (128x128) | dlp_celeba_gauss_pointnetpp_feat.pth |
MEGA.co.nz |
| Traffic (128x128) | dlp_traffic_gauss_pointnetpp.pth |
MEGA.co.nz |
| CLEVRER (128x128) | dlp_clevrer_gauss_pointnetpp.pth |
MEGA.co.nz |
- We designed a simple
matplotlibinteractive GUI to plot and control the particles. - The demo is a standalone and does not require to download the original datasets.
- We provide sample images inside
/checkpoints/sample_images/which will be used.
To run the demo (after downloading the checkpoints): python interactive_demo_dlp.py --help
-d: dataset to use: [celeba,traffic,clevrer]-i: index of the image to use inside/checkpoints/sample_images/
Examples:
python interactive_demo_dlp.py -d celeba -i 2python interactive_demo_dlp.py -d traffic -i 0python interactive_demo_dlp.py -d clevrer -i 0
You can modify interactive_demo_dlp.py to add additional datasets.
- CelebA: we follow DVE:
- CLEVRER: download the training and validation videos from here:
- Training Videos , Validation Videos
- Follow the pre-processing
in
datasets/clevrer_ds.py(prepare_numpy_file(path_to_img, image_size=128, frameskip=3, start_frame=26)
- Traffic: this is a self-collected dataset, please contact us if you wish to use it.
- Shapes: this dataset is generated automatically in each run for simplicity, see
generate_shape_dataset_torch()indatasets/shapes_ds.py.
You can train the model on single-GPU machines and multi-GPU machines. For multi-GPU training We use
HuggingFace Accelerate: pip install accelerate.
- Set visible GPUs under:
os.environ["CUDA_VISIBLE_DEVICES"] = "0, 1, 2, 3"(NUM_GPUS=4) - Set "num_processes": NUM_GPUS in
accel_conf.json(e.g."num_processes":4ifos.environ["CUDA_VISIBLE_DEVICES"] = "0, 1, 2, 3").
- Single-GPU machines:
python train_dlp.py --help - Multi-GPU machines:
accelerate --config_file ./accel_conf.json train_dlp_accelerate.py --help
You should run the train_dlp.py or train_dlp_accelerate.py files with the following arguments:
| Argument | Description | Legal Values |
|---|---|---|
| -h, --help | shows arguments description | |
| -d, --dataset | dataset to train on | str: 'celeba', traffic', 'clevrer', 'shapes' |
| -o, --override | if specified, the code will override the default hyper-parameters with the ones specified with argparse (command line) |
bool: default=False |
| -l, --lr | learning rate | float: default=2e-4 |
| -b, --batch_size | batch size | int: default=32 |
| -n, --num_epochs | total number of epochs to run | int: default=100 |
| -e, --eval_freq | evaluation epoch frequency | int: defalut=2 |
| -s, --sigma | the prior std of the keypoints | float: default=0.1 |
| -p, --prefix | string prefix for logging | str: default="" |
| -r, --beta_rec | beta coefficient for the reconstruction loss | float: default=1.0 |
| -k, --beta_kl | beta coefficient for the kl divergence | float: default=1.0 |
| -c, --kl_balance | coefficient for the balance between the ChamferKL (for the KP) and the standard KL | float: default=0.001 |
| -v, --rec_loss_function | type of reconstruction loss: 'mse', 'vgg' | str: default="mse" |
| --n_kp_enc | number of posterior kp to be learned | int: default=30 |
| --n_kp_enc_prior | number of kp to filter from the set of prior kp | int: default=50 |
| --dec_bone | decoder backbone:'gauss_pointnetpp_feat': Masked Model, 'gauss_pointnetpp': Object Model" | str: default="gauss_pointnetpp" |
| --patch_size | patch size for the prior KP proposals network (not to be confused with the glimpse size) | int: default=8 |
| --learned_feature_dim | the latent visual features dimensions extracted from glimpses | int: default=10 |
| --use_object_enc | set True to use a separate encoder to encode visual features of glimpses | bool: default=False |
| --use_object_dec | set True to use a separate decoder to decode glimpses (Object Model) | bool: default=False |
| --warmup_epoch | number of epochs where only the object decoder is trained | int: default=2 |
| --anchor_s | defines the glimpse size as a ratio of image_size | float: default=0.25 |
| --exclusive_patches | set True to enable non-overlapping object patches | bool: default=False |
Examples:
- Single-GPU:
python train_dlp.py --dataset shapes
python train_dlp.py --dataset celeba
python train_dlp.py --dataset clevrer -o --use_object_enc --use_object_dec --warmup_epoch 1 --beta_kl 40.0 --rec_loss_function vgg --learned_feature_dim 6
- Multi-GPU:
accelerate --config_file ./accel_conf.json train_dlp_accelerate.py --dataset celeba
accelerate --config_file ./accel_conf.json train_dlp_accelerate.py --dataset clevrer -o --use_object_enc --use_object_dec --warmup_epoch 1 --beta_kl 40.0 --rec_loss_function vgg --learned_feature_dim 6
- Note: if you want multiple multi-GPU runs, each run should have a different accelerate config file (
e.g.,
accel_conf.json,accel_conf_2.json, etc..). The only difference between the files should be themain_process_portfield (e.g., for the second config file, setmain_process_port: 81231).
Linear regression of supervised keypoints on the MAFL dataset it performed during training on the CelebA dataset.
To evaluate a saved checkpoint of the model: modify the hyper-parameters and paths in eval_celeb.py,
and then use python eval_celeb.py to calculate and print the normalized error with respect to intra-occular distance.
| Dataset | dec_bone (model type) |
n_kp_enc |
n_kp_prior |
rec_loss_func |
beta_kl |
kl_balance |
patch_size |
anchor_s |
learned_feature_dim |
|---|---|---|---|---|---|---|---|---|---|
CelebA (celeba) |
gauss_pointnetpp_feat |
30 | 50 | vgg |
40 | 0.001 | 8 | 0.125 | 10 |
Traffic (traffic) |
gauss_pointnetpp |
15 | 20 | vgg |
30 | 0.001 | 16 | 0.25 | 20 |
CLEVRER (clevrer) |
gauss_pointnetpp |
10 | 20 | vgg |
40 | 0.001 | 16 | 0.25 | 5 |
Shapes (shapes) |
gauss_pointnetpp |
10 | 15 | mse |
0.1 | 0.001 | 8 | 0.25 | 6 |
| File name | Content |
|---|---|
/checkpoints |
directory for pre-trained checkpoints and sample images for the interactive demo |
/datasets |
directory containing data loading classes for the various datasets |
/eval/eval_model.py |
evaluation functions such as evaluating the ELBO |
/modules/modules.py |
basic neural network blocks used to implement the DLP model |
/utils/tps.py |
implementation of the TPS augmentation used for training on CelebA |
/utils/loss_functions.py |
loss functions used to optimize the model such as Chamfer-KL and perceptual (VGG) loss |
/utils/util_func.py |
utility functions such as logging and plotting functions |
eval_celeb.py |
functions to evaluate the normalized error of keypoint linear regression with respect to intra-occular distance for the MAFL/CelebA dataset |
models.py |
implementation of the DLP model |
train_dlp.py |
training function of DLP for single-GPU machines |
train_dlp_accelerate.py |
training function of DLP for multi-GPU machines |
dlp_tutorial.ipynb |
Jupyter Notebook tutorial for explaining and training DLP on the random shapes dataset |
interactive_demo_dlp.py |
matplotlib-based interactive demo to plot and interact with learned particles |
environment17/19.yml |
Anaconda environment file to install the required dependencies |
requirements17/19.txt |
requirements file for pip |
accel_conf.json |
configuration file for accelerate to run training on multiple GPUs |
- CelebA pre-processing is performed as DVE.
- Normalized intra-occular distance: KeyNet (Jakab et al.).


