Pytorch implementation of RetinaNet object detection as described in Focal Loss for Dense Object Detection by Tsung-Yi Lin, Priya Goyal, Ross Girshick, Kaiming He and Piotr Dollár.
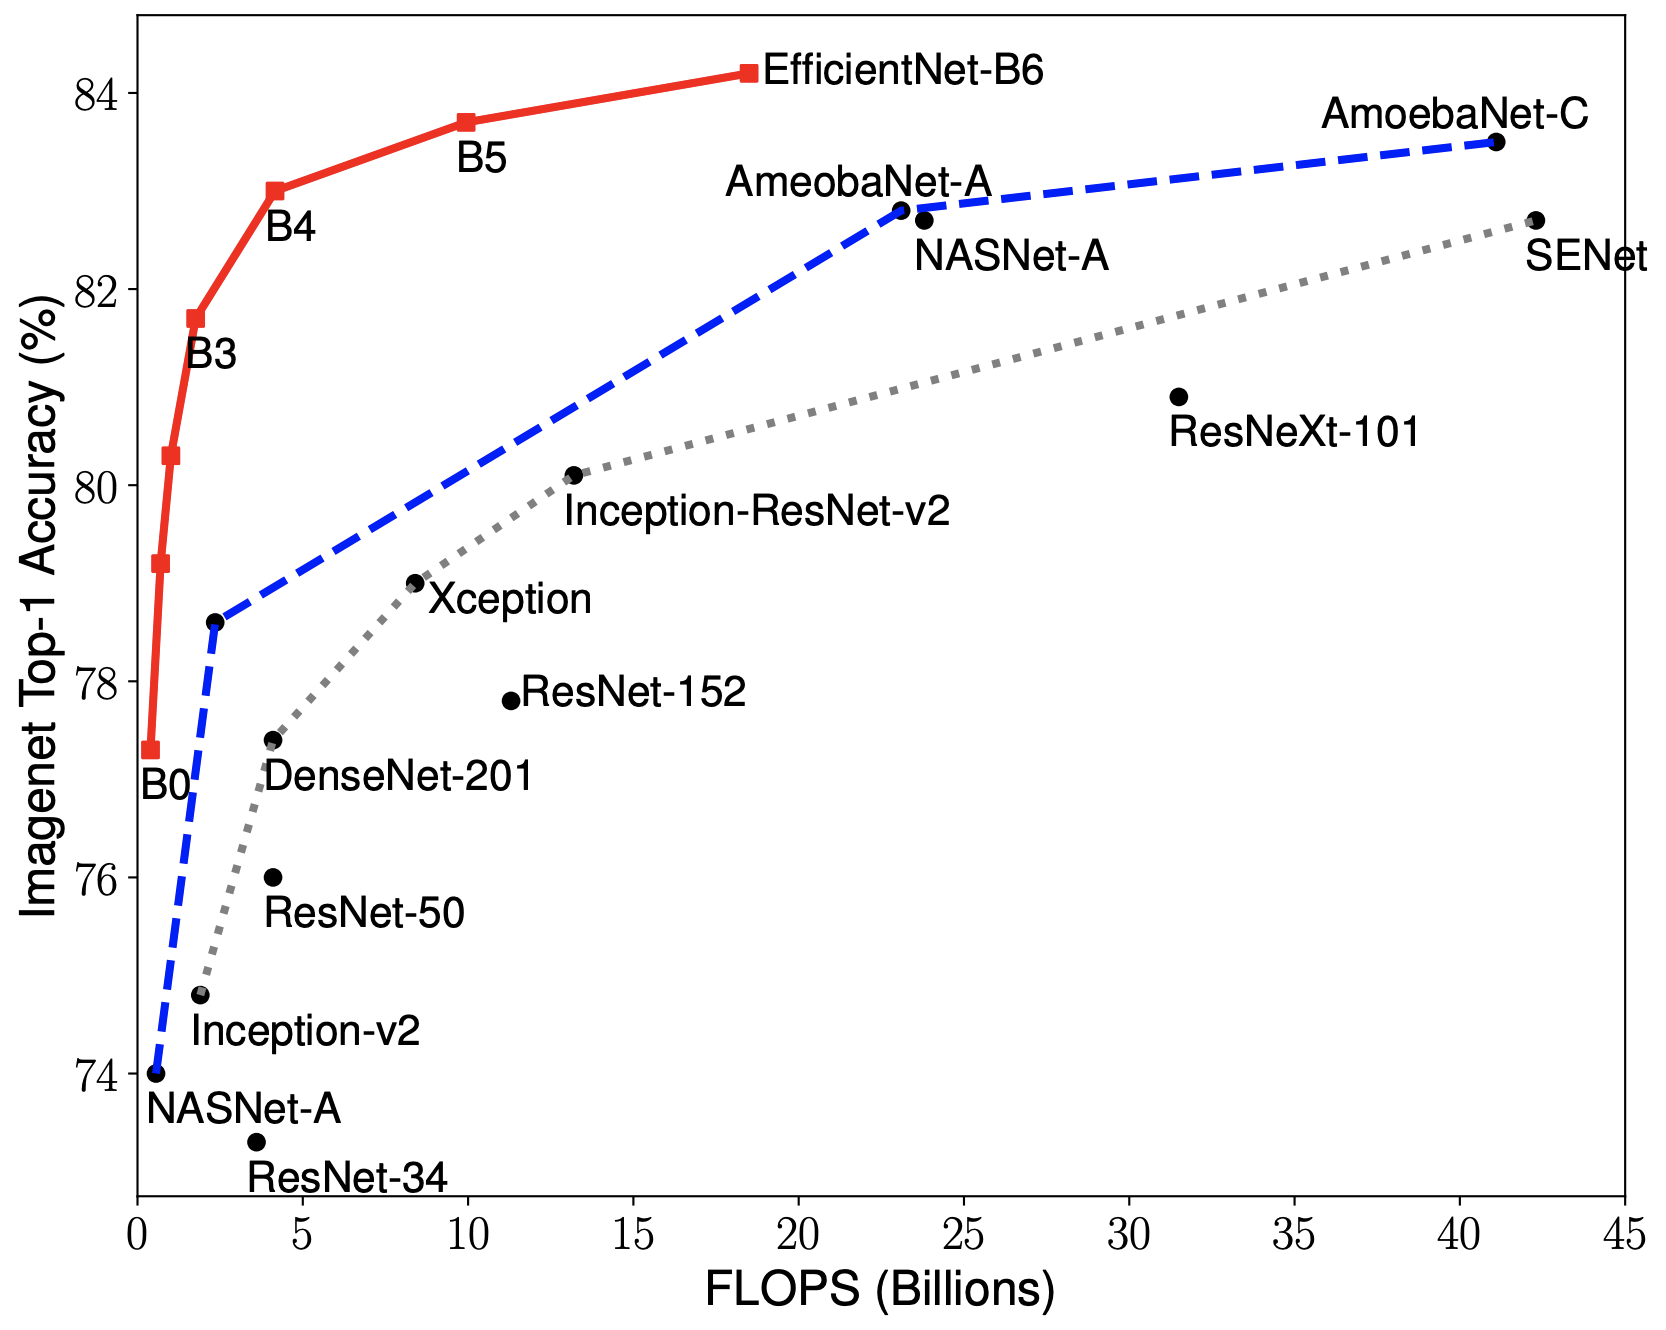
EfficientNets are a family of image classification models, which achieve state-of-the-art accuracy, yet being an order-of-magnitude smaller and faster than previous models. EfficientNets are developed based on AutoML and Compound Scaling. In particular, authors have used AutoML Mobile framework to develop a mobile-size baseline network, named as EfficientNet-B0; Then, they have used the compound scaling method to scale up this baseline to obtain EfficientNet-B1 to B7.

|

|
EfficientNets achieve state-of-the-art accuracy on ImageNet with an order of magnitude better efficiency:
-
In high-accuracy regime, EfficientNet-B7 achieves state-of-the-art 84.4% top-1 / 97.1% top-5 accuracy on ImageNet with 66M parameters and 37B FLOPS, being 8.4x smaller and 6.1x faster on CPU inference than previous best Gpipe.
-
In middle-accuracy regime, EfficientNet-B1 is 7.6x smaller and 5.7x faster on CPU inference than ResNet-152, with similar ImageNet accuracy.
-
Compared with the widely used ResNet-50, EfficientNet-B4 improves the top-1 accuracy from 76.3% of ResNet-50 to 82.6% (+6.3%), under similar FLOPS constraint.
-
For training
- To create csv files.
- Change paths in the create_csv_files.py
- Run create_csv_file.py then execute the following command:
python train.py "dataset/train_labels.csv" "dataset/test_labels.csv" "labels.csv" "b0" 100 1The retinanet model uses a EfficientNet backbone. You can set the backbone using the model_type argument. model_type must be one of b0, b1, b2, b3, b4 or b5. Note that deeper models are more accurate but are slower and use more memory.
- b0 - efficientnet-b0
- b1 - efficientnet-b1
- b2 - efficientnet-b2
- b3 - efficientnet-b3
- b4 - efficientnet-b4
- b5 - efficientnet-b5
-
For inferencing To visualize the network detection, use
inference.py:!python inference.py "model_path" "image_path" True
- The
CSVGeneratorprovides an easy way to define your own datasets. - CSV files can be generated for custom data using the following command.
python create_csv_files.py - Change the paths in the create_csv_files.py
create_data_lists("Path to img_dir","Path to json","dataset") #dataset folder contains the created csv files. - Update the function coco_to_csv(images_path, annotation_path, output_folder) in data_utils.py based on your dataset format.
- It uses two CSV files: one file containing annotations and one file containing a class name to ID mapping.
The CSV file with annotations should contain one annotation per line. Images with multiple bounding boxes should use one row per bounding box. The expected format of each line is:
path/to/image.jpg,xmin,ymin,xmax,ymax,label
A full example:
/data/imgs/img_001.jpg,837,346,981,456,cat
/data/imgs/img_002.jpg,215,312,279,391,dog
/data/imgs/img_002.jpg,22,5,89,84,cat
This defines a dataset with 2 images.
img_001.jpg contains class 1.
img_002.jpg contains classes 1 and 2.
The class name to ID mapping file should contain one mapping per line.
Each line should use the following format:
Refer to labels.csv
class_name,id
Indexing for classes starts at 1. Do not include a background class as it is implicit.
For example:
dog,1
cat,2
- To enable multi-scale training change
Resize()toResize(is_test=False, multi_scale=True, p=0.7)intrain.py(line 29)Resize(is_test=False, multi_scale=True, p=0.7) During training phase is_test = False multi_scale = True p = 0.7(the test image size will be used 30% of the time) During testing phase is_test=True
- Add support for multi-scale training
- Add augmentations
- Anchor generation using KMeans Clustering
- Look into CutMix augmentation