-
Notifications
You must be signed in to change notification settings - Fork 69
Build
Table of Contents generated with DocToc
These instructions are specific to Ubuntu Linux. The low level software is Linux specific (i.e. it won't run on other OSs) but should run on any Linux distribution. High level components (all but sawRobotIO1394) can be compiled on Linux, Windows, MacOS and used in separate processes using cisstMultiTask with ICE.
- git
- CMake for build and configuration
- C++ compiler, either gcc or clang
- libraw1394: IEEE-1394 API
- libxml2: for parsing XML config files
- Qt 4: GUI
- libncurses5-dev: curses based test GUI for 1394
- flite: for some experimental text to speech
sudo apt-get install libxml2-dev libraw1394-dev libncurses5-dev qtcreator
sudo apt-get flite cmake-curses-gui cmake-qt-gui libopencv-dev git subversionThe main repositories for the dVRK project are:
- http://github.com/jhu-cisst/cisst-saw.git - equivalent of the cisst SVN repository - you need to checkout this first. It uses submodules to clone all cisst libraries and SAW components
- http://github.com/jhu-cisst/cisst.git - cisst libraries, this repository is included as a submodule of cisst-saw.git
- http://github.com/jhu-saw/.... - submodules for sawRobotIO1394, sawKeyboard, sawControllers, .... All included as submodules of cisst-saw.git
- http://github.com/jhu-dvrk/sawIntuitiveResearchKit - SAW components specific to the dVRK. All included as submodules of cisst-saw.git
For ROS, you will need these extra repositories
- http://github.com/jhu-cisst/cisst-ros.git - SAW component and conversion functions used to create bridges between the cisst/SAW components and ROS
- http://github.com/jhu-dvrk/dvrk-ros.git - ROS bridge, data files, ... specific to the dVRK/ROS integration
We provide two ways to build the software:
- Automatically download and build using the bash file autocisst.sh
- Download, configure and build step by step manually
Essentially, the autocisst.sh file performs all the steps described in the manual build section.
To use autocisst.sh to automatically download and build the cisst library and sawIntuitiveResearchKit, please create a directory for the library, download the script file and run the script.
# create folder: here we use ~/dev/cisst
mkdir -p ~/dev/cisst
cd ~/dev/cisst
# download autocisst.sh
wget https://raw.githubusercontent.com/jhu-dvrk/sawIntuitiveResearchKit/master/share/autocisst.sh
# run script
bash ./autocisst.sh
Now under the ~/dev/cisst directory, there are three folders: cisst-saw, cisstNetlib-Linux and build. If you have sawIntuitiveResearchKitQtPID under the build/bin directory, the build is successful.
These instructions allow you to go step by step if you are running into issues with the automatic build.
- Create folder, source, build
# create folder: here we use ~/dev/cisst
mkdir -p ~/dev/cisst
cd ~/dev/cisst
# create source & build directories
mkdir build- Check out code
git clone https://github.com/jhu-cisst/cisst-saw.git --recursive- CMake and build
# go to build dir
cd build
# set cmake settings
ccmake ../cisst-saw- CMake settings
- Type
[c]to configure and check error - Press
[e]to exit messages view - Press
[t]to show advanced settings - Set
CISST_HAS_JSONtoON - Set
CISST_HAS_CISSTNETLIBtoON - Type
[c]to configure and then type[e]to exit help - Set
CISSTNETLIB_DOWNLOAD_NOWtoON - Type
[c]to configure and then type[e]to exit help - Set
CISSTNETLIB_DOWNLOAD_ARCHITECTtoi686for 32-bit system orx86_64for 64-bit system - Set
CISST_cisstRobottoON - Set
SAW_sawRobotIO1394toON - Set
SAW_sawControllerstoON - Set
SAW_sawIntuitiveResearchKittoON - Set
SAW_sawTextToSpeechtoON - Type
[c]to configure and then type[e]to exit help - Type
[c]to configure and then type[e]to exit help (you have to do it twice!) - Type
[g]to generate
Once you're done with the CMake configuration, you can now compile the code using the command line:
make -j4 -lThe number 4 corresponds to the number of parallel compilations, replace it by whatever number of cores you have to compile faster.
Compiling in Release mode can greatly improve performances. To make sure your build is configured to use the Release mode (telling the compiler to optimize the code), go to your build directory and start CMake using:
cmake -gui .Alternatively, you can also use the CMake text based program using:
ccmake .Once CMake is started, look for the variable CMAKE_BUILD_TYPE and make sure it is set to Release. By default, the variable is empty.
cisst/saw uses a few environment variables, standard ones such as PATH (see http://www.linfo.org/path_env_var.html) and LD_LIBRARY_PATH (see http://tldp.org/HOWTO/Program-Library-HOWTO/shared-libraries.html). To simplify the user's life, we provide scripts to set these environment variables based on individual setups. To set your environment variables with bash, go in your build tree and type:
. cisst/cisstvars.shNotes:
-
The environment variables are set per shell, i.e. if you open a new terminal, you need to "source" the
cisstvars.shscript again. -
If you want to set the cisst variables once and for all, you can modify your
.bashrcor.profileconfiguration files. -
More info can be found on the cisst wiki
-
If you still have some issues with your firewire permissions and need to use
sudoto start any dVRK program, thecisstvars.shwon't work sincesudostarts a new shell that won't inherit the current shell's variables. So, fix the firewire permissions first (see https://github.com/jhu-cisst/mechatronics-software/wiki/Development-Environment)
Qt Creator is a nice IDE (Integrated Development Environment) that works well with CMake. There are many pages describing the process:
- http://qt-project.org/doc/qtcreator-2.8/creator-project-cmake.html (skip the Windows specifics)
- http://www.youtube.com/watch?v=I208-iVEpwk (youtube video)
For the research kit, the basic steps are:
- First setup your build tree manually. Starting with an empty build tree from QtCreator won't work as you need to set some CMake options first.
- Once you have a working source and build tree (i.e. you've followed instructions above and can compile), start QtCreator and:
- In menu
File,Open File or Project, go to source directory to locate the topcisst-saw/CMakeLists.txt - Replace the build directory suggested by QtCreator by your own (e.g.
~/dev/cisst/build) - Hit
Run CMake
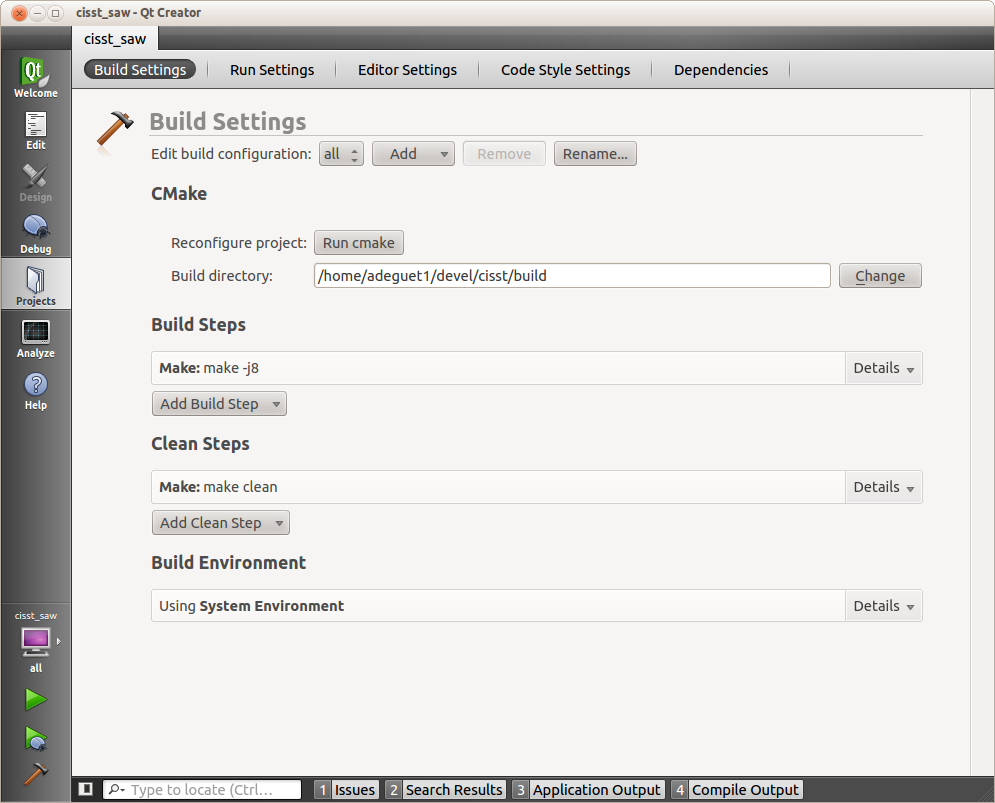
To compile a bit faster, you can change the Build Settings and add the command line option -j4 or whatever number of core you have.

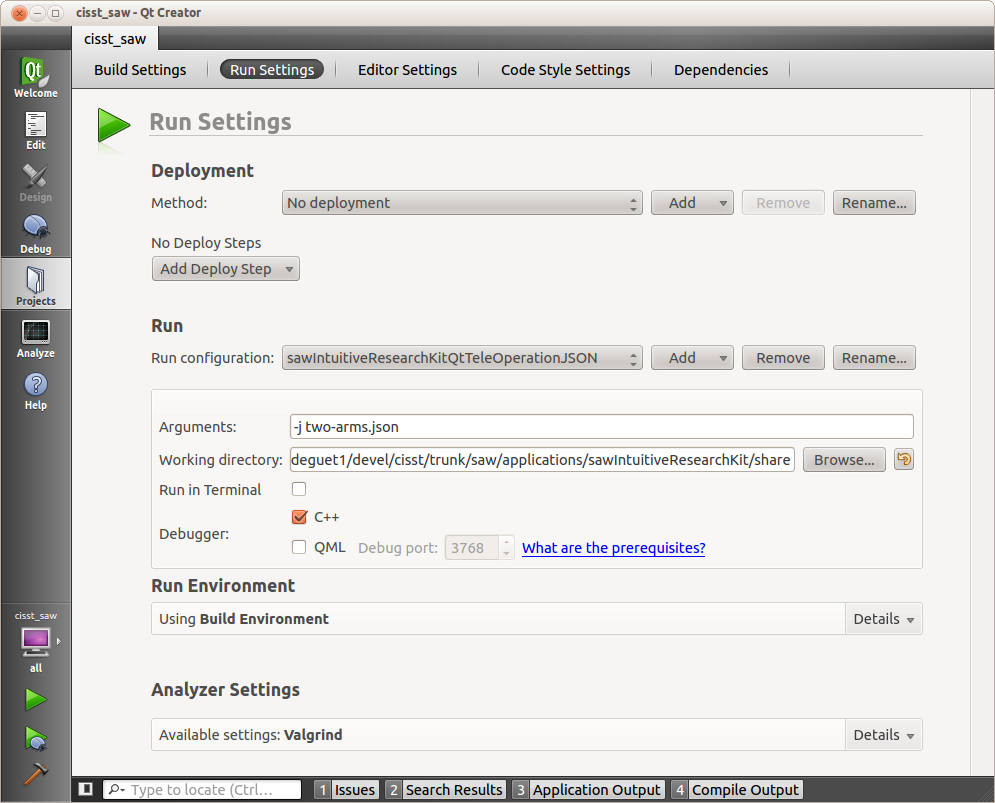
To run and debug programs from QtCreator, go to Run Settings:
- Select an executable target (i.e. program)
- Add the command line options
- Change the working directory to whatever location you have used to store your configurations file

Community
Getting Started
- First Steps
- Software installation
- Controller Connectivity
- Configuration files
- Hardware Setup
- Calibration
- Classic/Standard
- Si
- Examples
Advanced
- Software Architecture
- Application Development
- APIs
- UI Customization
- Teleoperation
- Kinematics Simulation
- Potentiometer Issues
- Development Branches
- Release Checklist
- Projects
- Controllers/versions
- E-STOP Wiring
- Full da Vinci System
- Head Sensor
- Foot Pedals
- Video
- Instruments
Miscellaneous
- Frequently Asked Questions
- User manuals Classic and Si moved
- QLA Heat Sink
- Build w/o ROS Linux Mac
- cisst
- JHU
Deprecated
