-
Notifications
You must be signed in to change notification settings - Fork 0
Admin Call Flows
- Introduction
- Prerequisites
- Architecture
- Interface
- Providers
- Designer
- Renderers
- Troubleshooting
- FAQ
- Reference
- CfL default callflows
The call flows module is used to configure callflows for your application on the OpenMRS implementation.
This module can be found here.
This section indicates the prerequisite skills required for configuring callflows.
The following technical skills are required to be able to work with the "Call Flows" module effectively.
Voice interactions with a caller and the call flows module both work around the web’s HTTP request-response model with an IVR provider’s server as an intermediary node. The application simply needs to respond to HTTP requests and send back HTTP responses. The translation of these requests and responses from voice and to voice is handled by the technology at the IVR provider’s end.
The "Call Flows" module leverages this understanding in order to generate a voice based HTTP response in the form of VoiceXML / CCXML / CallXML or any other configured custom format.
The "Call Flows" module manages the state of what is happening in the call and thus conducts a real live conversation with the caller. For more details, refer the architecture of call flows.
Velocity Templates are used in both user and system nodes, while designing Call Flows.
Velocity guide on the Apache site.
Underscore JS Templates is a very simple Javascript template engine that is used in the call flow renderers to generate the desired output format.
It allows just three kinds of delimiters:
    <%= ... %> for Javascript expression interpolation
    <% ... %> for arbitrary Javascript code
    <%- ... %> for interpolation and HTML escaping the output
Since arbitrary Javascript code can be included in the template, one can define functions for advanced use.
To print the string "Hello, WORLD", where WORLD is available inside of a variable aptly named world, the following templates can be used:
Hello, <%= world %>
<% print('Hello, ' + world); %>
Underscore JS Templates guide.
The "Call Flows" module’s architecture is depicted in the figure below.

The caller’s call is connected with the call flows module by the IVR provider using HTTP requests. Once connected, the call flow module uses a specific call flow that was designed earlier to conduct the interaction.
The call flow module calls upon configured Spring beans to perform complex business operations at runtime and generates a VoiceXML or CCXML, depending on which extension was used when invoking the call flow.
External Storage is an external server where the files are held.
Below are presented sequences of interactions that follow in a Voice XML based voice interaction with the caller:
-
Caller calls a number which internally connects his call to the IVR Provider’s end.
-
The IVR Provider looks up its registry to determine the called number to an application mapping.
-
An HTTP request is made to our application URL:
http://{server}:{port}/openmrs/ws/callflows/in/{config}/flows/{flow}.vxml
Where:
{server}:{port} is the external host name and port of our server accessible over the internet and
{config}: is one of our configured providers and
{flow}: is the name of the call flow to invoke.**Note: **Notice the “in” in the above URL that marks this URL as a request for an inbound call. The call flows module supports a similar URL to initiate an outbound call, if “in” is replaced by “out”.
-
The application generates a VoiceXML response to the IVR Provider with a conversation continuation URL.
-
The IVR Provider translates the response to voice output over the line, requesting for say some input from the caller.
-
Caller speaks his/her input voice or presses keys on the phone DTMF.
-
IVR Provider passes the input in the form of request variables to our conversation continuation URL that has the form:
http://{server}:{port}/openmrs/ws/callflows/calls/{callId}.vxml
Where:
{callId} is a universally unique identifier UUID, that is unique for this call. -
The subsequent requests and responses continue to use the URL above, as the call flows module manages its own state, and determines how to conduct the conversation.
CCXML based interactions are very similar to Voice XML. The only difference is that CCXML is used to manage the call state, including call connection and disconnection, while VXML is used to manage the conversation. The advantage of CCXML is that it provides a rich event-based system to listen to various call events.
It’s also possible to create a pure CCXML based interaction without Voice XML if the renderer template is changed accordingly.
-
The caller calls a number which internally connects his call to the IVR Provider’s end.
-
The IVR Provider looks up its registry to determine the called number to an application mapping.
-
An HTTP request is made to application URL: http://{server}:{port}/openmrs/ws/callflow /in/{config}/flows/{flow}.ccxml
Where:
{server}:{port} is the external host name and port of our server accessible over the internet and
{config}: is one of our configured providers and
{flow}: is the name of the call flow to invoke.Note: Notice the ccxml in the URL above. Replacing that with vxml triggers a Voice XML interaction instead.
-
The application generates a CCXML response to the IVR Provider.
-
The CCXML response typically has a way to connect and conduct a VXML based interaction.
-
At this point, the steps in the Voice XML based interaction holds TRUE until call is disconnected.
-
When the call is disconnected, the call disconnection event can be listened and acted upon from the CCXML Template.
-
Whenever call status change events happen, CCXML can be configured to invoke an HTTP request to the call flows module to update the current status: http://{server}:{port}/openmrs/ws/callflows/status/{callId}.vxml?status=..&reason=..
See Reference for a list of statusses that can be passed. The reason can be any textual string.
This adds the ability to design the call flows and to configure the IVR provider information. It is designed to be user-friendly and intuitive.
"Call Flows" module elements are only accessible to admin users. To access this module, navigate to the home page of OpenMRS then click on "System Administration":
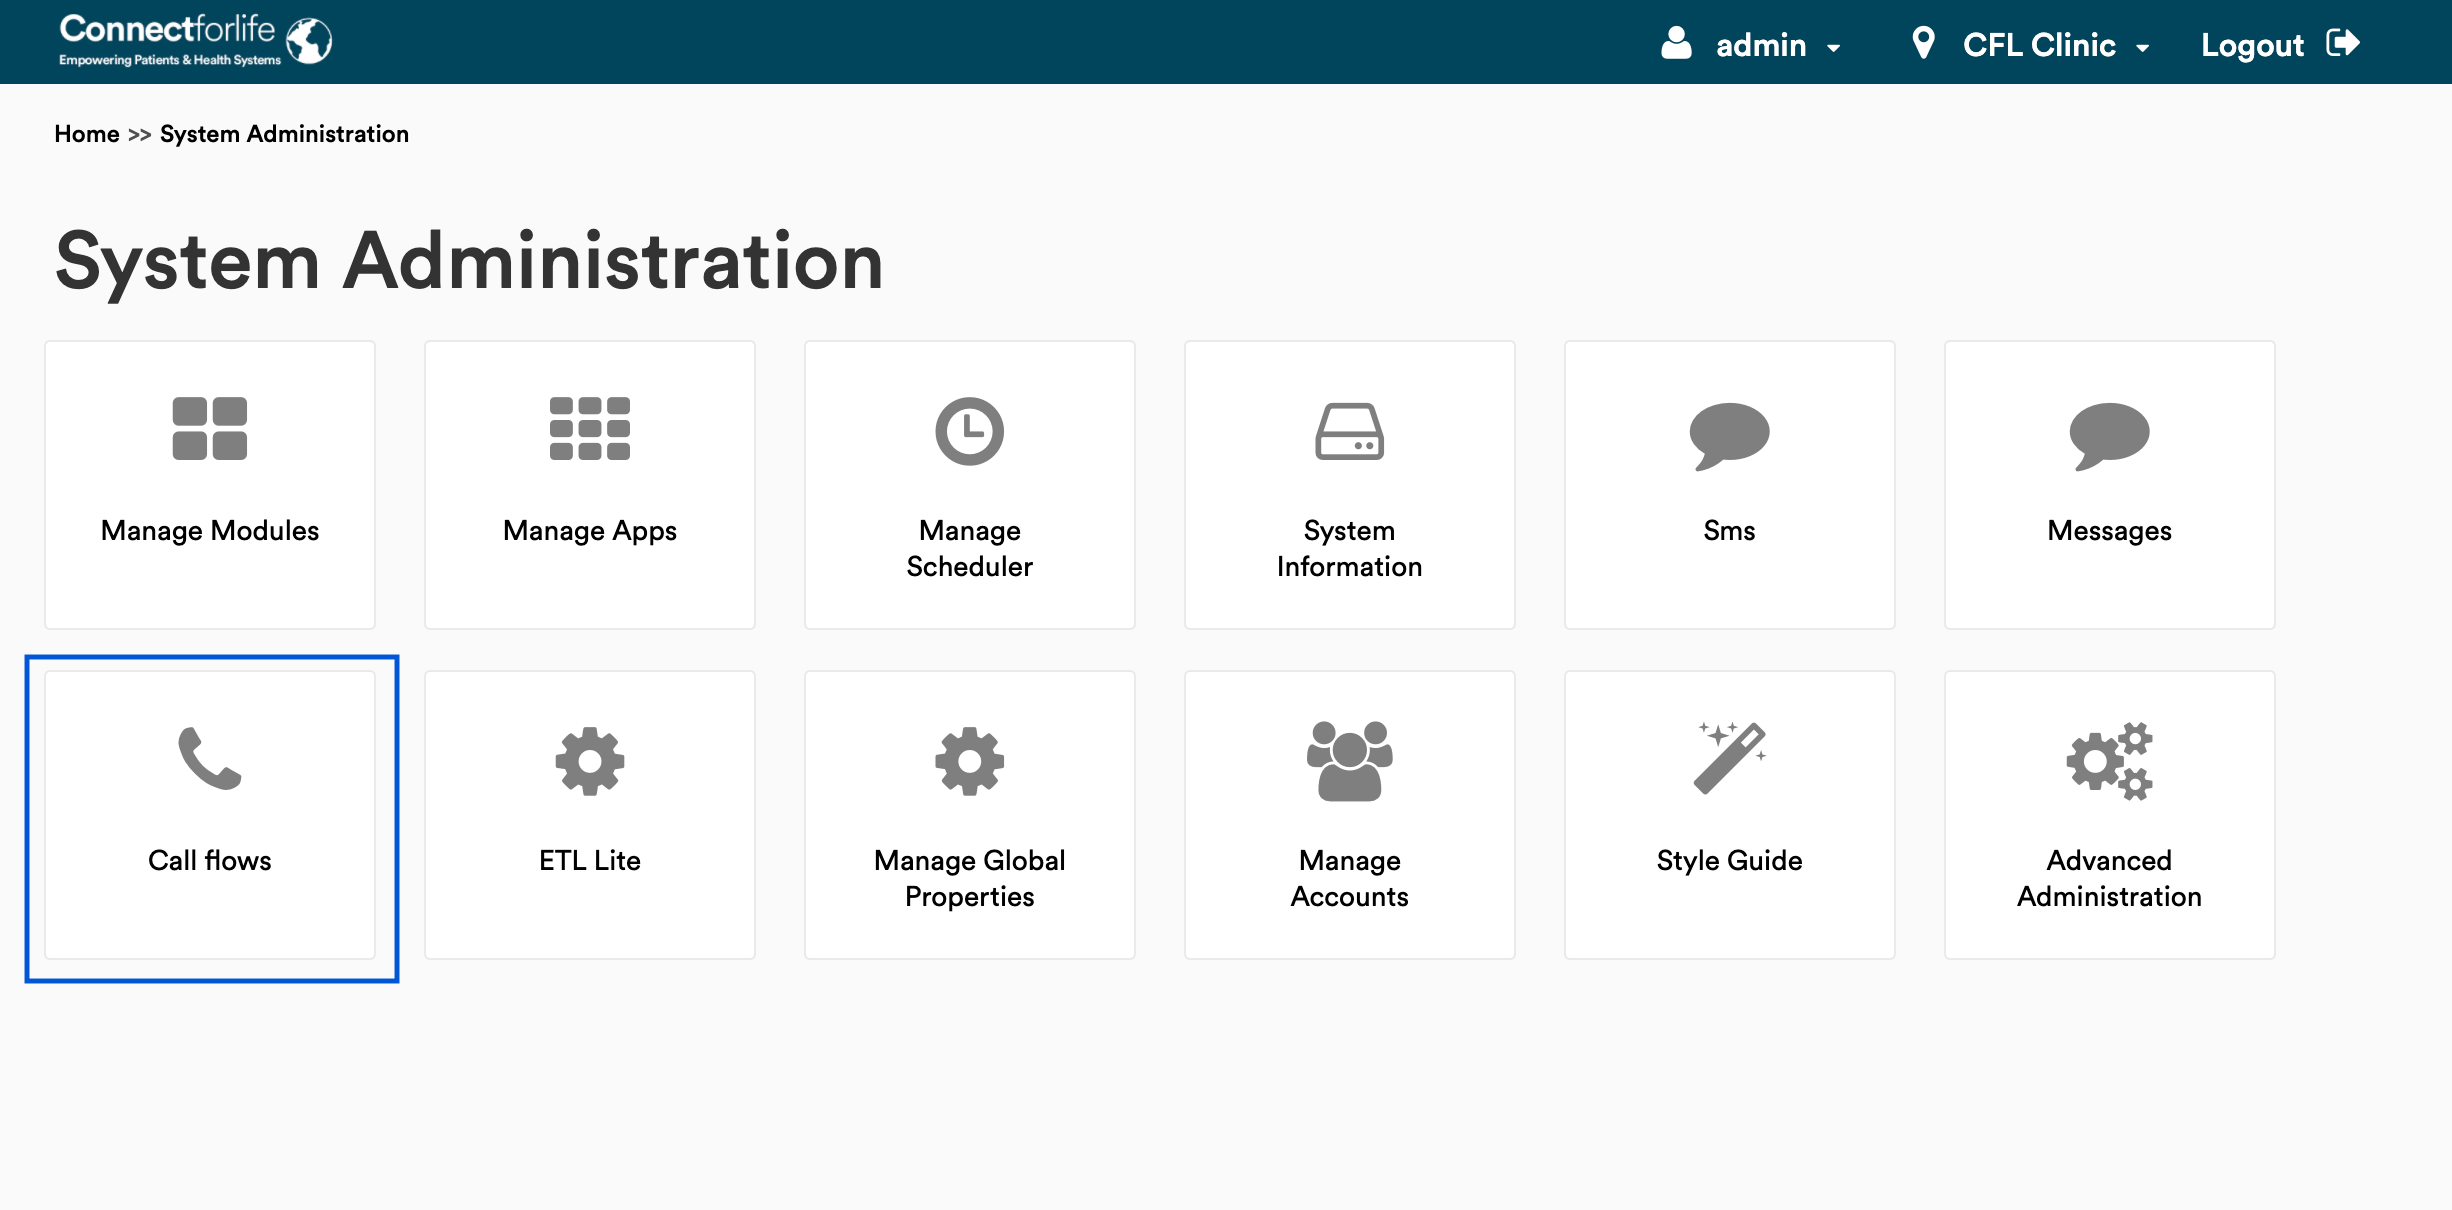
The interface includes links to:
- Designer to create and model call flows.
- Providers to configure IVR provider information and to inject Spring services.
- Renderers to configure renderer templates that work in tandem with the call flow model in the designer view.

At least one provider needs to be configured in order for call flows to be run. This is applicable even for the test runner. To access providers page, the admin user should click “Providers” button on the "Call flows" page.

An IVR provider’s name and any Spring beans that are required for the call flow are required. These two parameters are sufficient to test callflows, for INBOUND flows only.
Spring beans are the key concepts of the Spring Framework. These are backbone elements of the application that are managed by the Spring IoC container. More information can be found here:
- https://docs.spring.io/spring-javaconfig/docs/1.0.0.M4/reference/html/ch02s02.html
- https://www.tutorialspoint.com/spring/spring_bean_definition.htm
- https://docs.spring.io/spring-javaconfig/docs/1.0.0.m3/reference/html/creating-bean-definitions.html
Each Spring Bean has assigned a unique identifier that can be used in the scope of the Call Flow module (the id can be found in the code spring application context definition).
To use the Spring beans in the call flow you need to place the information about bean in the Injected services map in the scope of Call Flow provider configuration. This field stores a map of services that can be injected in IVR templates. Key is the name used in Velocity, Value is the id of Spring Bean you need. For instance:
"patientService:patientService,cflPersonService:cflPersonService,personService:personService,messagesService:messages.messagingService,openmrsContext:context,patientTemplateService:messages.patientTemplateService"
Next in the IVR template, you can use the key as a reference to the service injected by Spring.
Enter a name for the configuration and relevant services.
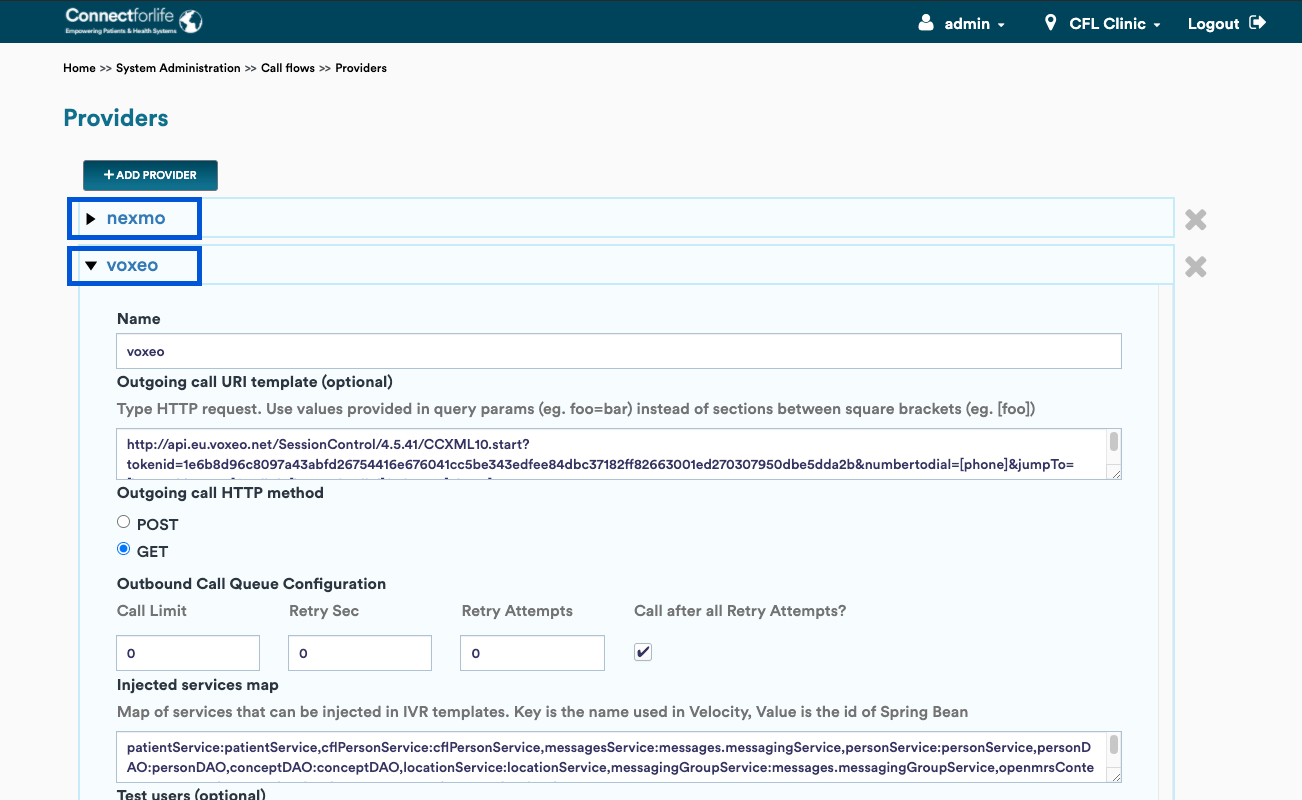
The outgoing call URI template is used to communicate with your IVR provider for outbound calls. If you have only inbound calls, this field can be left blank.
For an IVR provider like voxeo, this URL is takes the form:
http://api.voxeo.net/SessionControl/4.5.41/CCXML10.start?tokenid=TOKEN&numbertodial=[phone]&jumpTo=[internal.jumpTo]&callId=[internal.callId]&phone=[phone]
Replace the TOKEN with the outbound dialling token provided by voxeo.
Note: For outbound calls to work, ensure that your IVR provider can successfully hit the URL that you include in the outgoing call URI template.
If your IVR provider demands the request to be sent with headers and parameters embedded in body of the request, POST method of outgoing call HTTP should be selected.

You need to populate POST header parameters and POST parameters fields based on the IVR provider.
If you register test users in the system, that URL will take precedence over the outgoing call URI template. This can be used for testing call flows with simulators even in a production server without affecting other callers of the application.
The "Call flow" module comes with call queuing support.

To enable this, first identify the number of calls allowed at a time in your contract with your IVR provider.
For example, if 200 active calls are allowed to be active at the same time, identify the percentage (%) of calls that you want to allocate for outbound dialing. If 70% of your active calls are outbound calls, then set the call limit as 140 (70% of 200). The retry secs ensures that in case the limit is hit, the call flows module will queue the call and attempt to retry call for the configured retry attempts after the configured retry secs.
If all retry attempts are exhausted, you can also determine whether the call should still be made (possibly at additional cost that you might incur, depending on your contract with your IVR provider) or should the call fail. Making or declining the call is controlled by the last parameter ”Call after all retry attempts”. By default this should be checked.
Attention: For call queuing to work correctly, you need to use CCXML renderer either by itself or in association with the VXML renderer. This is because the CCXML renderer is responsible for providing the correct up-to-date state of every call in the system and identifying this number at real time. It’s critical to know whether the call should be queued or not.
To delete a provider configuration, open the relevant provider and click on the x icon right to the configuration.
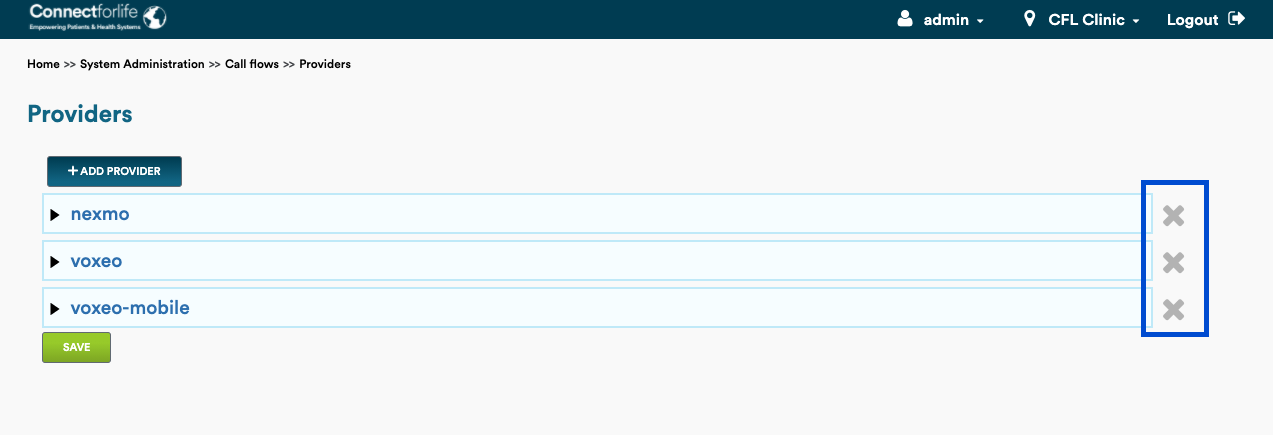
This activity needs to be confirmed.

Be aware that at least one provider is required in order for calls to be tested either with the test runner or with a simulator.
Designing a call flow in the system involves the following steps:
- Modeling the call flow
- Using the built-in "Test Call Flow"
A call flow is modeled as a series of interactions that represent the HTTP request-response cycle.
Modeling call flows is best demonstrated with a real example.
To open the call flows designer, click the “Designer” button on the module panel.

Model a calculator call flow, the requirements of which are that the user chooses an operation to perform, say one of addition or multiplication and then we allow the caller to enter operands, and the call flow will compute the result out. This requirement, even though it sounds simple, is detailed enough for us to explore various aspects of the call flow like velocity templates, string parsing, sub flows, test runner, audio support.
Explore the call flow interface to get familiar with the elements of the interface.
On the call flow "Designer" page, click the “Create” button.
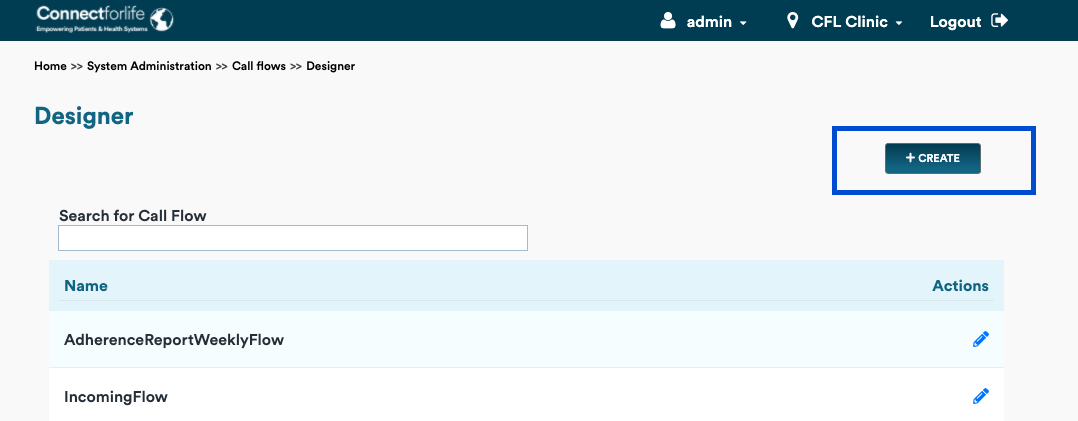
In the name field, enter the name of the flow, for example “CalculatorFlow”, and click the “Add Interaction” button to add an interaction.

Tip: It’s a best practice to title case flow names to distinguish them from variables which typically start with a lowercase character.
Danger: Flow names cannot have any . (dots) or special characters in them. Names need to be strictly alphanumeric only.
The “Add Interaction” button added a pair of nodes. The first node is the user experience node, otherwise referred to as the user node. The second node is the server system node, where control flow and the logic of the call flow is scripted.
Enter the name of the node, for example, “entry” and click “+ Form”, followed by “+TTS”. TTS refers to text to speech that allows to greet the caller with a message. Enter the message as shown in the screenshot below.
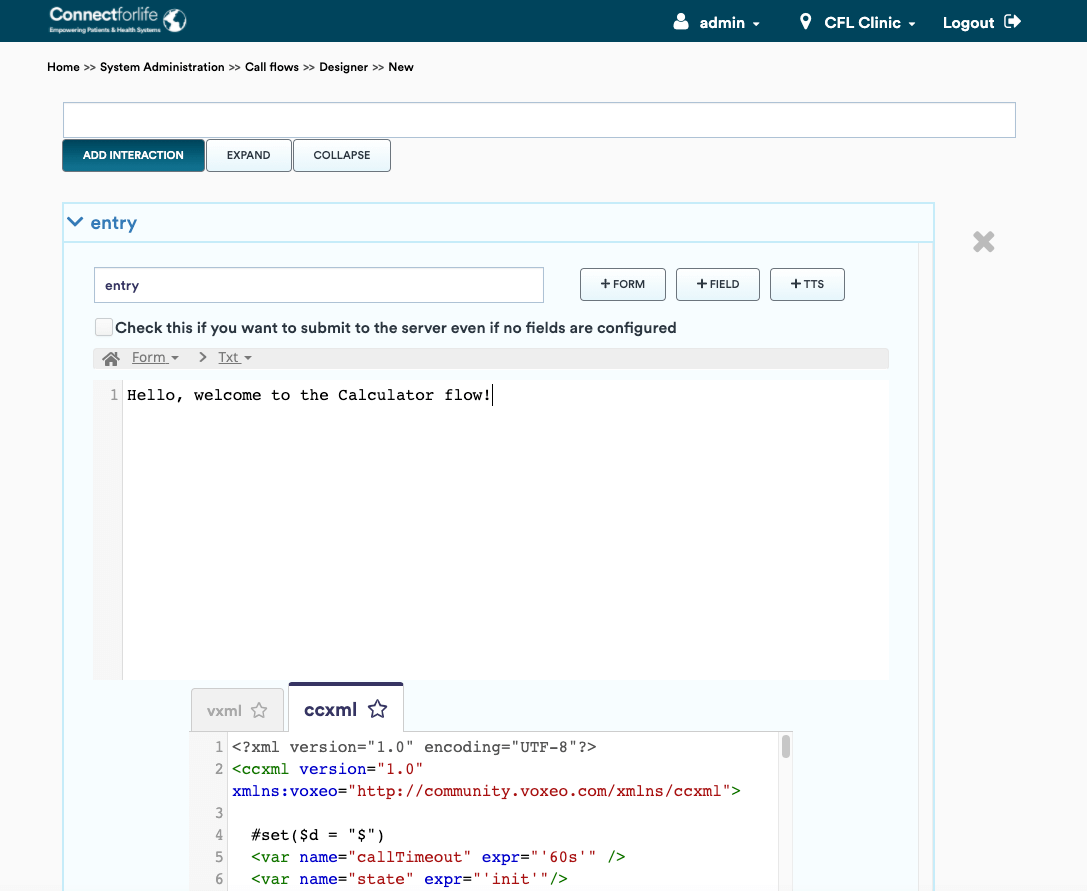
You will notice that the vxml renderer section immediately started generating Voice XML based on what we typed. A renderer takes input from the call flow model and generates the content of the user node. Check out Renderers for more information.
Since we want the caller to enter their preference for addition or multiplication, we need to add a field element. In the entry node, click the “+ Field” button. Enter field as operator and text as in the figure and watch the vxml interface as you type.
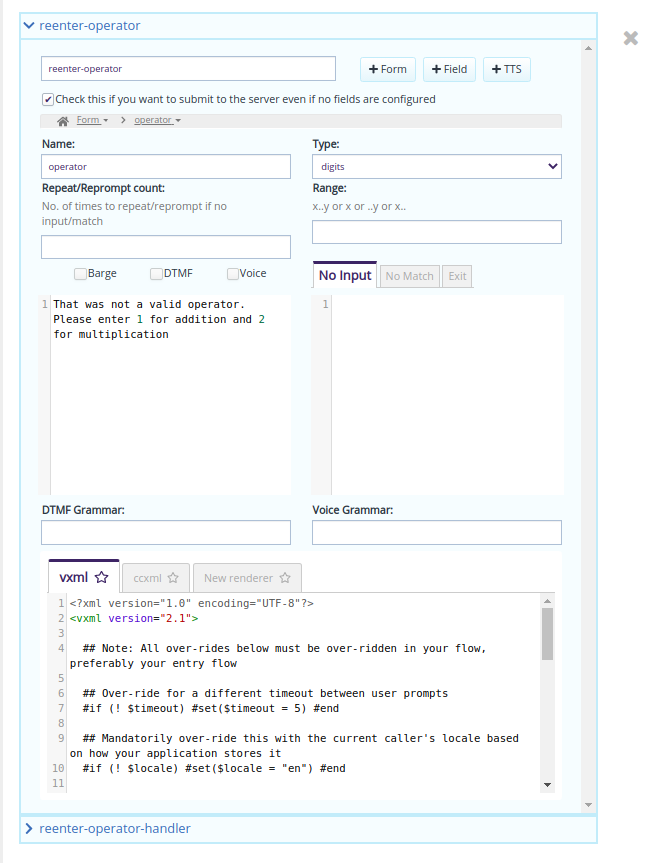
The field interface is a lot more involved than the TTS interface. A designer can configure the field name, whether the input should be asked in the form of voice or DTMF.
A barge in property indicates whether the caller needs to listen to the whole text before he can provide the input or can barge in at any time. This is a very useful property for regular callers who can’t be bothered to listen to the complete messages when they already know what to press.
The DTMF Grammar and the Voice Grammar fields accept a comma-separated list of numbers or strings, and if the caller does not provide any of these inputs for the field in question, the “No Match” section will get triggered.
You can also leave the grammar fields blank if desired.
The "No Input" field can be used to speak out some text to the caller if the caller has not entered any input within some pre-configured period of time.
The "No Match" field can be used to speak out some text to the caller if the caller has entered input that does not match what we want. For instance, we are expecting digits, and if the user presses a button that is not a digit, the "No Match" content will be activated.
The "Exit" field can be used to terminate the call if the number of times we re-prompted the caller for the correct input exceeded 3.
In the second node, the server node, enter the name of the step as entry-handler and the content as
|debug|

Tip: It’s a good practice to name the server nodes with a “-handler” suffix to the respective user node’s name. For example: “entry” and “entry-handler”, “addition” and “addition-handler”.
Click the “Add Interaction” button again to add another pair of nodes. In the first node, enter the name “debug”. Click “+ Form” followed by “+ TTS” and enter the following content as on the screenshot.

Leave the corresponding server node blank and click the “Save" button.
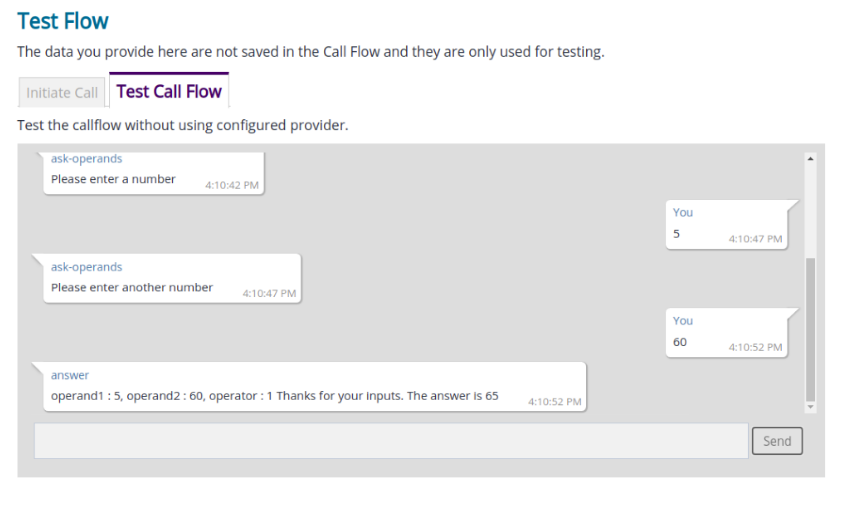
With the opened call flow, click the “Test Call Flow” tab, below created interactions. The test runner immediately starts executing the currently loaded call flow’s instructions.
The test call flow interface is inspired by chat applications as a call flow can be considered as a chat between the caller and the application.
The input box at the bottom is where we provide input to the test call flow. Enter "1" and press “Send”. The input is immediately sent to the server node, which doesn’t do much other than jump to the debug node, and that in turn prints out all the incoming parameters available as part of the $params variable.

Once control reached the debug node, the call flow is terminated. It is indicated by the fact that the input box is disabled.
We had provided |debug| in the entry-handler. The | sign indicates a pipeline connecting the call flow from one point to another. The label within the pipe is the name of another node, either a user or a system node. If we provide a system node, then the call flow continues execution until we reach a user node so that we can communicate back to the user.
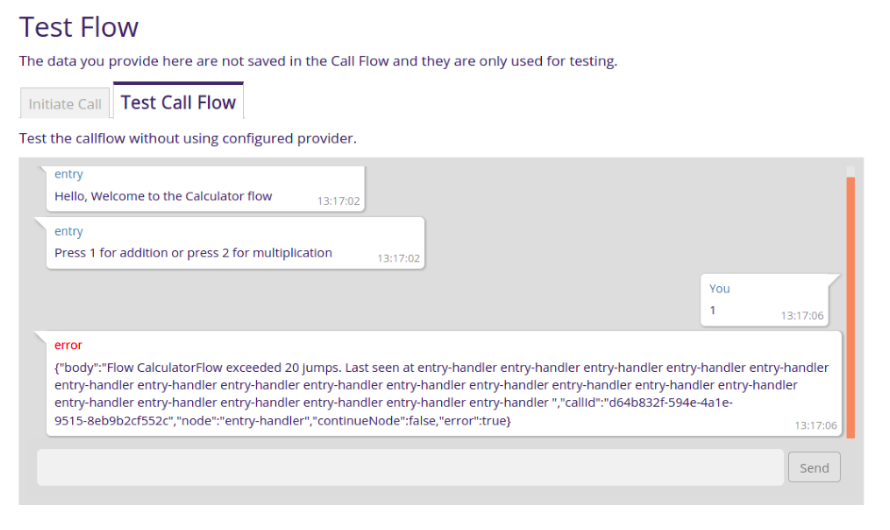
Caution: If you aren’t careful, you can easily invent cyclic loops and crash the server. The call flow prevents this by allowing a maximum of 20 jumps.
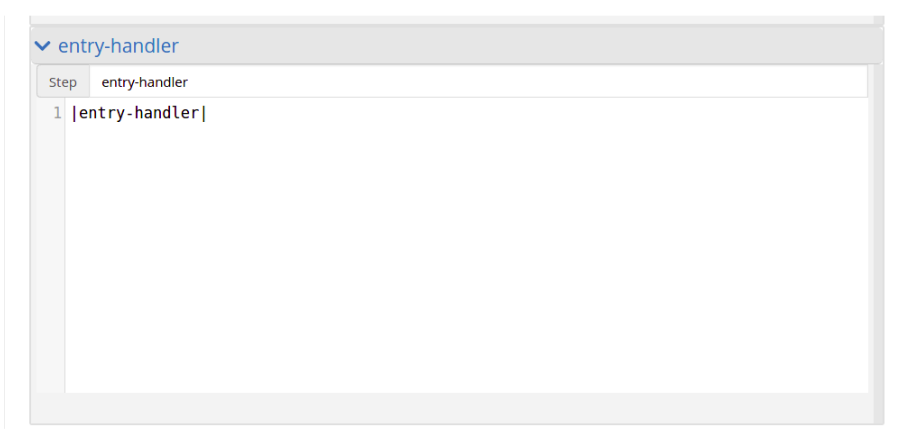
As a fun experiment, try making the content of entry-handler as |entry-handler| to indicate that it should jump back to itself repeatedly and save the call flow and test it. The "Test Call Flow" should clearly indicate the error.
Now that at entry-handler we are aware of the operator, let’s store the operator in the Call Flow state and ask for operands. Enter the following content in the entry-handler. Here we are attempting to ask for operands if the caller had chosen a correct operator, otherwise we ask the caller to re-enter a correct operator.
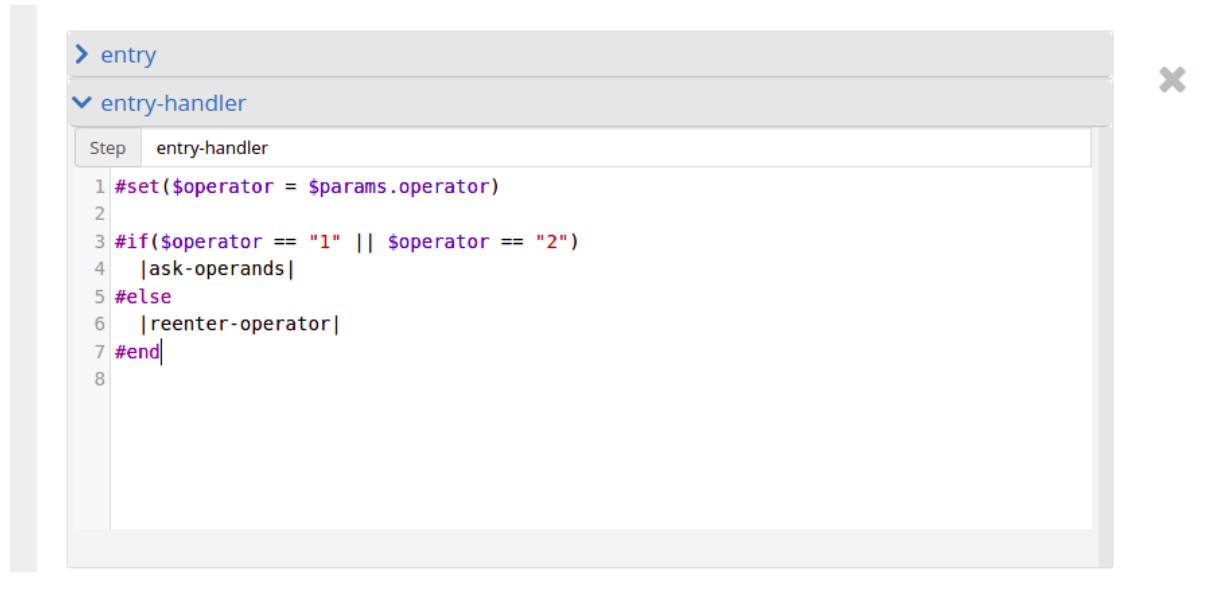
Click the “Add Interaction” button a couple of times and create the “reenter-operator” node with a field that asks for the operator again.

The reenter-operator-handler node simply redirects back to entry-handler, which checks whether the operator is a valid operator all over again.

The “ask-operands” node with two fields that asks for the first operand. Note that the type of the field is listed as number here.

And the second operand.

The "ask-operands-handler" is where we perform our actual logic.

We redirected to an |answer| node from our |ask-operands-handler|. Click on “Add Interaction” again and click on “+ Form” and “+ TTS” to speak out the result to the user.

Click the “Save” to save the call flow.
To design more complex call flows, you need to use the available Spring services in your application. These are set in the Providers section and once set, they can be accessed in velocity as $myService.
The renderers section is used to generate one of the various formats required at an IVR provider’s end.
The call flows module ships with two sample renderers for Voice XML and CCXML and both are completely customizable using Underscore JS Template Syntax.
To access the "Renderers" page, the admin user should click the “Renderers” button on the "Call flows" page.

Enter the file extension for the renderer, for example: vxml or ccxml and click the “+ Add Renderer” button.
- Provide a Underscore JS template
- Enter the MIME type of the relevant file extension, which the Call Flows module will use to generate the appropriate HTTP response header
- For vxml, the MIME type is application/voicexml+xml
- For ccxml, the MIME type is application/ccxml+xml
- Click on the "Save" button
A new tab with the renderer will be created.

The renderer template can be thought of as a Javascript function that is supplied with two arguments:
- node - representing the current node to render
- flow - representing the current flow the node resides in
The output of the renderer template is executed on the server side for the current node that is being executed and then the string output is sent to the IVR provider’s end.
The flow object besides other things, also provides access to audio mappings.
The structure of both these objects is very important in order to understand how to use the renderer template.
The flow object structure is built in this manner:
{
 raw : {
  audio : {
   "<phrase>" : [{"mapping" : "<mapped_to_text>", "target" : "<target_node>"}]
     },nodes : [
    <Node>
  ]
 }
}
The node object structure is as follows:
{
 blocks: [
  type: "form",
  elements: [
   <TextElement | FieldElement*>
  ]
 ]
}
TextElement object structure is as follow:
{
 type: "txt",
 name: "<name>"
}
The FieldElement object structure is as follows:
{
 type        : "field",
 name        : "<name>",
 fieldType   : "digits|date|boolean|currency|number|phone|time",
 fieldMeta   : "<range>",
 dtmf        : "<boolean>",
 voice       : "<boolean>",
 noInput     : "<text>",
 noMatch     : "<text>",
 exit        : "<text>",
 bargeIn     : "<boolean>",
 reprompt    : <number>
}
With this knowledge, to generate a prompt in Voice XML:
<prompt bargeIn="false">Hello, Welcome<prompt>
We could use the following renderer template to iterate over all the blocks first, then each block’s elements and filter elements based on their types:
<%
for (var i=0; i < node.blocks; i++) {
 var block = node.blocks[i];
 if (block.type === 'form') {
  for (var j = 0; j < block.elements; j++) {
   if (element.type === 'txt') {
    print('<prompt bargeIn="' + element.bargeIn + '">' + element.txt + '</prompt>');
   }
  }
 }
}
%>
A renderer for a FieldElement could be more involved. Refer the sample renderer template provided for vxml for examples on how to do the same. The idea is to use the information in the flow and node models to generate the content that we require.
Tip: The Underscore JS templates can also generate Velocity Script which will then be executed on the server, when that node is executed! Renderer Templates are therefore very flexible.
The renderer is by default ON for all nodes of a call flow. This means that manual edits in the template section of a call flow will be lost, the moment the modeling information is changed.

For specific nodes, an individual renderer needs to be turned off, the same can be done in the "Designer" by clicking the * icon. Click again to toggle.

If the renderer is OFF, automation generation will not happen and the Underscore JS template will not be used. The content can then be manually edited to include features that you are not able to build with the call flows module.
Tip: Always use the renderer initially, as the modeling information is what enables the Test Call Flow to work. Once the fields are modeled, then the renderer can be safely turned OFF and the content changed as desired.
Attention: Once the renderer is saved, all the call flows should be saved individually.
-
My Conditionals are not working!
Did you convert the params to an appropriate type?
-
Outbound calls are not working!
Is the Outgoing call URI template in Providers set correctly?
-
I manually edited a vxml output template and marked the renderer OFF, but the Test Call Flow is not picking the changes.
The Test Call Flow uses information from the Call Flow model for its execution engine and specifically does not parse or work with the generated content. We recommend that you always use the renderer initially, test with the Test Call Flow and then perform manual edits as desired.
-
Using a debug node
One best practice to debug a specific call flow is to create a new interaction in that specific callflow with a user node marked as debug. The server handler node can be left empty.
In the debug user node, print out all variables that you want to inspectSet the relevant server nodes to jump to the debug node, so that you can inspect what the current state is.
Inspecting the Call Flow state at different points using a debug node will help in understanding the state of the specific call flow at a point in time. The debug node also works very well with the test runner for quick debugging.
Once debugged completely and the call flow adjusted, the jump nodes can be reverted. We recommend leaving the debug node as is for future use.
Note: In debug nodes, print out the class of variables using $var.class to make sure you are dealing with the right methods!****
What should be the output of a server node?
A single jump point. If you have conditionals, ensure that there is exactly 1 path to a jump point. Generating multiple jump points will lead to a run time error in the system. See Jump Syntax in Reference.
How do I quickly convert my string param to a number in my velocity template?
Depending on which type you require:
$Integer.parseInt($params.myVar)
$Long.parseLong($params.myVar)
How do I load a Java class that’s not injected by default in my Velocity Template?
This might work as long as the class is accessible from the CLASSPATH:
#set($myClass = $Long.getClass().forName("fully.qualified.class.name"))
How do I create an instance of a Java class that’s not injected by default in my Velocity Template?
This might work with a default constructor for a class in the CLASSPATH:
#set($myInstance = $Long.getClass().forName("fully.qualified.class.name").newInstance()
In the server nodes of the call flow, the following syntax is used to jump to other nodes:
- |entry| -jumps to a node in the current flow named entry
- |$someNode| -jumps to a node in the current flow whose name is the value of $someNode
- |SubFlow.| -jumps to the first node of a flow by name SubFlow. Note the . character
- |SubFlow.main| -jumps to the main node of another flow by name SubFlow|
- ${someFlow}.| -jumps to the first node of a flow whose name is the value of $someFlow
- ${someFlow}.main| -jumps to the main node of a flow whose name is the value of $someFlow
Note: Though white spaces can be liberally used in the jump syntax on either side of the pipe characters, it is recommended to stick to the syntax specified here.
| Variables | Description |
|---|---|
| $internal.callId | the current call’s UUID |
| $internal.jumpTo | represents the requested outbound flow. Not set for a inbound call |
| $internal.callDirection | either of INCOMING or OUTGOING |
| $internal.baseURL | the base URL of the server: http://{server}:{port}/openmrs (can be used to construct otherURLs) |
| $internal.nextURL | The call continuation URL |
| $internal.actor | Write-only variable. The value of this variable is persisted as the actor. Associated with the call flow - can be used for reporting. You can set the phone number of the caller or a application specific ID that identifies the caller. Use the #set directive to set this and internal.actorType |
| $internal.actorType | Write-only variable. If you have different kinds of callers like patients and doctors, there is a likelihood thatthe internal.actor might conflict and therefore this field can be set to clarify this |
| $internal.externalID | Write-only variable. The value of this variable is persisted as the external ID associated with the call flow and can be used for reporting. Identifies the unique ID/ UUID used by other service provider. |
| $internal.external | TypeWrite-only variable. Identifies the type of service provider’s external ID. |
| $internal.played | MessagesUsed to store information of played messages. |
| $internal.refKey | A reference passed by different systems integrated with call flow module to identify the relation with calls -can be used for reporting as well. |
All incoming parameters are under the key: $params.
For example:
$params.pin, $params.get("session.callerid")
Params are shortlived for a single request.
The designer has to manually persist using the #set directive. $params.playedMessages can be used to store the messages played in any of the user nodes.
The designer has to manually persist using the #set directive in corresponding system node to set the value of voice files being saved. Data stored in each node are separated by | separator.
For example:
A user node entry plays voice files hello and welcome_test then in system node entry-handler, designer need to set as
#set($params.playedMessages = "hello|welcome_test")
Supposing that control navigates to user node active which plays enter_pin voice file, then, in system node active-handler, designer need to set as
#set($params.playedMessages = "enter_pin")
This will be stored in db as
hello|welcome_test|enter_pin
Some java classes have very useful static methods that could be used to designing callflows. These classes are included in title case and since they start with an upper case character, they generally won’t clash with the variables that you create using the #set directive in your velocity templates.
- $String,
- $Integer,
- $Long,
- $Float,
- $Double,
- $Math
- $Date,
- $SimpleDateFormat,
- $Calendar,
- $DateUtils
Developers note: More classes can be added in omrs-callflows/omod/src/main/java/org/openmrs/module/callflows/web/controller/CallController
Connect for Life application contains some default call flows that are ready to use after configuring call provider. Below you can find information how each callflow is built and what it does.
This is the entry point of each call. It consists of several nodes:
- entry - it retrieves data passed to the callflow context (e.g. phone number, actorId, refKey, messages, params) and sets several number of new variables (e.g. callId, pinAttempts, maxPinAttempt, sourceId, sourceType, personStatus etc.) needed in further stages of call connection. If patient with given actorId is found, the call is forwarded to 'PinFlow' flow, otherwise to the exit node
- main - sets variables for storing information about number of no input and invalid input (noInputCount, invalidCount). Checks also if any message still needs to be played, if yes, call is forwarded to 'OutgoingFlow.entry' flow, otherwise to 'goodbye' node
- exit - this is the last step of call, nothing special happens here
- no-input - it plays/reads text with information that user did not provide input and increases counter of appropriate variables
- goodbye - this node plays/reads goodbye message and forwards call to 'exit' node
This is flow which handles PIN code logic. It usually consists of 3 nodes:
- validate-pin - it plays intro music and waits for user input. Then it validates user input and forwards call to appropriate node, if everything is fine, call is forwarded to MainFlow.main flow, if PIN is invalid, call is forwarded to 'invalid-pin' node, if user reaches the maximum number (usually 3) of attempts for providing correct PIN user is redirected to 'blocked-pin' node.
- invalid-pin - it plays/reads text that PIN code is incorrect, please enter a valid PIN, and call is forwarded back to the 'validate-pin' node
- blocked-pin - it plays/reads text about reaching maximum number of attempts for providing PIN and handles any extra logic if needed
This is 'intermediate' flow that forwards call to appropriate flow based on type of message and also handles invalid input from user. It consists of 3 nodes:
- entry - checks current message and forwards call to appropriate flow, e.g. if message name = 'Adherence Report daily' then let's go to the AdherenceReportDaily flow etc. When all messages have been played, call is forwarded to 'MainFlow.goodbye' flow.
- invalid-input - it plays/reads text that user provided wrong input during messages that expect some feedback from user e.g. in AdherenceReportDaily or AdherenceReportWeekly. If user reaches maximum number (usually 3) of attempts for providing input, call is forwarded to 'remove-first-message' node
- remove-first-message - it plays/reads text that system did not receive any valid input and call is forwarded to 'entry' node and call plays next messages (if there are any left)
It handles logic of Welcome message call. It consists of 4 nodes:
- entry - it makes sure that current message is a welcome message and forwards call to play-welcome node
- play-welcome - it plays/reads text of welcome message, performs some backend actions like registering attempt of scheduled service and forwards flow to 'repeat-message' node
- repeat-message - it plays/reads text about repeating message and waits for user input. If user pressed correct number on phone keypad, call is forwarded once again to 'play-welcome' node, otherwise to 'end' node
- end - it forwards call to 'OutgoingFlow.entry' flow
It handles logic of Adherence Report Daily flow. It consists of 3 nodes:
- entry - it sets some variables like invalidCount and noInputCount and forwards call to 'adherence-question' node
- adherence-question - it plays/reads adherence question and waits for user input. Example adherence daily question can be 'If you took you medication press 1, if not press 3'. Then it validates the input and forwards call to appropriate flow/node - when user input is empty call is forwarded to 'MainFlow.no-input' flow, if user input is incorrect call is forwarded to 'OutgoingFlow.invalid-input' flow, if user input is correct call is forwarded to 'user-response' node
- user-response - it plays/reads text with thanking user for the input and performs some backend actions like registering actor response (it saves actor response with adherence question concept, question text and user response concept). After that call is forwarded to 'OutgoingFlow.entry' flow
It handles logic of Adherence Report Weekly flow. It consists of 3 nodes:
- entry - it sets some variables like invalidCount and noInputCount and forwards call to 'adherence-weekly-question' node
- adherence-weekly-question - it plays/reads adherence question and waits for user input. Example adherene weekly question can be 'In last week how many days did you miss your medication? Press the appropriate number on the phone keypad'. When user input is empty call is forwarded to 'MainFlow.no-input' flow, otherwise to 'user-response' node
- user-response - it plays/reads text with thanking user for the input and performs some backend actions like registering actor response (it saves actor response with adherence weekly question concept, question text and user response text). After that call is forwarded to 'OutgoingFlow.entry' flow
It handles logic of Adherence Report Weekly flow. It consists of 4 nodes:
- entry - it calls special AdherenceFeedback service to fetch results about patient adherence level and adherence trend. After that call is forwarded to 'play-adherence-feedback' node
- play-adherence-feedback - it plays/reads text informing patient about his/her adherence level/trend using data fetched in 'entry' node. After that if performs some backend actions like registering attempt of scheduled service and call is forwarded to 'repeat-message' flow
- repeat-message - it plays/reads text about repeating message and waits for user input. If user pressed correct number on phone keypad, call is forwarded once again to 'play-adherence-feedback' node, otherwise to 'end' node
It handles logic of Visit Reminder flow. It consists of 4 nodes:
- entry - it extracts all required data that needs to be played/read like visit date, time, location etc. Then call is forwarded to 'play-reminder' node
- play-reminder - it plays/reads text with visit reminder. After that some backend actions are performed like registering attempt of scheduled service and call is forwarded to 'repeat-message' node
- repeat-message - it plays/reads text about repeating message and waits for user input. If user pressed correct number on phone keypad, call is forwarded once again to 'play-reminder' node, otherwise to 'end' node
- end - it forwards call to 'OutgoingFlow.entry' flow
It handles logic of Health Tip flow. It consists of 4 nodes:
- entry - it calls special HealthTip service to fetch health tip that should be played for patient. After that call is forwarded to 'play-tip' node
- play-tip - it plays/reads content of health tip concept and performs some backend actions are performed like registering actor response (it saves actor response with health tip question concept [usually it is 'Which health was played?'] and health tip concept that has been already played for patient). After that call is forwarded to 'repeat-message' node.
- repeat-message - it plays/reads text about repeating message and waits for user input. If user pressed correct number on phone keypad, call is forwarded once again to 'play-tip' node, otherwise to 'end' node
- end - it forwards call to 'OutgoingFlow.entry' flow
ADMIN GUIDE
Configuration
Modules
FAQ
USER GUIDE
Modules
DEVELOPER GUIDE