-
Notifications
You must be signed in to change notification settings - Fork 0
Admin Registration
- Introduction
- Add registration app
- Display and configure fields
- How to configure 'fields' section
- Supported field types
- Consent validation
- Patient identifiers
- Specific registration app based on location
- Custom elements in Confirm section
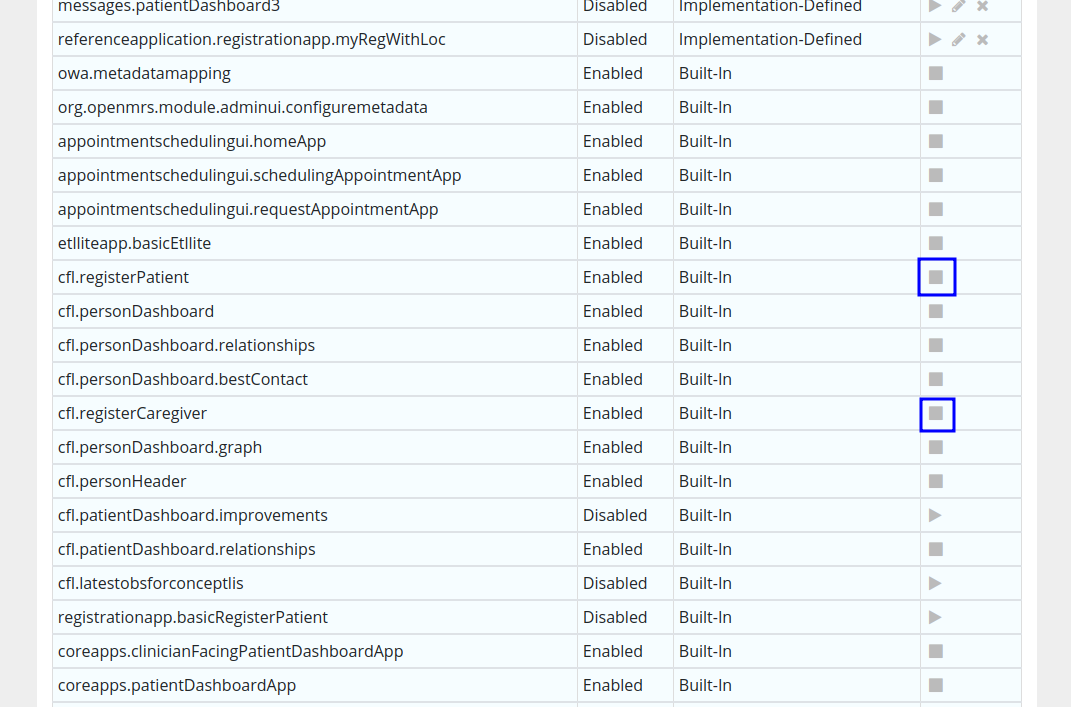
Both registerPatient and registerCaregiver apps are available from the "System Administration" page on the "Manage apps" page.

Registration forms are built-in apps and are not customizable. To provide a changed registration form, the built-in app has to be stopped by the “stop” icon and a new app needs to be created.

At the top of "Managing Apps Definition" page, the user can find the “Add App Definition” button which allows to add a new, customizable app to the implementation.

This button sends you to the page allowing to add a new app, in this case we added a new app for registration.

In the definition field, json with the created app needs to be put, the app ID should be the same as the one provided in json definition (check the screenshot above).
Exemplary app definition json for patient registration:
{
   "id":"cflui.registerPatient",
   "description":"CFL UI",
   "order":0,
   "extensions":[
      {
         "id":"demoapp.homepageLink",
         "extensionPointId":"org.openmrs.cfl.homepageLink",
         "type":"link",
         "label":"Register Patient",
         "url":"owa/cfl/index.html#/register-patient",
         "icon":"cfl-register-patient",
         "requiredPrivilege":"Add Patients"
      }
   ],
   "config":{
      "steps":[
         {
            "label":"Name",
            "title":"Patient Demographics",
            "subtitle":"What's the patient's name?",
            "fields":[
               {
                  "name":"givenName",
                  "required":false
               },
               {
                  "name":"middleName",
                  "required":false
               },
               {
                  "name":"familyName"
               }
            ]
         },
         {
            "label":"Birthdate",
            "title":"Patient Demographics",
            "subtitle":"What's the patient's birth date? (Required)",
            "fields":[
               {
                  "name":"birthdate",
                  "required":false,
                  "type":"date"
               },
               {
                  "label":"Or",
                  "type":"separator"
               },
               {
                  "name":"birthdateYears",
                  "required":false,
                  "type":"number"
               },
               {
                  "name":"birthdateMonths",
                  "required":false,
                  "type":"number"
               }
            ]
         },
         {
            "label":"Gender",
            "title":"Patient Demographics",
            "subtitle":"What's the patient gender? (Required)",
            "fields":[
               {
                  "label":"Sex assigned at birth",
                  "type":"separator",
                  "class":"mb-1"
               },
               {
                  "name":"gender",
                  "required":false,
                  "type":"buttons",
                  "options":[
                     {
                        "label":"Male",
                        "value":"M"
                     },
                     {
                        "label":"Female",
                        "value":"F"
                     }
                  ]
               }
            ]
         },
         {
            "label":"Address",
            "title":"Patient Demographics",
            "subtitle":"What's the patient's address?",
            "columns":2,
            "fields":[
               {
                  "name":"address1",
                  "required":false
               },
               {
                  "name":"address2",
                  "required":false
               },
               {
                  "name":"cityVillage",
                  "required":false
               },
               {
                  "name":"stateProvince",
                  "required":false
               },
               {
                  "name":"country",
                  "required":false
               },
               {
                  "name":"postalCode",
                  "required":false
               }
            ]
         },
         {
            "label":"Language",
            "title":"Patient Demographics",
            "subtitle":"What language does the patient prefer?",
            "fields":[
               {
                  "name":"personLanguage",
                  "required":false,
                  "type":"select",
                  "options":[
                     "English",
                     "Spanish",
                     "French"
                  ],
                  "defaultOption":"Spanish"
               }
            ]
         },
         {
            "label":"Phone Number",
            "title":"Patient Demographics",
            "subtitle":"What's the patient's phone number?",
            "fields":[
               {
                  "name":"Telephone Number",
                  "required":false,
                  "type":"phone",
                  "defaultCountry":"PH"
               },
               {
                  "name":"Best contact time",
                  "type":"time",
                  "label":"Best Contact Time"
               }
            ]
         },
         {
            "label":"Patient Location",
            "title":"Patient Demographics",
            "subtitle":"What's the patient's location?",
            "fields":[
               {
                  "name":"LocationAttribute",
                  "label":"Patient Location",
                  "required":false,
                  "type":"select",
                  "optionSource":"locations"
               }
            ]
         },
         {
            "label":"Nationality",
            "title":"Patient Demographics",
            "subtitle":"What is the nationality of a patient?",
            "fields":[
               {
                  "name":"Nationality",
                  "label":"Nationality",
                  "required":false,
                  "type":"select",
                  "defaultOption":"Belgium",
                  "optionSource":"concept",
                  "optionUuid":"165657AAAAAAAAAAAAAAAAAAAAAAAAAAAAAA"
               }
            ]
         },
         {
            "label":"Relatives",
            "title":"Patient Demographics",
            "subtitle":"Who is the patient related to?",
            "fields":[
               {
                  "name":"relatives",
                  "required":false,
                  "type":"relatives"
               }
            ]
         }
      ]
   }
}
In this json object the order, validation, type of fields (text fields, dropdowns, available options) and fields names in the form can be applied –and edited in any moment.
The page where to redirect after successful registration can be configured. By default, user will be redirected to patient's dashboard.
The redirectUrl property contains URL of page to redirect to after successful registration. The page's URL is created from the server's host and the redirectUrl: <protocol>://<hostname><:port><redirectUrl>. The following placeholders in redirectUrl are replaced with corresponding values when final URL is created:
- %PATIENT_ID% - the UUID of newly registered Patient.
- %PERSON_TYPE% - the type of Patient, either Patient or Person.
When redirectUrl is omitted, the following URL is used:
/openmrs/coreapps/clinicianfacing/patient.page?patientId=%PATIENT_ID%&dashboard=%PERSON_TYPE%
Example of configuration which redirects to Visit's page:
...
"config":{
    "redirectUrl":"/openmrs/owa/visits/index.html?returnUrl=%2Fopenmrs%2Fcoreapps%2Fclinicianfacing%2Fpatient.page%3FpatientId%3D%PATIENT_ID%%26dashboard%3D%PERSON_TYPE%%26#/visits/manage/%PATIENT_ID%",
    "steps":
...
The most important part of registration form is 'config' section. There we configure the steps and fields displayed in the form. "steps" property is an array of objects that describe what will be displayed in each section.
Single 'step object' usually contains following fields:
- label - text displayed in the menu panel
- title - title header displayed in main section
- subtitle - text displayed under the header text
- fields - an array of config UI objects displayed in each section
Example (with one step with empty fields):
"config": {
    "steps": [
      {
        "label": "Name",
        "title": "Patient Demographics",
        "subtitle": "What's the patient's name?",
        "fields": [

        ]
      }
    ]
}
Each object in fields consist of few basic properties like:
- name - the name of property which is mapped into appropriate fields on the backend. It can be name of person attribute type or patient identifier type, name of gender or birthdate field etc. System will recognize how to map those fields and where to save values.
- label - text displayed as a placeholder of input field and also after entering the value text displayed in left upper corner of input field
- required - determines if value is mandatory or not. Possible values: true or false. If not provided then false value will be used by default.
- type - type of input field e.g. buttons, select etc. Depending on field type there can be different additional config
- text - renderers text inputs. This type need not be explicitly defined - text inputs will be rendered by default
Example:
"fields": [
  {
    "name": "givenName",
    "label": "Given Name",
    "required": true
  },
  {
    "name": "middleName",
    "label": "Middle Name"
    "required": false
  },
  {
    "name": "familyName",
    "label": "Family Name"
  }
]

- buttons - renderers buttons. Details of buttons we can configure with 'options' property. It is an array of objects where single object contain "label" and "value" properties. "label" determines what will be shown on UI, and "value" determines what will be saved on the backend.
Example:
"fields": [
  {
    "name": "gender",
    "required": true,
    "type": "buttons",
    "options": [
      {
        "label": "Male",
        "value": "M"
      },
      {
        "label": "Female",
        "value": "F"
      }
    ]
  }
]

- date - renderers date picker where we can select day, month and year. There is no specific additional configuration for this input type
Example:
"fields": [
  {
    "name": "birthdate",
    "label": "Birthdate",
    "required": true,
    "type": "date"
  }
]

- number - renderers input field where we can enter only number. We can type it manually or using up/down arrows
Example:
"fields": [
  {
    "name": "birthdateMonths",
    "label": "Estimated months",
    "required": false,
    "type": "number"
  }
]

- select - renderers dropdown with configured values. Values can be configured via 'options' property. We can also set value which will be prefilled by default using 'defaultOption' property.
Example:
"fields": [
  {
    "name": "Nationality",
    "label": "Nationality",
    "required": true,
    "type": "select",
    "options": [
      "English",
      "Spanish",
      "French"
    ],
    "defaultOption":"Spanish"
  }
]

Additional options for select input type:
-- instead of hardcoded values list in "options" property, we can also fetch data from concept that includes set members. To do this we have to add "optionSource" property with "concept" value and "optionUuid" property with UUID of appropriate concept.
Example (country concept with list of countries):
"fields":[
   {
      "name":"Nationality",
      "label":"Nationality",
      "required":false,
      "type":"select",
      "defaultOption":"Belgium",
      "optionSource":"concept",
      "optionUuid":"165657AAAAAAAAAAAAAAAAAAAAAAAAAAAAAA"
   }
]

-- To populate the dropdown with locations configured in the system we have to only add "optionSource" property with "locations" value
Example:
"fields": [
	{
    	"name": "LocationAttribute",
    	"label": "Patient Location",
    	"required": false,
    	"type": "select",
    	"optionSource": "locations"
	}
]
- time - renderers time picker (hours 0-23, minutes 0-59). We can specify default time which will be prefilled by default using 'defaultValue' property.
Example:
"fields": [
  {
    "name":"Best contact time",
    "type":"time",
    "label": "Best Contact Time"
    "defaultValue": "09:00"
  }
]

- static - adds hidden input field with preconfigured static value. It allows to set properties of Patient in background, without user's involvement. For example, when you don't want to collect Patient names, you can use static field to set 'NA' as patient name. Another example, would be setting a value of Person Attribute which configures patient's vaccination schedule in a system where there is only one schedule.
Example:
"fields": [
  {
    "name":"givenName",
    "type":"static",
    "staticValue": "NA"
  },
  {
    "name":"Vaccination program",
    "type":"static",
    "staticValue": "Single Vaccination program"
  },
]
- phone - renderers special input type where we can select country and then international phone number prefix and country flag will be prefilled automatically. Validation checks if phone number is provided in proper pattern (different pattern in each country). We can also set default country (2-characters country ISO code) for which flag and phone prefix will be shown automatically.
Example:
"fields": [
  {
    "name": "Telephone Number",
    "required": true,
    "type": "phone",
    "defaultCountry": "PH"
  }
]

- relatives - special input type for defining relationships for being created patient. Values are fetched from relationship types configured in the system
Example:
"fields": [
  {
    "name": "relatives",
    "required": false,
    "type": "relatives"
  }
]

- separator - special input type that renderers "new line" with optional separator text. It just separates two components with new line.
Example:
"fields": [
  {
    "name": "birthdate",
    "required": true,
    "type": "date"
  },
  **{
    "label": "Or",
    "type": "separator"
  }**,
  {
    "name": "birthdateYears",
    "required": false,
    "type": "number"
  }
]

Usually the registration form includes location field (drop-down list with available locations). The location which user has chosen to work for will be selected by default.
When the location field is not part of the registration form, the location which user has chosen to work for will be saved for a patient.
Consent validation is activated by default, but by the suitable global property it can be turned off.
To access the global property, click “Manage Global Properties” button on the admin panel.

Next, find message.consent.validation on the list and click the "pen" icon in the property’s row.

On the edit global property page change the value from “true” to “false” and save it. This action will remove consent validation for both patient and caregiver.
Some sections of the registration form allow adding identifiers to the patient profile.
To connect the desired fields with the identifier, the UUID needs to be included in the part of the app definition json referring to the identifier.
For example, Aadhar number includes UUID for this identifier.
{
	"legend":"Aadhar Number",
	"id":"AadharNumberLabel",
	"fields":[
		{
			"type":"patientIdentifier",
			"label":"Aadhar Number",
			"formFieldName":"Aadhar Number",
			"uuid":"4aa897a3-0b05-4ec9-8d70-a93a336be548",
			"widget":{
				"providerName":"uicommons",
				"fragmentId":"field/text"
			}
		}
	]
},
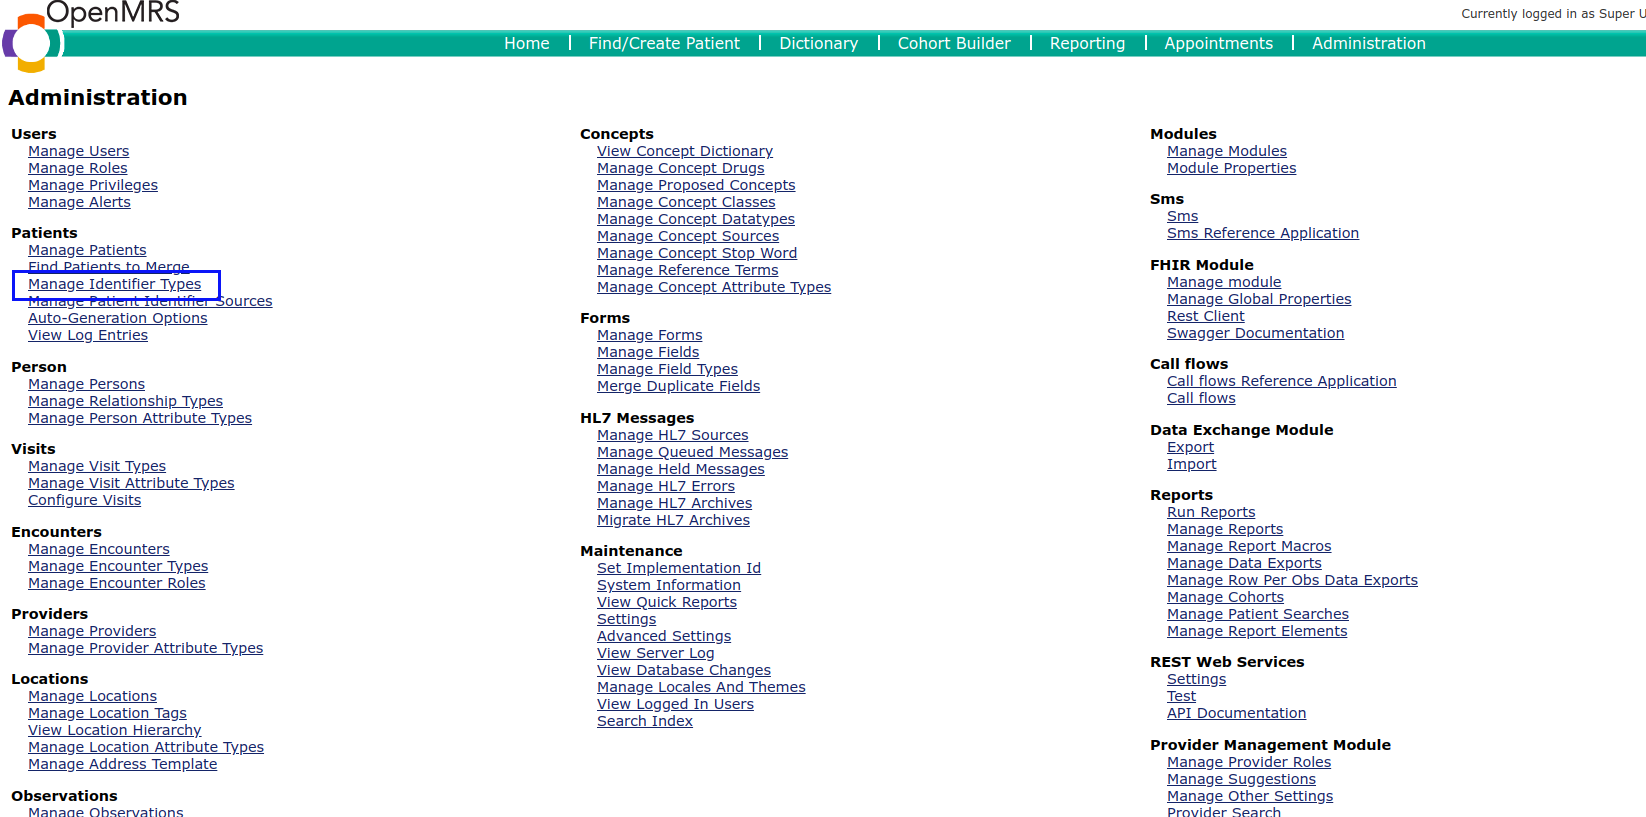
Managing patients identifiers is available from the Advanced Administration page in patients' section.


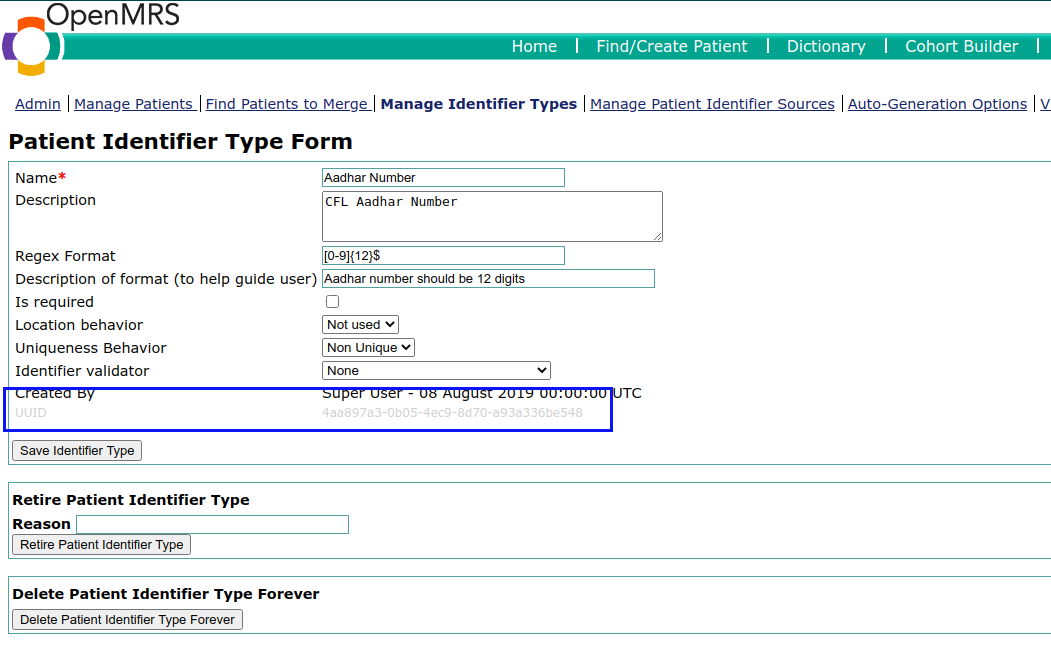
Manage Identifier Types page consists of a list of created identifier types that can be used in the OpenMRS implementation. This page allows creating a new identifier type as well.
Mentioned Aadhar number is implemented with regex format. UUID for this patient identifier is marked on the screenshot below.

A user can use different registration forms depending on the location to which he/she is currently logged in. This is especially useful when the registration form is different for each location. To enable this functionality we have to configure following things (via admin account):
- Find the location for which we want to display a custom registration form (Configure Metadata -> Manage Locations).
- Click the Edit icon and set the project name for location ("Project" field).
- Create the specific registration form for a location (System Administration -> Manage Apps -> Add App Definition). It is important that the name of the registration app must consist of three parts:
- main part of the name -> cflui.registerPatient
- dot (.)
- suffix which is a project name set in the 2nd point.
For example, if we set project name to "XYZ" then the registration app must have the name "cflui.registerPatient.XYZ".
From now, this specfic registration app will be displayed for users who logged in to the location chosen in the 1st point.
If the location does not have this property set, then the default registration form (cflui.registerPatient) will be displayed.
The above process can be applied to caregiver registration app as well. In case of caregiver registration, the app name must consist of main part cflui.registerCaregiver, dot(.) and suffix which is a project name e.g. "cflui.registerCaregiver.XYZ".
User can also define some custom elements in 'Confirm' section. Those elements are displayed between main section and buttons. On this moment only checkbox with corresponding label is supported.
Example:

Required fields (with red asterisk symbol) must be checked to be able to register a patient, otherwise the 'Confirm' button is disabled.
Those fields are only visible during registration. When editing a patient's profile, fields are not displayed.
To configure those fields, we have to add following section to registration form app definition:
"confirmPageCustomElements":[
   {
      "name":"DoctorConsent1",
      "label":"Some text 1",
      "required":false
   },
   {
      "name":"DoctorConsent2",
      "label":"Some text 2",
      "required":true
   },
   {
      "name":"DoctorConsent3",
      "label":"Some text 3",
      "required":false
   },
   {
      "name":"DoctorConsent4",
      "label":"Some text 4",
      "required":true
   },
   {
      "name":"DoctorConsent5",
      "label":"Some text 5",
      "required":false
   }
]
It is simple JSON array containing objects. Each object consist of three fields:
- name - name of person attribute where value (true/false/empty) will be saved
- label - translation key or plain text that will be used for displaying text next to the corresponding checkbox
- required - determines if field is required to continue registration
ADMIN GUIDE
Configuration
Modules
FAQ
USER GUIDE
Modules
DEVELOPER GUIDE