Editor (Common)
The Editor is an AR-related part of the application, which is responsible for any 3D visualization and interaction. There is Scene Editor for creating and editing scenes and Project Editor for creating and editing projects. Detailed information about these two editors can be found on their respective pages. Here you can find common information shared between both editors.
When opening the Editor each first time when running the application, either Scene view or Project view, the AR tracking needs to be established, and calibration needs to occur. Therefore, a user is prompted by the animation and notification to move the tablet slowly around the workspace. When the ARFoundation tracking library finds at least one horizontal plane and more than one feature point, the tracking is established, and the calibration phase is launched automatically. To successfully calibrate, a tablet camera needs to be pointed to some visible calibration markers (defined on the AR Server). The calibration will happen automatically. When successful, a calibration cube is displayed on the marker or somewhere in the scene (based on where the center of the workspace is defined), and the AR content (action objects, action points, etc.) is displayed.
The system will try to recalibrate automatically periodically (based on the settings, default is 120 seconds) to eliminate tracking drifts and virtual content "jumps". If in need for recalibrating manually, the Recalibrate button in the Hamburger menu can be used.
 |
 |
|---|
In the Editor hamburger menu can be seen the hostname or IP address of the ARServer in the top line, followed by several buttons:
- Save logs
- Saves all notifications, errors, and communication with the server into a local file and uploads to the ARSever as well.
- Show notifications
- Shows all notifications since the app started.
- Recalibrate
- Recalibrates the tablet. At least one calibration marker must be visible in the camera view.
- Disconnect
- Disconnects from the server.
- Exit
- Turns off the application.

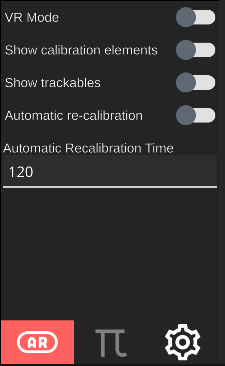
Main editor settings contain useful settings related to augmented reality and AREditor itself. It can be found under the gear wheel icon in the Home category.

The first tab (with the AR icon) contains AR-related settings:
- VR Mode
- Turns on and off the VR mode
- Show calibration elements
- Shows/hides calibration elements, i.e., box above detected markers and on the position of the main anchor
- Show trackables
- Shows/hides planes detected by the ARCore framework
- Automatic re-calibration
- Turns on and off automatic recalibration, i.e., decides if the application should try to recalibrate its position in regular intervals or if it should recalibrate only on demand
- Automatic recalibration time
- The interval (in seconds) for automatic recalibration
The second tab is available only for the project editor and contains a list of all project parameters in the current project with their value. In the lower part of the menu, an Add project parameter button is presented, which could be used to create a new project parameter.

By clicking on any of the listed parameters, a parameter detail dialog is shown to the user. In this dialog, the name and value of the parameter could be altered. Using the trash can in the top right corner, the parameter could be removed. When the new parameter is created, the type of the parameter could be set as well. At the moment, the string, integer, boolean, and double parameters are supported.

The third tab with the icon of the gear wheel contains the following settings of the AREditor:
- Connections visible (only available in project editor)
- Decides, whether or not the connections between actions should be visible
- Orientations visible (only available in project editor)
- Decides, whether or not the arrows, representing AP orientation, should be visible
- Interactable
- Decides, whether or not the action objects could be interacted with (could be used to temporarily disable any interaction with action objects, e.g. in cases when editing program and only interaction with AP or actions is desirable)
- Show robots EE
- Decides, whether or not the arrows, representing robots end effectors, should be visible
- Visibility
- Global settings of action objects visibility
- AP size (only available in project editor)
- Global settings of action points dimensions
- Project service URI
- Settings of location, where models of action objects and robots are available

The selector menu, combined with Crosshair in the center of the screen, serves as the main interaction widget for object selection. It has four tabs on the lower side of the menu: Aim, Alphabet, NoPose, and BlockList. Four filter buttons are presented on the top edge, which allows users to disable robots, action objects, action points and actions from the interaction. In the middle of the menu, a list of objects is located. Each item of the list consists of an icon of the object, followed by its name.

The list of the items is hierarchical, meaning i.e. actions or orientations are subitems of action points, end effectors are subitems of robots, etc.
Using raytracing, the selector menu constantly looks for nearest object, based on the custom metrics. The nearest object gains a yellow overlay around its item in the list and also around the 3D object itself. When the user clicks on the object's item in the selector menu, the selection becomes locked, the item gets red background and the objects will remain selected regardless of tablet motion. By clinking on the selected item, the objects will be unlocked and the application will start to look for nearest object again. By clicking on another object, while some are already locked, the original will get unlocked and the new one will get locked.


This is the default variant of the selector menu, which shows a subset of objects based on the tablet's position and the Crosshair in the middle of the screen.
In this tab, all objects in the scene (except for those on the blocklist) are presented in the list. All of them are collapsed by default, meaning that to find any action, the user needs to expand the related action point.

All objects which have not defined pose (i.e., any services) are located in this tab. These objects could not be selected using the Aim selector menu as they are not visualized in the scene.

This tab contains all action objects which had been put on the blocklist.

The object manipulation menu could be used to:
- Move (action object, collision object, action point)
- Rotate (action object, collision object)
- Scale (collision object)
The desired transform could be set using buttons in the lower part of the menu.
 |
|
|---|---|
| Object manipulation menu | 3D manipulation widget |
The main part of the manipulation menu is so-called transform wheel, which serves for the actual transformation of the object, based on the selected type of transformation (translation, rotation, scale) and selected axis. Under the wheel, there is a unit selector, which enables to select a degree for each transform.
Selection of axis is done using the Sight in the middle of the screen. The axis is selected when the user intersects the sight with an axis of the gizmo. The axis remains selected until another axis is selected or the menu is closed. When any transformation is in progress (i.e. the transform wheel is moving), the axis selection is locked to avoid unwanted selection. The button with an image of palm could be used for free-movement of the object (i.e. the object is moved by the movement of the tablet).
The transform menu could be switched to the robot-mode with the switch in the left part of the menu. In this mode, the object will be attached to the robot end-effector and the user could release robots actuators using the palm-icon button.
For the movement of the robot, a robot stepping menu could be used. The robot stepping menu could be opened using the arrows button under the robot category. The menu itself has a similar appearance as the object manipulation menu. Instead of the transform wheel, there are just two buttons (+, -) for making of one step in the selected axis, using the plus for movement in the direction of the axis or the minus for movement in the opposite direction. The step length could be set using the arrows under the buttons. For movement axis selection, the same gizmo as with the object manipulation menu.
In the above part of the menu, there is a button with the palm icon, which could be used to release the robot's actuators and allow manual navigation of the robot. Next to it, a button "Set perpendicular" button is placed, which serves to align the end-effector perpendicular to the ground. Bellow these buttons, a speed slider is presented, which will affect the speed of the end-effector movement.
Three switches are presented in the left part of the menu. The first one serves for switching between safe and unsafe movements. Safe movement means that the robot will not allow any movement, which could lead to a collision. This option is not available for every robot. The second button switches between global and local transformation systems. The last button decides whether the end-effector will be moved or rotated in the selected axis.


When a new object (action object, action point, etc.) is added to the scene, its name is automatically generated based on certain parameters:
- Action object: the name is the same as the name of the original ObjectType.
- Action points: the default name for a new one is "AP".
- Action: the name is the same as the type of the action.
- Orientation: the name is "default".
If an object with the same name is already presented in the scene, an underscore followed by a number is added to the original name to make it unique. Any object could be renamed by the user using the "Rename" button in the utility category of the main menu.

Any object could be removed using the trash icon in the utility category of the main menu.
